The Fissure of Woe
 |
Alright, so, a lot of people come here to farm obby shards (obsidian shards) to either sell or later forge their FoW (Obsidian) armour, and the best way to
go about doing that is to just kill everything in here. However, this guide will not tell you how to do that (even though we will kill most of the things
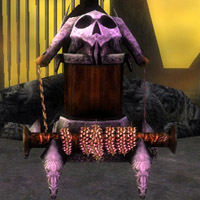
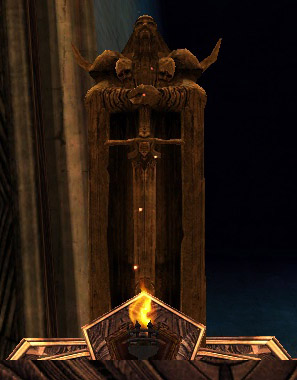
in here), but will give you the most efficient way to complete all of the quests in FoW (known as "clearing FoW") so you can open the end chest (pictured
left) and put the statue (pictured right) in your Hall of Monuments if you have the GuildWars: Eye of the North expansion. |
 |
Anyway, in order to enter FoW, you must be level 20 and ascended. Depending on which campaign your character was born (i.e., created/started out in), this can mean
different things.
In the Prophecies campaign, you become ascended by first doing the three missions in the Crystal Desert (Thirsty
River, Dunes of Despair, and Elona Reach, and the order you do them in does not matter) and THEN beating your Doppelganger at Augury Rock.
If you're from the Factions campaign, you must become Weh no Su (Closer to the Stars) by defeating the celestials while completing
the Nahpui Quarter mission.
If you're Elonian (from the Nightfall campaign), you don't really have any such life-altering experience
happen to you in order to become ascended; you just have to complete the quest Hunted! in Kourna. I'm not entirely sure if completing one of the ascension
quests in a campaign you weren't born in (i.e., say, a Prophecies character completing Nahpui Quarter without having defeated their Doppelganger) still
counts as ascension. At some points in the past it has, and at other points it has not. So, to be safe, you might just wanna do the one in your native
campaign, because if you're not ascended, the game won't let you into FoW, even if the rest of your party is, and then people will get cranky at you.
Now, actually getting there... it's not really an area you can run to, in any campaign, but is accessible in every campaign. Basically, you first have to
get to one of the cities that has access to FoW, and in this case it doesn't matter which campaign you're from. So even if you are a Prophecies character,
you can still get to FoW using the Nightfall or Factions town, and vice-versa. In Prophecies, the town is the Temple of the Ages in Kryta; in Factions, the
town is Zin Ku Corridor in Kaineng City (not Kaineng Center the town); in Nightfall, the town is the Chantry of Secrets in Vabbi. Once you get to any of
these three towns, either use a Passage Scroll to the Fissure of Woe or kneel in front of the statue of Balthazar and pay 1k "to the service of Balthazar"
in order to enter FoW.
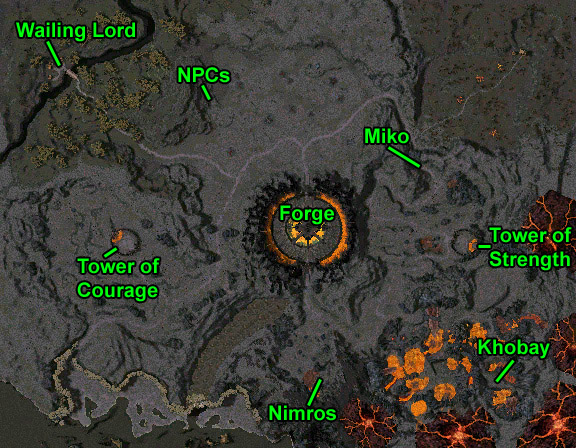
One last thing before we kick this thing off: there are two maps I've made for this area.
The first one labels the various areas
in FoW, which I will refer to during the walkthrough for FoW.
The second shows key locations in FoW, such as quest-giving
NPCs or specific locations like the Forge.

OK, as soon as you load, MOVE BACK. Seriously, turn around and see that wall there? HUG IT. This will reduce the chance that your party accidentally
aggros one of the nearby mobs before you're ready (and yes, sometimes the mobs spawn closer than usual). You will also notice a ghost NPC pretty much
right next to you that has a quest for you. If you're PUG-ing, someone probably has yelled out to not talk to the ghost. They are referring to this NPC.
So yeah, don't talk to him yet. Trust me, you do not want him following you around. See, the thing is, while you're in here, there are various NPCs that
can die, and their deaths will result in mission failed and you getting kicked out of FoW. So you'll wanna keep Rasty here out of harm's way, and not talking
to him yet is the best way to do that. Once everyone has loaded and is ready, turn left and watch that group there. There's a small patrol that will come
and go from this mob here, so you might want to wait until the patrol leaves before you pull the mob there. Please be aware that Shadow Beasts have the
elite necro skill Spiteful Spirit, which will do damage to not only the person with the hex on them whenever they physically attack or use a spell or skill,
but also does damage to anyone in your party that happens to be near the hexed party member whenever the hexed party member physically attacks or uses a
spell or skill. Make sure your entire party knows to try to limit their actions as much as possible when they have this hex on them, and possibly even call
out that they've got SS (the abbreviation for Spiteful Spirit) on them so anyone near them knows to move away to avoid collateral damage. Take out the
aforementioned patrol as well when you're done with the mob. Now, go back to Rasty (still don't talk to him) and take out the mob on the other side of him.
This mob also has a patrol that will wander off, and you really don't want to aggro this patrol at the same time as this mob because Shadow Elementals have
powerful AoE fire magic which hurts like hell, and the less of them you have to deal with at one time the better off you'll be. If anyone in your party
has the Asuran skill Pain Inverter, have them use it on a Shadow Elemental (this skill is also useful on Shadow Warriors, since they have Hundred Blades).
After this mob is dead, head all the way right (right, if you're facing in the same direction you were when you loaded into FoW) and then left up the hill
when you can't continue further anymore.
You'll see two short hills to your left. Don't get in range of the hills yet, just wait, as a mob will soon run down to one of the hills and camp there.
Kill them! Soon, another mob will appear and run to the second hill. Don't kill them just yet. Go southeast, hugging the wall, and stop when you see a
path appear on your compass (it leads right). Stop when it first shows up on your compass, cause this will trigger two mobs to run down that path and
head in your direction (yeah, some mobs ran off in the opposite direction. You don't have to worry about them). The reason I'm having you kill these guys
first is cause the last thing you want is to have them show up while you're fighting another mob. OK, go kill the second hill mob. Stop here and wait.
You'll see two patrols of two enemies each coming and going on your left, and some random group running around near you on your right (you might have to
wait a bit to see the one on the right, but just know that there is one). Take out the patrols on the left first but let them come towards you before you
aggro them. Do not aggro any Shadow Rangers or Abyssals yet. Take out the running-around mob that I just mentioned whenever they get close enough.
Aggroing them will trigger a shadow beast or two to head in your direction from the east, so be aware of this. After they're taken care of, go ahead and
start taking out mobs to the northeast around the fiery building there. If a random group of non-rangers/Abyssals has shown up near the fiery building,
take them out first. It might be easier to take this random mob out if you go down to where Rasty is and run past him going north and attack them from the
opposite side. Another shadow beast or two might spawn if you do this. Either way, only approach the fiery building (a.k.a., the Tower of Courage) from
the side we were originally on. You'll see why soon enough. Go attack some rangers/abyssals! Please be aware that the rangers have Barrage, which can
quickly wipe an unprepared party. After you kill an abyssal or two... oh, hey, hi... Rasty... what're you suddenly doing up here by the tower? Yeah, basically,
when you kill an abyssal, Rasty here moves. And he always takes the same path. This happens even if you didn't talk to him yet. So this is why I said to
approach the tower from this side. There's another mob that runs around to the southeast that will come close enough to aggro, so keep an eye out for them.
You might end up aggroing both them and the other rangers/abyssals at once and sometimes that can't be helped, but if possible, take out the roving mob
before engaging the last group of rangers/abyssals. Once all of the rangers/abyssals around the tower are dead, Rasty will move again and start opening
the door to the tower, so be ready for this. Rasty (and any other killable NPCs) will never stop being killable while you are in FoW, so keep that in mind.
Have any tanks in the party body-block the door before Rasty finishes opening it, or cast any spirts you have (attacking or otherwise) right in front of
the door because as soon as the door opens some enemies will spawn, including two abyssals. Once they are dead, Rasty runs inside and an unlocked chest
appears. Feel free to open the chest and also acquire the quest (Tower of Courage) and the quest reward from Rasty now. DO NOT get
Rasty's second quest yet. We need to do some stuff first.
Leave the tower and head southeast. Take out the mob at the bottom of the hill and head east (these mobs here have elementals in them, although sometimes
there is only one mob). Pause here for a minute and hit your left Ctrl key. Oh hey, new enemy types! Icehands are water elementalists with Maelstrom (ow),
and Etherbreakers are mesmers with Chaos Storm (ow) and Energy Surge (ow ow). The only other skeleton-types out here that might pose a problem are Skeletal
Impalers, if only cause they tend to drop a lot of traps and it's not very fun to go pick up a drop and then fall over dead from hidden trap spam. Alright,
once the mob at the bottom of the steep decline is dead, head along the east wall (by the way, this area is known as the Battlefield). Around where the
weird pieces of wood sticking out of the ground are is a popup group of two Impalers. Kill them, and then wait for a bit, as a large-ish mob of skellies
will soon come towards you. Once this group is dead, head northwest along the path, take out the mob, and continue west along the same path. We will now
encounter new enemies! The only new things you really need to worry about are Spirit Shephards. They're heavy-hitting air elementalists, and always travel
in groups of three. OK, head into the Forest (yep, new area too), kill off the Spirit Shephards and the wurms that pop up. OK, basically, you're gonan
clear out this entire forest. The good news is that it's not that big. The bad news? Lots of twists and turns and enemies with high ground advantage.
Anyway, what you have to clear is all of the top-left corner on the first map I linked to (i.e., everything that you can reach that is covered in trees on
that map). The easiest way to do this, after aggroing most everything along the main path running through here but without going too far into where the
path is surrounded by high terrain on both sides, is to then head west and clear that side first, then north, then you can head east towards the other exit.
(and yes, when I say "clear the forest" that includes the stuff on the other side of that bridge in here) Be careful when you cross that bridge, though,
cause as soon as you step on the other side both mobs will run towards you from the sides, and two shadow beasts will spawn in front of you. Once you've
gotten rid of the last mob (should be some spirit shephards and wurms at the other entrance to this area), go back to the bridge, stay on the side with no
houses, and go park your party under the trees just to the southwest of the bridge. Now, have someone run back to Rasty and grab his second quest
(The Wailing Lord, and don't worry, everyone can grab the quest later since we all have to go back to him eventually), then run back
to the party (and don't worry, nothing new will spawn on the path between here and Rasty until later). DON'T ATTACK ANYTHING YET. If you'll notice, some
weird enemies have spawned on the other side of the bridge. You have to kill ONLY the banshees, and NOT the Wailing Lord, however, the Wailing Lord is an
aggressive target, and will attack you if you aggro him. And if he dies, you get kicked out of FoW, cause the second quest specifically says not to kill
him.
OK, so... what can we do? Well, first things first. Any mm's in your party cannot be the pullers, because it's almost 100% sure that his minions will aggro
the Wailing Lord and fail the mission for you. Also, anyone with a summon following them (via skill or summoning stone) cannot do the pulling, for the same
reason. Secondly, have the puller equip a bow. I don't care if it's the crappiest bow in the history of mankind. Also, shadow bows are a really common
drop down here, so you're almost certain to have one by now, regardless of whether you actually brought one with you or not (and anyway, most players will
bring a bow for the purpose of pulling, whether they're part ranger or not, so SOMEONE should have one). Now, the reason I had you park over here under
these trees is cause if you head to the section of the chasm that is right next to your party you'll notice that on the other side is an area that comes
closest to this side of the bridge and most of the banshees will come rather close in this part. Use your bow here and aggro one of the banshees when it
comes closest to the chasm (by the way, the banshees have a chance to drop ectos ^O__o^;; ). Anyway, there's always 1-2 banshees that won't play the game
properly, so you'll have to actually go onto the bridge at some point, but please please please do not aggro the Wailing Lord. Pull carefully. Once all
of the banshees are dead, the Wailing Lord is no longer hostile. Move your part over to his location but do not speak to him yet. Make sure that none of
your party members or their, uh, attachments, are left over in that grove of trees you were parked at. And by attachments I mean minions, summons, spirits
of any kind (attacking or otherwise), ANYTHING. Nothing should be left over there, I don't care what it is. Once you're sure that area is clear, speak to
the Wailing Lord to get the third FoW quest (A Gift of Griffons, and yes yes, I know, some of you haven't grabbed the second one yet,
just trust me!). Oh yeah, and open the unlocked chest that spawned if you wish.
See? This next quest has you returning to Rasty anyway. However, this quest must be done very very carefully. Remember that second entrance into this
forest I had you clear earlier? Go there. DO NOT go to the original entrance we used to first get into the forest. For those who've forgotten: From the
bridge head left, follow the edge of the area to the east, and, oh hey, there's the exit. Yay. You'll notice that just beyond this narrow passage is a mob.
You may or may not notice that they weren't there before (well, they weren't). Go kill them. Be careful, as there's another impaler popup right around
there. Look south and you'll see a raised area with a tent on it. Don't go anywhere near there yet, but we do need to go south, so just go east a bit and
then south. You can kill any skeleton mobs in your way, but do not aggro the shadow mob near the tent. Alright, continue south and head back to Rasty
(and yes, a couple of new mobs have spawned between you and him, and those shadow mobs you are allowed to kill). Also, each of these newly-spawned shadow
mobs also have hidden shadow beast popups. OK, go talk to Rasty, all of you. Those who didn't get quest 2 (The Wailing Lord) can get it now, and everyone
can get the reward for quest 2 now as well. Alright, now turn back around and head back to the forest using the first entrance we used, killing all of the
mobs that spawned from taking quest 3 on the way. Once inside the forest, head west again and you'll soon come across three ghostly forest griffons. Now,
the deal with these things is that if even one of them dies, you get booted out of FoW. This is why we went back and killed everything first. I mean, yeah,
it's possible to complete this quest even with these guys following you while you kill the new mobs, but they are very very likely to die this way. Alright, now,
BACK TO RASTY! Actually, you can manage to just have one party member take them back if all of y'all don't want to go. Just park the party in one location
and have one party member run off, and the griffons should follow them. Keep the party parked until the delivery boy party member is out of range (i.e.,
their name goes grey in the party list), then the party can go kill stuff if they want to and the griffons should still follow delivery boy. You don't really
need to accept the quest reward to get credit for the quest in regards to completing FoW, but if you're worried about the EXP for whatever reason, we'll
be coming back to this area later anyway, so even if you're not the delivery boy you can still get the quest reward later. Alright delivery boy, go rejoin
your party!
OK, you're gonna wanna clear the whole west side of the Battlefield, still avoiding the mob near the tent. After the west half is cleared (including any
mobs that stray over to the west side), head to the back (north) part of the Battlefield (careful of some random impaler popups along the way). Oh... hey
there... giant... undead... dragon... thing... ^.__.^;; OK, so, we have to kill this thing. However, you'll want to pull it west-ish (might be another
impaler popup just to the west if you didn't get them before) because if you go too far up on the hill the dragon thing is at the bottom of it'll trigger
the other dragon thing on the other side to head your way. While you do need to kill both of them, you don't want to fight both at the same time. So yeah,
once the first one is dead go up the hill, slay the second undead dragon, then head back towards the tent. However, I highly suggest heading directly
west from the dragon hill until you hit the wall and then head straight south toward the tent, because there's an impaler popup or two somewhere between
the second Forest entrance and the tent and you'll need to get rid of them and anything else near the tent (in case I didn't make that obvious enough by
now). Once you reach the tent, please be aware that 1) there's an impaler popup right when you aggro the mob near the tent, and 2) there's a shadow beast
popup if you go up onto the tent's hill (towards the south side of the hill). Once all of those enemies up there are dead, some NPC ghosts spawn right
next to the tent. These guys CAN die, and will result in you getting kicked out of FoW if they do (although I'm not entirely sure about Zurotai the Eternal,
but I do know the other two count, and better safe than sorry). This is why I had you get rid of everything on the west side of the battlefield. Grab the
quests from Kromril (Army of Darkness) and the Eternal Weaponsmith who doesn't get a name (The Eternal Forgemaster),
and head back to the dragon hill. The dragons are gone but some rangers, a monk, a shadow beast or two, and the quest's objective, the Priest of Menzies
(who is also sometimes a Zaishen Bounty, btw) have spawned by the tents. Take out the monk first, then the rangers. Once the Priest of Menzies is dead he'll
drop the Unholy Text. Pick it up and take it back to Kromril to complete quest #4. Woooo... (yes, I'm aware it's not #4 in the list, but I'm more efficient
than the list :op )
OK! On to quest #5! You need to head to the area labelled Forge on the first map, however, the best way to do that is go south to the crossroads and then
go straight east. You'll see why soon enough. When you see the next crossroads (check your compass) there should be a rather large mob of shadow warriors
and whatnot camped out there. However, for some reason they and the shadow mob just up the ramp from them are enemies so sometimes one or the other of
these mobs is dead when you get here. If the mob at the crossroads has died, a large group of shadow beasts has now spawned and is around the crossroads.
If the ramp mob is dead, nothing really changes (cept you don't get any drops from them :o( ). If they're both alive, you need to pull the crossroads
mob west as much as you can because, if you haven't figured it out from what I just said, as soon as the crossroads mob dies a large mob of shadow beasts
spawns and heads to the crossroads. This is bad. If you pull the crossroads mob west, your party can regen after the mob is dead and then attack the shadow
beasts. After that's dealt with, destroy the ramp mob if they're still alive, then go up the ramp and head towards the Forge entrance. Stop here for
awhile and watch the mobs inside. It'll be much easier on your party if you pull the roving mob that wanders by the entrance to the outside of the Forge.
That way, you don't aggro any other mobs inside. After they're dead, enter and head right a bit and pull the stationary mob towards you, to avoid aggroing
the second patrol. Please take note that there are ramps going up towards the middle of this area and some enemies at the top of the ramps. These enemies
are rangers and have no problem with shooting you from up there if you aggro them from the bottom, which is a terrible thing to happen when you're busy
fighting abyssals and shadow warriors and what-have-you. Next, take out the second patrol as they come towards you. Continue working your way around the
bottom level of this area (there's another patrol on the east side, just so you know), then regen. Once everyone's ready, head halfway up one of the ramps
and attack the rangers at the top. You do NOT want to go all the way to the top unless you enjoy impersonating a pincushion, cause all of the rangers will
target you. Once everything up top is dead, the Eternal Forgemaster spawns. This is the guy who forges FoW armour (a.k.a. Obsidian/Obby armour), however
he won't forge anything for you (or act as a regular merchant, for that matter) until you do two more quests. So needy. ^-__-^;; Well, anyway, talk to
him to get your reward for the unnamed Weaponsmith's quest. Do not take the Forgemaster's first quest (Defend the Temple of War)
until everyone is ready because as soon as even one party member accepts the quest mobs spawn at both of the Forge's doors. Anyway, accept the quest when
you're all ready, and STAY UP HERE. ARGH. I can't even begin to tell you how many party wipes I've seen because some people don't understand what STAY UP
HERE means. ^-__-^;; Your mission is now to protect the Forgemaster and yes, you guessed it, if he dies you're outta FoW. The mobs will start heading up
one of the ramps (not always the same one) two enemies at a time. At the beginning it's just shadow beasts, but don't get too cocky cause if one of your
party members gets SS cast on them and ignores this fact and just attacks/casts away while within range of the Forgemaster the Forgemaster can and will die
from the AoE-type effect of SS. So... make sure everyone knows this. Also, stay at the very top; don't meet any of the groups halfway down the ramp cause
the next group doesn't always wait until the previous group is dead to start heading up top. And don't get impatient if the mobs take too long to come to
you. I'm sure the monks in your party will enjoy the breaks. Once the abyssals start coming make sure to body-block them at the top of the ramp so they
can't get anywhere near the Forgemaster. When there's only four enemies (not groups) left, feel free to head down and aggro all four of them if your party
is strong enough, since they're all at the same entrance. After all of the enemies are dead random ghost NPCs show up all along the bottom level of the
Forge. Apparently these guys can also die, causing a mission failure, but this only really matters if you overaggro something later on and then try to run
away back through the Forge (so, uh, don't do that, k?). Grab your reward from the Forgemaster (nope, still no merch services or armour yet, soz) and the
next quest (Restore the Temple of War). DO NOT get Khobay the Betrayer yet. You'll notice there's some weird guy named Eternal
Lord Taeres who's randomly inserted himself into your party list. Ignore him for now, even though he gives you a quest. His quest becomes a lot easier if
you don't take it yet (same applies for the Khobay quest).
Alright, head out the second Forge entrance (to the south, and yeah, it was closed before) and take out the mob that may or may not be just outside this
exit (no, I don't know why sometimes they're not there. Maybe an extended lunch break?). Another ramp leads down from here. Stay as far up it as you can
and pull the next mob towards you. This is another mob that spawns another large shadow beast mob when they die, so be aware of that. And this shadow
beast mob will not stop at the bottom of the ramp. Be careful, cause if you have minions you might end up aggroing a patrol when fighting the shadow
beast popup mob. OK, if you look to the east you'll see a path. You need to kill everything between the entrance to that path and the small fire lake to
the south (and everything right of the fire lake too. Also, this fire lake is not to be confused with the area labeled Lake of Fire on the first map). A
patrol moves up and down the aforementioned path, and you have to kill them at some point anyway, so if you see them go ahead and get rid of them now. Be
careful of the patrol near the mini fire lake as they seem to be good at overwhelming parties sometimes. There's also an NPC on the other side of the mini
fire lake (which will not set you on fire, so don't worry when you cross it). Grab his quest (The Hunt), but be aware that an enemy
spawns right behind you when you do (well, on the other side of the mini lake, anyway). This quest involves finding and killing seven of these creatures,
which obviously will not have spawned til now. They are strewn all over FoW, but don't worry, the ones in the areas we've already covered will go quick.
For now, follow your quest marker for Restore the Temple of War into the cave just to the north. Go slowly in this cave because it is deceptively near
empty. Basically, every time you aggro a dryder and/or seed of corruption, 1-2 mobs of cave spiders pop up and attack you, and they can overwhelm an
unprepared party. Technically, your quest involves only killing the Seeds of Corruption, however everything else in here isn't exactly gonna leave you
alone. When you finish off the last seed, keep going through the cave. Be careful at the end though cause wave after wave of spiders will come down from
the ceiling, and not always right away. Once you're done with the army of spiders, leave the cave through the south and go west and you'll soon find your
second shard wolf. Be careful though, cause scale in large numbers can get really annoying. Continue west through the mobs, then up the path to the north
to find yourself... right back at the beginning near the Tower of Courage. Woo ^O__o^;; But never fear! I never lead you astray! Head northeast towards
the tower to find shard wolf #3. And anyone who was wondering when they'd get the chance to grab their quest rewards from Rasty if they didn't get them
before, well, here we are. Anyway. Continue towards the Battlefield, but head into the Forest instead. The fourth shard wolf is near the second entrance
to the Forest, so go left and around the back past the bridge, then right to reach him. And if you're wondering why I had you come in the first entrance,
well, it's closer and then you have to go out the second entrance anyway. So do that. Head towards the Forge again and you should find shard wolf #5 on
the way. Go back into the Forge to get your reward from the Forgemaster (who'll also forge armour for you/buy things from you now), then go out the south
entrance.
Go up the path to the east (killing the random shadow beast pops as you go), then head northish. However, don't go too far cause a large mob's headed your
way and you don't want to get that patrol plus the stationary mob at the same time. Once the patrol is dead, head east towards the Lake of Fire. Go ahead
and kill everything in the Lake of Fire. The drakes here are basically just higher level versions of the shard wolves (in that they have the same spells,
although possibly with the addition of the ward). You technically don't have to kill everything in the Lake of Fire but definately get rid of everything
leading to the wurm in the bottom-right corner of the map (and kill that wurm as well). Once that's done, go back to the entrance to the Lake, then head
north. Take out the patrol after you crest the hill (the one with abyssals in it. It is REALLY easy to get overwhelmed in here, especially with all of
the infernal wurms everywhere, so don't be afraid to pull back towards the Lake of Fire when you need to. Basically, you want to clear this entire area
(on the first map, everything between the Lake of Fire and the Burning Forest) just to make things easier. It's also easier to get down if you go all the
way left at the start. Not only are we going to the Burning Forest, but we also need to clear around the Tower of Strength (see second map) as well. So
yeah, when I say everything I mean everything. ^@__@^;; Plus, the sixth shard wolf is around here too. *ahem* Dear Infernal Wurms: Your range is h4x.
Plz die nao. ^-__-^;; Speaking of the Tower of Strength, an easier way to get rid of the mobs near there is by standing on the hill between the Tower and
where we entered this area. You have the height advantage there, and can pull the patrol to you and away from the wurm. Alright, now, if you're wondering
how to get down to the lower level, pass by the front of the Tower of Strength and continue north. There's a path here that leads down to some lava, which
still doesn't set you on fire but does lead to the lower level. Woo! (yeah OK, so there's some enemies on the southwest side of the lower level that you
can safely ignore)
Enter the Burning Forest to find... an NPC. Do not worry about this NPC. He won't die no matter what. He does have the ability to body-block you if you
try to run past him during an overaggro so keep that in mind. But DO NOT take his quest yet. OK, clear everything on the east side of the Burning Forest,
front to back. And yes, there are Mahgo Hydra here. Why are there things here from the Ring of Fire Island Chain? I dunno. But they are, and they are
priority targets here because MS spam == ow. Also, watch your compass like a hawk; the chances of overaggro in here are really really high. You should
find the last shard wolf during your rampant hydra/skale killing. Make sure you clear everything around the windmill at the back as well, then head back
to the unkillable NPC Miko and accept his quest (Slaves of Menzies). Head back to the windmill and I highly recommend pulling one
mob at a time, but that's up to you. You do need to kill all four mobs that have spawned around the windmill (technically, you only have to kill the four
overlords, but they don't really pull very well as individuals). Once they're dead, return to Miko for your reward. Now, from Miko go north, kill off the
hydra/smoke walkers, and continue down the path to find yourself on the Battlefield. Head to the Forge (shouldn't be that many enemies between you and
there) and grab the last two quests from the Forgemaster (Khobay the Betrayer) and Eternal Lord Taeres (Tower of
Strength). Grab your reward from Nimros for killing the shard wolves (out the southern exit) and head back to the Lake of Fire. ... you know what I just
noticed? Nimros acts all big and bad, but... HE'S LEVEL TWO. WHAT THE HELL. ^-__-^;; OK, in the Lake of Fire head to the Khobay marker on the second map
and kill off Khobay and his mob. They all have res signet so be aware of that, plus there's a monk and an ele. They are a lot easier now that we got rid
of that wurm.
Once Khobay and his buddies are dead, head to the Tower of Strength and go back to that hill near the tower that I mentioned last time we were here. You
can easily pull at least two of the mobs to you from here. Afterward, go clear out the other patrols around the tower. OK, now, the quest may say that
Taeres will send Eternil Sigil Mages to open the door once the patrols are gone, but really it's only one Tower Mage, and he isn't really sent. So... park
your party at the front of the Tower of Strength and send someone back to go fetch the Tower Mage. He's at the southern exit and starts running towards
the tower as soon as you get near enough to the ramp. Do not leave the Tower Mage alone to run to the tower because as soon as the Tower Mage opens the
tower door things will spawn inside, just like with the first quest we did in FoW, and you can't let the Tower Mage die. Fortunately, the only thing inside
is one Shadow Lord (shadow beast). Now you can go hand in your quests, get your EXP, and, most importantly, OPEN THE CHEST OF WOEEEEEE (it's by the Forgemaster).
Congratulations on clearing The Fissure of Woe! Now you can put that nifty statue in your Hall of Monuments. Enjoy your shinies! :oD

