How to Play
(User Interface)
Table of Contents
- Account and Character Creation (page 1)
- User Interface (page 2)
- Windows/Menus (page 3)
- Playing the Game (page 4)
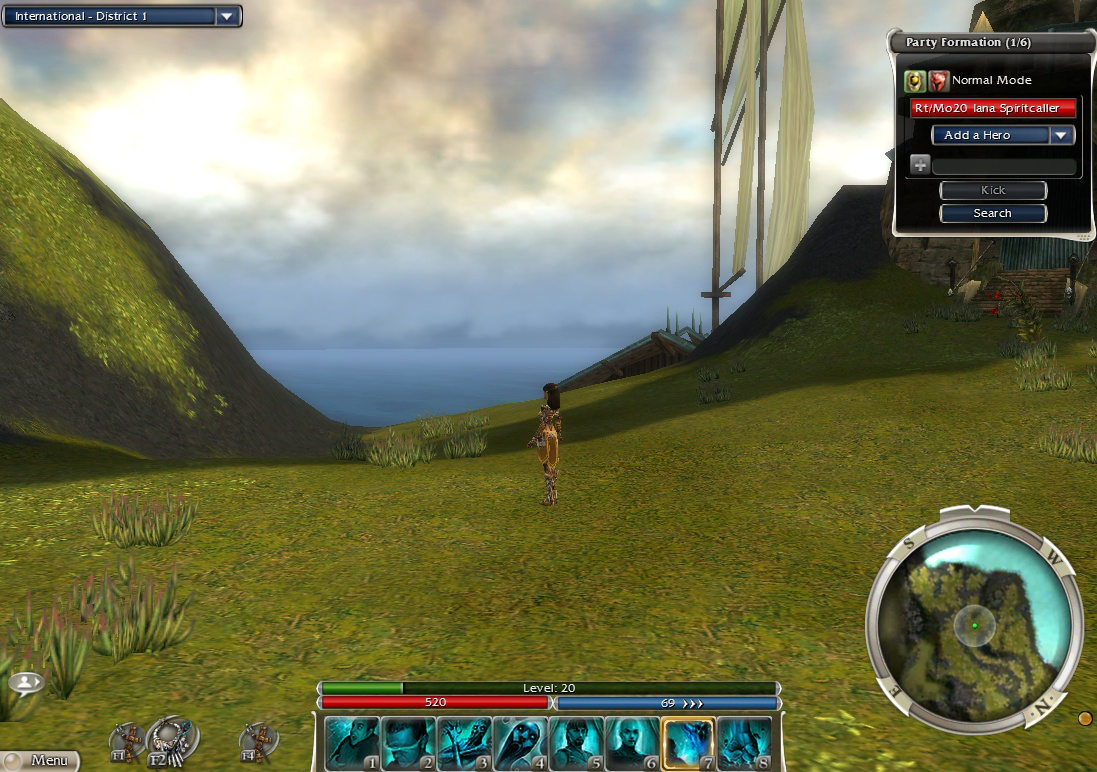
Below, is a picture of your UI (User Interface). Click the image to see it in actual size, cause the small one doesn't really show things very well...

Your configuration will probably look slightly different. I will go over how to move things around and such on the next page. Anyway. In the top-left corner,
you will see a blue button that says "International - District 1." This blue drop-down menu (click on the down arrow to open the menu) only appears in cities
and mission outposts, as GuildWars has instanced gameplay when in the field (i.e., when you go outside (leave a city through a portal), you get your own
private copy of the game world, shared only by the people in your party). Opening this menu will allow you to switch districts on that server (American,
European, International, or otherwise), switch between International or your default server, or click on More Options to switch to another region's server,
as long as your account is linked to a region that supports this option. This is crucial when trying to meet up with friends, as when you enter a city, the
game dumps you into a random, active district, as long as the district isn't full. So it is rather logical to assume that you and a friend will end up in
different districts often enough, so if trying to meet up with someone, you should probably specify which district you are in. And possibly which server,
as some people like to switch around sometimes.
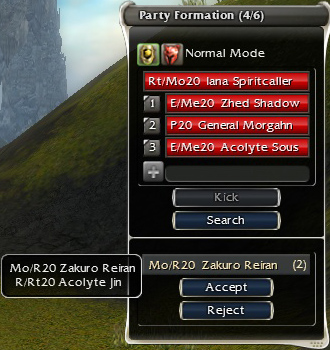
In the top-right in the screenshot, you will see the Party window. At the top of this window, it will say (1/6) or something similar. The first number tells
you how many people are in your current party (in this case, one), and the second number tells you the maximum party size for the area you are in. Different
areas have different max party sizes. For instance, pre-searing (the first area of Prophecies) has a max party size of two, whereas the Ring of Fire Island
Chain near the end of the game has a max party size of eight. In this screenshot, this location has a max party size of six. Under the title of this menu,
you see a gold button and a red button (in this example. If you've not got these buttons, don't worry about it). The gold button means Normal Mode (hence
the text next to it), and the red button means Hard Mode. Hard Mode makes all enemies in all areas hostile to you, and they are all extremely high level
(usually lv 20+ each), even in usually low-level areas. You can only unlock Hard Mode (abbreviated as HM, whereas Normal Mode would be NM) for a campaign
(for all lv 20 characters on that account) if a character on that account has beaten that specific campaign (so no, beating Prophecies will not unlock HM
in Factions or anything else). Under these two buttons, you will find a red rectangle with white text. The first letters are your professions (if you do
not have a secondary yet, you will only have one profession's abbreviation here). The abbreviations for the professions are, in alphabetical order: A
(Assassin, Factions campaign exclusive), D (Dervish, Nightfall campaign exclusive), E (Elementalist), Me (Mesmer), Mo (Monk), N (Necromancer), P (Paragon,
Nightfall campaign exclusive), R (Ranger), Rt (Ritualist, Factions campaign exclusive), and W (Warrior). I mention non-Prophecies professions in this guide since
just because the other professions are exclusive to other campaigns does not mean that you will never see one of these professions wandering about
Prophecies. How to travel between campaigns will be discussed in the main walkthrough and on
the FAQ page. So in this case, my
character is a Ritualist/Monk (Rt/Mo). After the abbreviations for professions is the character's level (in this case, 20) and name. The party leader's
professions and name will be the first red rectangle in the list (so no, your name will not always be first). Only the party leader can invite or kick
people from the current party, so if you're by yourself, you are the party leader and can invite whomever you wish (I'll get to this in a sec). Other people
will appear as other red rectangles under the party leader's name (see picture at right). If someone wishes to add you to their party or join your party,
invite requests will expand the Party menu to show the people who are inviting you to party (professions, level, name, and party size). Multiple invites
will expand the Party menu further, listing all of the invites (you may or may not have to expand the window yourself, or scroll down with the arrows that
will appear next to the names). Hovering over the names will show who else is in that person's party (if any), as seen in the picture, again with professions,
level, and character name. You can click on "Accept" or "Reject" to either, well, accept or reject the invite. Now, the "Add Hero" blue button drop-down
thing will only appear if you have heroes, which are only available if you have the Nightfall campaign or the Eye of the North (abbreviated GW:EN or EotN)
expansion, so will not be covered here. Just know that if you have someone in your party and they have other names under theirs that are indented like in
the picture (the 1, 2, 3 numbers will not be there if they are not your heroes, but the red rectangles are still indented), then those "other people" are
that person's heroes and, even if you are the party leader, you will not be able to kick that person's heroes from the party. Only the person they belong
to will be able to kick them out of the party. And that is the only reason why I mention them here. :o) Plus, even if you don't have access to campaigns
with heroes, other people with heroes can still join your party. Anyway, moving on! Below that, you will see a + next to a field. If you are near someone
you wish to add to your party (like a henchman or someone within view), you can click on them and then click on the + to add them to your party (if they're
a henchman), or send a party invite (if they're an actual player). (Note: there are no henchmen in pre-searing). Henchmen show up in cities and mission outposts. Usually, the same ones will
be in every city in that campaign. They can change, though, and won't always have the same skills in each town. Also, henchmen only have a primary profession, although sometimes they will use
a skill that is not of their primary profession (I've only heard of this happening with one NF henchman, though). Usually, real people are better than henchmen, but sometimes
this is not always true. Henchmen levels and skills tend to change as you progress through the game, so don't think that Alesia [Healer Henchman] will be
level three the entire game. They just don't gain EXP, no matter how many things you kill while they're in your party. Anyway. As mentioned earlier,
when you receive a party invite, you get the option to Accept or Reject the invite. So when you send an invite to a real player, they also get this option.
So if their name disappears from your list, you don't need to keep sending the invite 15,000 times, as this gets a bit annoying. They've just rejected your
invite. Generally, it is in bad taste to send a blind invite to someone (i.e., not pm them or tell them in allchat before sending the invite, as most people
do not like this, and reactions will range from just rejecting your invite, to becoming verbally abusive towards you in either pm (private message/whisper)
or allchat) unless they are specifically advertising that they are looking for a party in chat. You'll prooooobably get a better reaction (and maybe even a party member) if you pm that person
first and ask them if they would like to join your party. I will talk about pm's later. If you know the player's name, you can also type their name into the field next to the + and press Enter
to invite them to your party (if they're in your district) so you don't have to run through the entire town looking for the person to click on them. Now,
under this field, you will find two buttons. The Kick button obviously kicks someone out of your party, if you are the party leader and the other person
is not someone else's hero. To do this, you must click on the player's red rectangle then click on Kick (and yes, if you kick someone with heroes their heroes will also be kicked along with their
owner). The Search button is under that. Clicking on this will open a new window (or you can just press P while in town. Pressing P in the field does something else though). In this window
you can see things that people are advertising, like things people are selling, or people who are looking for a party for a quest or mission (if you're in a mission
outpost), or sometimes people who are recruiting for a guild (yep, still not talking about guilds yet. Patience, grasshopper!). You can also write something in the field in this window to post
your own advert. There's more to this window which I'll get to on the next page.
OK! Bottom-right corner. I'm pretty sure the default does not have this compass/radar down here, I just find it easier to have it there (again, I will talk
about how to move stuff soon, I swear!). Anyway. Wherever you may have it, it should look almost exactly like this. As you can see, it is, in fact, a compass, as it
has N, S, E, and W directional marker thingies. This is incredibly helpful when people tell you things like "Storage is to the east," or "The NPC you want
to talk to is to the SW." Especially if you're reading my walkthrough, as I like to give directions like north and south (although I usually provide maps
anyway, so... I dunno). This thing is very useful because it also shows the direction of important quest objectives (if the quest you have highlighted has
this option). I will get to the quest log soon enough! (yes yes, promises promises. I am trying to inject some order into the chaos! ... the fact that
my guild tag is [KAOS] has nothing to do with that. Really!) If your quest's objective is within range of your radar, you will get a green starburst
on your radar. If it is out of range, you will get a green arrow on the edge of your compass (where the N, S, E, and W thingies are) that points in the
direction of the objective. You can also use the mini-map (explained later, yeah yeah) or the regular map to see the starburst if it's not within radar
range. Please note that if your quest's objective is in another area (i.e., through a portal), then your starburst will appear at the portal to the other
area. This does NOT mean that your quest objective is at the portal or right after it. Kiiiinda annoying sometimes. To the immediate right of the compass,
you will see an orange dot. This cannot be moved elsewhere, as far as I know, but can be a different colour (red, orange, green), and may or may not have
a white lightning bolt thingy in it. This is your ping (not to be confused with when people tell you to "ping your location/skills/HP/bar/whatever"). It
will tell you your FPS (Frames Per Second, not First Person Shooter :op ), last ping, average ping (not quite sure what ping means, since I'm not uber
tech savvy, but I'm pretty sure it has something to do with how good your connection is), and your server IP. Green means your connection is good, orange means yours is average, and red means
your ping is really really high (which is BAD). And having a lightning bolt in this little ping-dot-thingy is worse, but it usually means something is taking up most of your bandwidth.
Continuing in a clockwise rotation, we come to the bottom center of the screen. Again, your UI will probably not look exactly like this (I believe the EXP
bar (green one) is by default in some crazy location near the Server-District drop-down I mentioned earlier and, IIRC, the red and blue bars are at the top of the screen for whatever reason).
Anyway. The eight squares at the very bottom, with
numbers in their bottom-right corners, are your skills. This is your skill bar. As you can see, the max number of skills you can have equipped at one time
is eight, including one elite skill (elite skills are designated by the gold border around the skill, in this case, the skill in slot 7). A list of all of
the skills available in the Prophecies campaign is listed
here, with elite skills having a gold glow around them. When you first
start a new character, you will only have grey squares in your skill bar, as you will have no skills yet. As you obtain new skills, they will automatically
start filling up your skill bar. Once you acquire eight skills, you will get a popup window upon acquiring a new skill that lists the skill's icon, skill
name, energy cost, cast time, recharge time, description, and buttons to either equip the skill now or later. Holding down the Ctrl key and left-clicking
on your skill bar will cause a message to appear in teamchat with a clickable link to your skill set. This is called pinging your skills/bar.
Clicking on the link will bring up a window (the message and resulting window is pictured below).
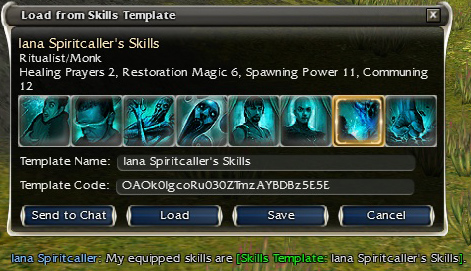
... yeah, I moved the window down to make the image size smaller. Anyway. The window shows the person's name, their professions, their attributes (yes, I
have 2 Healing Prayers. I just hate to have extra attribute points left over cause I'm OCD like that. Or something), the skills in their build (useful when
you want to make sure that you don't have some moron in your party that has, for example, 4 fire magic, 4 blood magic, 4 water magic, 4 death magic, 4 soul
reaping, 4 earth magic, 4 air magic, etc., etc., because it makes him "more versatile"), two fields, and four buttons. The first field allows you to change
the template name (I will get to this soon, trust me), and the second field has the template's code (if you mess with this, it will change the skills in the
template). The Send to Chat button will make the message show up in the chat log again (useful button when trying to give someone else a template you have
saved, or if someone pm's you a bar and you want to post it in team chat), the Load button loads the template into your skill bar (if possible. If you do not have the same primary profession as
what's listed in this window,
or if you don't have the secondary that's listed available to your current character, the template will either load incompletely, or not load at all), the
Save button obviously saves the template to your hard drive, and the Cancel button closes the window. When I talk about skills a bit later on, I will come
back to the templates thing. Above the skill bar (in my screenshot, anyway) are two bars, a red one and a blue one. The red one is your HP bar. Generally, it shows your max HP. You
can also ping your HP by Ctrl-clicking your HP bar. This makes a message appear in the teamchat log, like "My Health is 520 out of 520." As you
take damage, this bar starts to deplete, and the number goes down. When the bar depletes completely, you die. More on this on the fourth page.
The blue bar is your energy bar. Energy is pretty much what other games call MP. As I explained earlier, different professions can have different
max base energy (elementalists can have 100+ energy because they have Energy Storage as their primary attribute, and increasing their rank in this attribute
will increase their max base energy). You can also ping your energy if you want, and will get a similar message as when pinging your HP. As with your HP,
when you use energy, your bar depletes. But there are (usually) some arrows next to your energy amount in this bar. This designates how many arrows/pips
of regen you have. Caster professions have four pips of energy regen, assassins have four pips, rangers have three pips, and warriors and paragons have two
pips of energy regen. Some weapon mods/enemy skills will cause you to have less regen pips, but none will make you have more regen pips. There are some skills
that will increase your energy regen, though, but only temporarily.
Above these bars is a green bar. This is your EXP (experience) bar. It will tell you your current level and show you how far along towards your next level
you are. After reaching lv 20, you will no longer gain levels, but each time this green bar fills up, you will gain a skill point. Skill points are used
to purchase skills from skill trainers (or for buying certain consumable items, but only in GW:EN), and for buying Signets of Capture (see
the skills page for a description of Signets of Capture or for other skills in Prophecies). This is another bar you can ping,
which will result in a message like "I am level X and am XX% of the way to earning my next level" in the teamchat window.
To the right of all of this stuff are some grey circles labelled F1, F2, F3, and F4. These are where your equipped weapons are shown. Pressing the
corresponding key (F1, etc., etc.) will switch to whatever weapons are set in those slots. Holding down Ctrl while pressing the corresponding key will ping
the weapon in that slot. You can have up to four different sets equipped at a time, but they are not set in stone. Also, you will only have F1 at first until you enable the other weapon set
circle thingies, which I'll get to on the next page. Next to your weapons is a button labelled Menu which is, of course, your menu. Nobody really uses this menu, though, as all of the options
have keys that will activate them without clicking on the menu. I will list these on the next page. Right above that is an icon with a little dude and an arrow. Clicking
this will open your chat log (pressing the ~ key should also do this as well). The opened log is shown below:
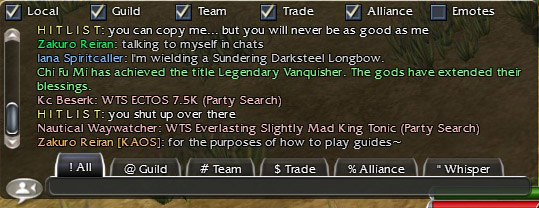
As you can see, with the chat log open, you can see the messages better with that dark background. Also, you can scroll up if you missed a message or want
to re-read a message (although the chat log will only keep a certain amount of messages at a time, and no, there is no way to save your chat log unless you
take a screenshot (use the Prt Scr button on your keyboard to take a screenshot. A message will show up in the chat log that says where the screenshot was
saved. You can also use this button to take screenshots of ingame things that you want to look at later. If you want to get rid of the UI while you take
the shot, press Ctrl-Shift-H. You can use this same key combination to bring the UI back after taking the shot (please note that when the UI is gone, you
will not get the screenshot taken message)). Now, to explain about these different-coloured messages in the chat log. The sickly all-green text (i.e., "Chi Fu Mi has achieved the title
Legendary Vanquisher. The gods have extended their blessings," amoung others) is usually reserved for server/game messages. The one in the example are the ones you will
see most often. This means that someone on your server has obtained a max title (again, Prophecies titles are
here). The second half of this message doesn't really
mean as much anymore... basically, it means that people on your server can enter The Underworld or The Fissure of Woe (they are high-level "elite" areas that can only
be entered when your server has the blessing of the Gods. I will talk about these more... no, not later. In the actual walkthrough. :op and also the FAQ). Waaay back
when, before they allowed the free switching between servers, the different servers were at war with eachother. Long, arduous battles were fought in the
PvP arena called Heroes' Ascent, and if one server's teams won four times in a row, that server would get favour, allowing the players on that server to
enter these elite areas. But if one server won three times in a row, and then another server won once, the counter would be reset. Ah... the good old days...
anyway. Oh yeah, winning in HA will still generate a green server message but it won't say "The gods have extended their blessings" anymore.
Moving on! Some emotes (listed
here) will also cause all-green text to appear, but unlike the server messages (like the title ones), not everyone can see them.
Certain
ingame events will also cause server-wide sickly
all-green text to appear. Another message that tends to appear (but not quite as often anymore) is the "There is a new build of Guild Wars available.
Please exit the client," or something similar to that. This means that you need to completely close GuildWars (not just logout), then open it again and
login again after downloading the new files. Otherwise, you will not be able to see people who have downloaded the new build, even if you are both in the
same district of the same city. Not good when trying to meet up with someone. Guild messages will also appear in this all-green text when you login or the
guild leader or officer changes the guild message (if you're in a guild, that is). Clicking on the "! All" tab in the chat log, or pressing Shift-1, will allow
you to post messages in allchat/public chat. To post a message, type, then press Enter. To post another message, you must press Enter again before typing
anything, or else you will open up a bunch of windows instead of actually typing a message. Allchat messages are designated by white text, and the poster's
character name in yellow (such as the messages from player "H I T L I S T" in the screenshot). Everyone in the district you are currently in can read messages you post in this way unless they've
ignored you (covered later in this guide). Clicking on the "@ Guild" tab, or pressing
Shift-2, will put you in the guildchat tab. Messages in guildchat are designated by white text, and the poster's character name in darker green than the
server messages (such as the first message from Zakuro Reiran). The guildchat tab will only be available if you are in a guild (again, more on this later), and messages written in guildchat can only
be read by people who are in your guild and online at the time of you sending the messages. People not in your guild will never be able to read these
messages. The "# Team" tab (Shift-3) allows you to talk in teamchat. These messages can usually only be read by people in your current party (i.e., people
listed in the party menu mentioned earlier). The only exceptions to this are in AB (Factions-exclusive PvP), where everyone on your same side can read these
messages, or possibly two co-operative missions in Factions, but since this is a Prophecies guide, it doesn't matter. :op Teamchat messages are white text,
with the player's character name in blue. This is where your pinged messages (skills, HP, energy, whatever) will appear, such as the pinged weapon in the screenie. Please note that NPC's whose
dialogue appears in the chat log also use these colours, so sometimes it can be a bit confusing as to who said what, and if the NPC's talk a lot, it can be easy to miss messages posted by your
teammates. The "$ Trade" tab (Shift-4, notice a pattern yet?) is for buying, selling, or trading items/whatever.
*NOTE: Buying, selling, or trading in allchat is
considered spamming by Anet, which is a bannable offense. People can and, if you're unlucky, WILL report you for doing things in allchat that are meant for tradechat, which will likely result
in your account being suspended for 70+ hours. There is a tradechat for a reason! Of course, if you do it once, by accident, you won't get banned Messages in tradechat are all pink,
including the player's name and message (such as the messages from players "Kc Beserk" and "Nautical Waywatcher" above). The "% Alliance" (Shift-5, what a surprise) tab is only available if you
are in a guild, even if your guild is NOT in an alliance (odd, huh?). Only people
in your alliance can read these messages, if they're online at the time. If there are no guilds allied with your guild, then it will function the same way as the guildchat, just in a different
colour (some weird orange-peach-ish colour, such as the second message from Zakuro Reiran). These alliance messages will also have the player's guild tag after their name so you know which guild
in the alliance they are from (such as [KAOS] above). And finally, there is the
" Whisper" tab (Shift-"), also known as pm's. You can either type in the player's name whom you wish to contact in the left field, then your message in the right one to pm someone, or click on
the person's name if they say something in the chatlog (emotes, which are purely white text, do not count), or choose the appropriate option when clicking on the icon next to their name in the
Friends' List menu (menus will be explained on the next page). If someone has just pm'd you and you haven't pm'd anyone recently, you can also press / to open the pm tab of the chatlog and reply
to them without clicking their name or typing their name. Messages of this sort are designated by all-blue text (received messages) or all-green text (sent messages), and can only be
read by the single person you are pm'ing (sorry, no screenie of this, I kinda ran out of space in the chatlog).
Now, at the top of the chat log, you will see several checkboxes. When the boxes are checked, you will be able to see messages posted in the appropriate
chats. When the boxes are unchecked, you will not see messages posted in that particular chat. So in the example picture, all messages in all chats would
be displayed, EXCEPT emotes. Please note that you cannot turn off pm's here (the next page will explain how to prevent pm's from being sent to you). And
no, just because people have the ability to turn tradechat off it does NOT mean that it is OK to spam allchat with trades and sells, etc. (see the red text
in the previous paragraph).
Next How to Play page!