How to Play
(Windows/Menus)
Table of Contents
- Account and Character Creation (page 1)
- User Interface (page 2)
- Windows/Menus (page 3)
- Playing the Game (page 4)
Inventory
... this guide should get some sort of award for being so long... anyway! Now we will discuss the different windows that you can access ingame (i.e., the ones
that are listed in the Menu list). Pressing I will open your inventory (the F9 key does relatively the same thing, except in a more obnoxious way. If you
don't have a belt pouch and two bags and you press it, you will have no idea what I mean (it opens every single bag in your inventory
at the same time)).
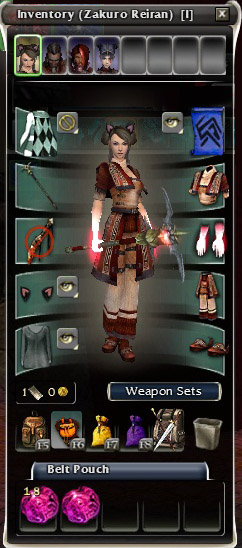
Pictured on the right is what happens when you press the I key, not the F9 key. F5 will also open the inventory, but just your backpack. F6 will open your belt pouch, F7 your first bag, and
F8 your second bag. There is no button associated with the equipment pack at this point (and these different bags and whatnot are explained in the next paragraph).
As you can see, at the top it says "Inventory" and your character's name. Below that are eight squares. The
first one will always have your character's face. If you do not have heroes (only available if you have the NF campaign or the GW:EN expansion), or your heroes are not
currently in your party, the other squares will be grey (like the fourth square in this example). If you do have your heroes in your party (not someone
else's), then their faces will occupy the appropriate boxes here. Clicking on their faces will open up that hero's "inventory" (please note that heroes do
not get their own actual inventory, so they cannot carry items in a separate inventory than yours. When I say "hero's inventory," I only mean the parts above
your inventory slots, and excluding the Weapon Sets button and gold field. The inventory slots shown when clicking on a hero's face are still your own).
Under that, on the right, are boxes that show what armour you are currently wearing (headgear, top, gloves, bottom, and shoes). The little button next to
your headgear allows you to choose whether you wish to have your headgear always showing, hide it in towns and outposts (it will only show up in the field
and PvP), hide in combat areas (will not show up anywhere you fight something, player or otherwise), and always hide (will never be shown). Here, you can
mouse-over (hover the mouse over) your armour, weapons, and items in your inventory slots to see what their stats are (i.e., if your armour has any inherant
bonuses, or runes/insignias, or the damage your weapon does, etc., etc.). In the middle is a picture of your character in their armour, and wielding
whatever weapons you currently have equipped. In the left row at the top is a sillouhette of a person wearing a cape, with a little button next to it. You
only get this option if you are in a guild that has a cape. The button allows you to choose whether to always have your cape visible, to hide it in towns
and outposts, to hide it in the field (anywhere you fight something that is NOT another player), or always hide it (except in PvP). Under that box are your
equipped weapons slots, one for your actual damage-dealing weapon, and one for your offhand. Offhands can be focus items for casters that give extra energy
(amoung other things), or shields for warriors and paragons. Warriors can use focus items and casters can use shields, but usually this isn't done,
as most weapons (offhand or otherwise) have a requirement in order to get the full benefits of the weapons and such. I will get back to this in a minute,
after I finish talking about the inventory window. One more note: if you are wielding a weapon that requires two hands (a hammer or a scythe or whatever
(mouse-over the weapon to see if it says "Two-handed" anywhere)), you will still be able to "equip" an offhand, but will not get any benefits from doing so (designated by a red circle with a
line through it on top of your "equipped" offhand, as in the screenie). Under your offhand slot are two more slots with the now-familiar eyeball/circle-with-a-line-through-it button. These
are slots for those novelty costume pieces that are "all the rage" in GWs now. The ingame store sells random full costumes, but the festival hats you get during special ingame events can also
be equipped in the hat costume slot. Anyway, you equip those there. They don't give you any bonuses at all, but they don't replace your actual armour anymore so you can still wear your max
armour or whatever and have the costume on top of it (like how I've got the kitty ears or whatever AND my regular headgear on in the screenie). So yeah, you can also choose when to have these
visible just like the cape and headgear. Under that is a box that says how much gold your current character has on them. Please note that the maximum amount of gold any one character can have
on them at a time (i.e., in their inventory) is 100k (i.e., 100,000g). If you have this much gold in your inventory, gold will still drop for you from monsters,
and you can still pick up the gold, but the amount in your inventory will NOT increase, so you will basically not be getting any more gold. I will talk about
storage boxes (where you can keep extra gold/items) in a minute, as well. Next to that is a button labelled Weapon Sets. Clicking this button opens up
a small window with four check boxes. Here, you can choose to add or remove some of the grey circles that I talked about on the previous page (your equipped
weapons). Again, pressing F1, F2, F3, or F4 will switch to whatever weapons you have set in those slots. You can have up to four grey circles, and as little
as, well, zero of them visible. I usually only have as many circles visible as I have weapons equipped (so in my UI screenshot on the last page, I only
have three grey circles), and I
usually don't have more than one circle, but I obviously make some exceptions on certain characters. As you can see
on
the professions page, many professions have different attributes. For example, warriors have sword, axe, and hammer attributes
(amoung others), but generally if you're playing a warrior, you will only specialize in one of these at a time, so you would not have sword, axe, AND hammer
skills in your bar at the same time, so you would not necessarily need to have a sword and shield in one slot, an axe and shield in another slot, and a
hammer in yet another slot (especially since all of these will still take up inventory slots, which are limited and I will get to right quick). You
can
do this if you wish, but another reason why most warriors do not have one of each of these things equipped is because, unlike caster weapons (that all have
the same max damage stats), warrior weapons have completely different max damage stats for each type of weapon (again, when I talk about weapons I will
explain this a bit further). HOWEVER, if you need to "restat" for whatever reason (i.e., change your attributes) it can come in handy to already have your weapons picked out.
For example, other professions, like necros and eles, have attributes like blood, death, and curses, or water, fire, air, and earth,
and those characters may have different builds based on what the situation calls for (some enemies may not leave bodies behind, so death magic, which mostly
has skills related to raising minions from corpses, would be useless in that sort of area, or some enemies are very resistant, or even immune, to fire/cold/whatever), and so
would have weapons equipped to match. My ele, for instance, has weapon sets for fire, water, air, and earth builds in her inventory so she can switch on the fly in between PvP matches or for
different areas, etc. ANYWAY! Moving on...
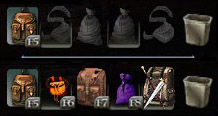
Under the Weapon Sets button, you will see six icons. When you first start out, the only one that will be coloured in will be the first one (your backpack
slot, like in the first row in the picture to the right). Backpacks have a limit of 20 slots. If you only have a backpack, this can get a bit frustrating, as you might want to hold on to a
couple of things instead of selling them or giving them away or even destroying them permanently, or even if you're out killing things and there isn't a merchant in sight.
This is why there is always a quest or some other way to acquire a belt pouch in the beginning area of any of the GuildWars campaigns (in Prophecies, there
is no actual quest, but you can acquire one by talking to a certain collector in pre-searing and giving him what he asks for. Check the actual walkthrough
for more details). Belt pouches are what go into your second slot. When you acquire one, drag it from your inventory into the second slot to start being
able to use it, or just double-click it (otherwise, it'll just sit in your inventory and you will not get any extra slots). Buuuuut belt pouches only offer five extra inventory
slots. Meh. This is why there are bags available, although in pre-searing you cannot acquire the regular bags usually used. Once you finish the Academy
and enter post-searing, you can buy bags at a certain merchant in Ascalon City, but they will also only add five slots each. You can expand these to ten
slots each by buying a Rune of Holding (500g each), then double-clicking the rune in your inventory and clicking the bag you wish to expand. But all is not
lost! In pre-searing, if you go out and kill a bunch of Charr you may possibly acquire a green item called a Charr Bag (by "green" I mean the text that shows up when you mouse over it is green.
I'll go into what the different text colours mean later). These look slightly different than regular bags, as you can see from the picture on the right (second row, third icon). They look
kinda like slightly-modified backpacks, but do not be fooled! They do not add 20 slots
each like actual backpacks (and no, you cannot acquire any more actual backpacks (one slight exception, which I'll cover in a sec), but they do already come with 10 slots each like expanded bags
from post-searing, so you can get max inventory slots (45, not including currently-equipped weapons (and minus the second-to-last slot) even in pre-searing. If you are too lazy or too low a
level to go Charr-hunting in pre-searing, you could also buy one or two from other players, if you have enough gold to do so. The second-to-last icon is a relatively new
addition to GuildWars: the equipment pack. These come in a variety of sizes (5, 10, 15, and 20 slots), and are the exception I was talking about. However, only one type of them can be acquired
in pre-searing from Nicholas the Traveler (check the maps section or the actual walkthrough for his location). In post-searing they can be aquired in the Great Temple of Balthazar (accessed
from any of the port towns (Lion's Arch in Prophecies, Kaineng Center in Factions, and Kamadan in Nightfall) by clicking
on the boat, or from your guildhall (press M) if you've already been to the Temple before) in exchange for varying numbers of Zaishen coins (which are
acquired through doing the Zaishen quests, which change daily around noon EST and are also located in the Balth Temple). Equipment packs are also different
from other baglike things because they will ONLY hold weapons and/or armour (and nothing else), customized or otherwise, so no minipets or monster trophy drops or quest items, etc.. The very
last icon in this row looks like a trashcan... because it is one. Sometimes, there are things that you wish to get rid of that you can't sell or drop in the field (like starter
weapons, extra quest items that nobody wants to buy, or old armour you no longer need and can't sell to merchants), but you don't want them taking up
precious space in your inventory. You can drag these items into this trashcan to destroy them permanently. Yes, PERMANENTLY, as in, there is no way to
bring them back after doing this, so try not to do so with something you actually want to keep. This is NOT like your recycle bin or trashcan on your
computer. This is like tossing something into your garbage disposal unit in the kitchen and turning it on. It is gooooooone.
Now, under this row of icons, you will see a bunch of slots. If you are just starting out, they should be all empty, like the last three slots in the first
picture. When you acquire items, these slots will start filling up. When you first start out, you will have a starter weapon already equipped. As soon as
you find something better (remember, you can mouse-over items to see their stats), you can equip it by double-clicking it in your inventory. While each
weapon you find will take up one inventory slot each, things of the exact same kind (like the pink things in the first picture) will "stack" (and no, even if you have two of the same weapon with
the exact same stats they won't stack, and when I say "weapons" I mean wands, staves, focus items, bows, swords, shields, EVERYTHING you can equip in your weapon slots). Stacking means they
will get lumped together into one slot and have a number in the upper left corner of that slot (such as the first slot in the inventory screenshot). You can also separate this stack if you'd
like (as I have done in the picture) by holding down the Shift key while dragging the stack to a new slot. This will pop up a window which asks you what you
would like the new stack size (in the new slot) to be (I would post a screenshot of this, but the game doesn't seem to want to let me...). Soooo I will describe it
for you instead. ^-__-^ There is an input field where you can type in the number of your choice (as long as it doesn't exceed the actual amount of the
thing you are moving). The default number is one, but you can also change it with the up and down arrows next to the input field instead of typing the number.
There are also three buttons. One says Max (number of items in the original stack), which will not separate the stack at all, just move the entire stack
into the new inventory slot (which you could've done with regular drag-and-drop anyway, without the Shift key). The other two say Split and Cancel. Split
causes the new inventory slot to have as many of the item whose stack you are splitting as you specified in the input field, and Cancel, well, cancels the
split. This Shift-drag comes in handy when using the storage box (yep, haven't gotten around to talking about that yet... PATIENCE!). Also, when trading with another player (discussed later)
you will get this same exact little popup window if you're trying to trade something in a stack, so the Max button can come in handy in that scenario. The max amount of any
item you can have in one stack is 250. This does not mean that you cannot acquire more of the same item after getting 250 though. It will just
start a new stack in your inventory. Things that will stack are items that collectors want, or crafting materials (like wood, iron, dust, etc.). Red iris
flowers will also stack, rare crafting materials, quest items of the same item, monster trophies, etc. Weapons of any sort will not stack, even if they are identical in every single way down to
each and every stat. Neither will salvage kits, ID kits, even if the items are exactly the same (there are some
other things in other campaigns that stack, but I will not go into those here). You can move things around in your inventory by dragging and dropping into
new inventory slots, and most things that you do not want anymore can be dragged out of your inventory and dropped on the floor (only in the field, though,
not in towns). Also, while your currently-equipped weapons will show up in their respective slots above the backpack and bag icons and do not show up in
your slots below the bag icons, the other weapons in your grey circles will show up in your actual inventory slots, so don't think that equipping multiple
weapon sets will save you any inventory space (however, a nice trick to get one free space is if your main weapon is a two-handed weapon. You can "equip" an off-hand item, but it will have a
red circle with a line through it like in the inventory screenshot. It will not give you any bonuses since technically it isn't equipped, but it will be in your off-hand slot and not in your
regular inventory~).
Personal (Hero)
Pressing H will bring up the following menu:
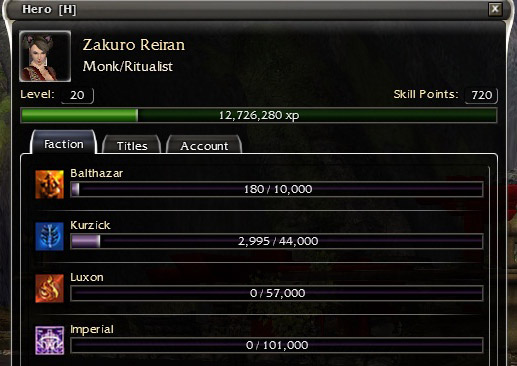
This is your personal menu. (yes, Iana Spiritcaller and Zakuro Reiran are both characters of mine. Yes, they are on two different accounts. And yes, on
one of the previous pages of this guide I did have both of them logged in at the same time. No, you are not supposed to be able to do this, and no, I do
not recommend doing it as it really takes a toll on your CPU usage. I only did it for the purpose of this demonstration, and when I need to trade stuff
between my accounts. Most places will tell you that you must edit your registry in order to be able to do this. This is not quite accurate. There is a
program out there that will run two accounts of GuildWars at the same time, but I must warn you that ArenaNet's official position on running two accounts at
once on the same computer is currently unknown. Their general position on third-party programs (i.e., non-ArenaNet ones) is that it will get you banned,
but most of those programs are used to give a player an unfair advantage over other players, like with obtaining free gold or duplicating items or whatnot.
This particular program does not do this, which is why their official position on it is unknown. We can only assume that it would be the same as their
position on things like
TexMod, which is that they don't condone it, but they don't really care if you
use it, and if it messes up your account or whatnot, they will NOT provide support for you. As Gaile Gray put it on that page: "That's called the 'If it
eats your hard drive and blows up your refrigerator, don't call us' policy." If you
reaaaally want to be able to run two accounts at once
(
*NOTE: By "account" I mean separate logins, not separate characters on the same account. I'm not sure why people keep making this
mistake. The program I will link to momentarily will NOT allow you to play two different characters from the SAME account at the same time), then
download the appropriate file from
this site. You will need to copy your GWs folder to another location on your hard drive
(not move it, COPY it) to be able to run this properly, as when you start up the program it asks you for the two file paths and will not work if you choose
the same one for both. And yes, this program is perfectly safe and will NOT result in your password/account being stolen (at least, not any more than it
usually would, so don't think that just because you have this program, you can start handing out your login/password to all and sundry and that it will
prevent those people from stealing your stuff). Well, at least, I've been using it for more than half a year now and never had a problem yet. Just don't
sue me if something does happen, as I did not put a gun to your head and make you use this program, nor is the program my personal property. Also, every
time there's a new update to the game (or "build," as the ingame message likes to call it), you will need to delete the copied GWs folder and re-copy it.
Yes, this is rather annoying, and no, I'm not quite sure why this happens).
Aaaaanyway. Back to the guide! Do not be fooled by the name of the menu (Hero [H]) and think that this menu is only for if you have heroes (available in the
Nightfall campaign and Eye of the North expansion). This actually has nothing to do with those heroes whatsoever. In this case, it means stuff about your
current character. As you can see, it has a small picture of your character's face, their name, the full name of both their professions (or only one if you
don't have a secondary yet), your current level, how many skill points you currently have, and your current amount of total EXP for that character. Mousing
over your EXP bar in this menu will show you exactly how much EXP (in numbers, not % like when you ping your EXP) you need before you level up/gain a new
skill point. Under your EXP bar are three tabs: Faction, Titles, and Account. This picture currently shows the Faction tab. If you do not have the Factions campaign, the
only bar you should see here is the Balthazar faction bar (unless they've changed it). You can acquire Balthazar faction in any form of PvP (except maybe the mock-PvP battle you may or
may not have taken part in after choosing to leave pre-searing), and you can use these points to unlock things like skills or weapon mods on your account.
Weapon mods unlocked this way can ONLY be used by PvP characters on your account. Skills unlocked in this way, however, can be learned by your character by
using a tome of that profession (tomes can only be acquired in Hard Mode, which I explained on a previous page, or by buying them from players. They come in
regular and elite varieties for each profession. Please note that you can unlock whatever skills you want with Balthazar faction, but can only learn skills
of the professions available to your character, and ONLY of the campaigns you own. So if you do not have, let's say, the Nightfall campaign, and unlock a
NF skill, you CANNOT use a tome or any other means to learn that skill on your character without buying the NF campaign (you can check on the
skills page to see if the skill is a Prophecies skill before unlocking it). Also, you can unlock heroes with
Balthazar faction, but not only will these heroes ONLY be available for your PvP characters to use, but just like skills, if you do not own the campaign they
come from, you will not be able to use them at all. Balthazar faction can be spent at any Priest of Balthazar. As Kurzick and Luxon factions pertain only
to the Factions campaign, I will not go into them here. Also, please note that, while the campaign may be called "Factions," this does not mean that you
must own that campaign to acquire
Balthazar faction (yes, Anet is kinda confusing, I know). And this Imperial faction nonsense is something new that I have no idea what it does or how
you acquire it but it's related to the Factions campaign so... also irrelevant~
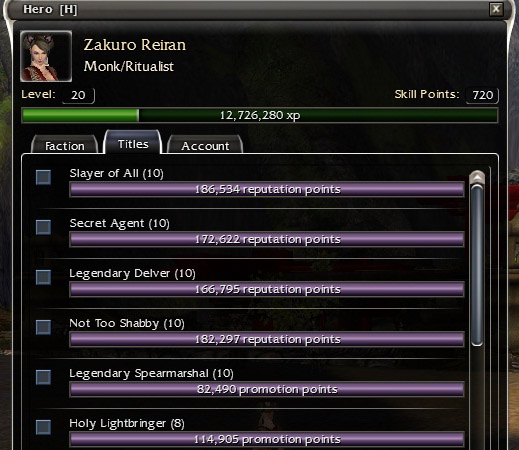
The Titles tab is, obviously enough, for any titles you achieve ingame. Titles available for display have a check box next to them. Even if you cannot
display a title, if the game determines that you are working towards a title track (even if you are not consciously doing so), it will appear here so you
can track its progress. Each campaign has specific titles you can acquire (the Prophecies ones are
here), and some titles may be
account-wide, but most are specific to each individual character (which kinda sucks).
The Account tab basically only lists your ranking and stats for PvP stuff, which has nothing to do with PvE so an explanation of that doesn't belong here. Sorry! :op
Skills/Attributes
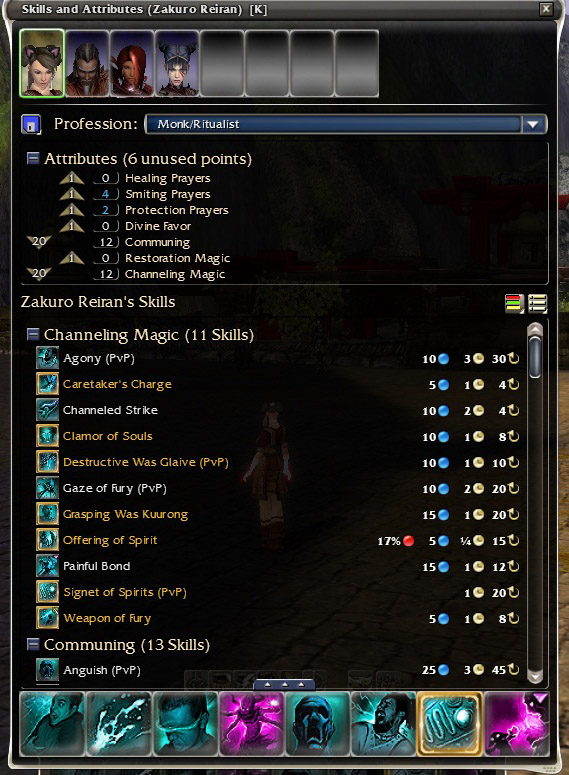
Behold, the K menu (press the K key or left-click your skills). Like your I menu, it has eight squares at the top; the first being your character's face, and the other seven are
meant for heroes (yes, I keep mentioning heroes even though this is a Prophecies guide. Since even Prophecies-only accounts have these squares, I figure
they should be mentioned so you're not left wondering what the heck these grey squares are doing invading your menus. Plus, just because
you don't have any heroes does not mean that
everybody else you encounter won't have them either, so you might as well know something about them). Clicking on one of your heroes' faces will switch the menu to that hero's own skills and
attributes menu, just an fyi. Anyway. Below that, there is the word Profession, with a blue drop-down menu next to it. This shows your current profession combination.
If you have other secondary professions permanently unlocked on that character (doing all of the secondary profession quests in pre-searing do not count for
this), you can use this drop-down menu to select another secondary profession for your character to use. All of the campaigns allow you to change your secondary
"permanently" (in that you can acquire the secondary and it will not go away, unlike what happened in pre-searing, and afterwards you can switch to and from them
at will when in a town or outpost) after a certain point in the storyline. Yes, this means that you can have every single secondary profession in the game unlocked for your character. PvP
characters can do this whenever they want, though. I'll explain about the little blue button to the
left of "Profession" at the end of this section. Under that, it says Attributes, how many unused attribute points you have, and lists your current attribute
ranks. If you are just starting out, you will have 0's in all of the categories. Every time you gain a new level, you get more attribute points for you to
use. There are also two quests in each campaign that allow you to acquire up to thirty extra attribute points, but that will be discussed in the actual
walkthrough. Obviously, upon reaching lv 20, you will no longer gain any more points as there are no more levels to obtain. The max rank you can have in
any attribute is 12, unless you use runes or special headgear (these things will be discussed on a later page. Just know that if an attribute rank is in
blue, like in the screenie, that means that it has been increased by a rune or headgear (or certain spells. Also, some effects will turn them red, which means that your stats have been decreased
temporarily). As mentioned on a previous page, it is adviseable to specialize in (i.e., pour more points into) only two or three
attributes at one time, instead of all of them, to be more effective. You can find out what each attribute does on the
Professions
page, or by mousing-over the attribute's name. You can collapse your attributes list by pressing the - button next to the word "Attributes."
Below this list are the skills you have available for that specific character, usually listed under the attribute they are linked to (some skills aren't linked to an attribute, so they are listed
at the bottom of the list under "No Attribute," but for the most part skills are linked to attributes. More on this later). Again, the - button
next to the headings will allow you to collapse/expand each individual attribute skill list. The name of the skill is listed, along with energy cost (

) or
adrenaline cost (for skills that use adrenaline only, symbolized by a grey fist in front of a red starburst (

, the number varies according
to the adrenaline cost) And no, there is no visible adrenaline bar in the game), casting/activation time (

), and recharge time
(

). Signets do not have an energy cost. Some skills have other little symbols like these, such as skills that cause energy degeneration
(symbolized by

and a negative number in front of it, which states how many pips of energy regen it takes away), and skills that require you to sacrifice HP (symbolized by
a percentage (how much of your max HP will be sacrificed upon using this skill) and a

). A list of skills by profession can be found
on the Skills page,
with descriptions and everything. Or you can mouse-over the skills in your list to see a description (or the ones in your skill bar, too, which is also at the very bottom of
this menu). Any green numbers you may see in the skill's description (in the mouse-over, not on the Skills page) are numbers that vary depending on your
rank in the attribute that skill is linked to (on the Skills page, these numbers are listed as a range from the lowest number (what it would be at rank zero
in that attribute) to the highest number (what it would be at rank 16 in that attribute) you can obtain by using normal means. This is why I recommend only specialising in 2-3 attributes. The
higher your attribute rank, the more powerful your skills become. This K menu is the menu you use if
you wish to change your current skills, or even just rearrange their order. Drag and drop the skills from your bar (the one in this menu, not the UI one)
into anywhere in the skill list to remove them from your skill bar, and drag and drop skills from the skill list into your skill bar to add them. As mentioned in a
previous page, you can only have eight skills (including one elite) in your bar at one time. Another skill restriction is that you can only have up to three PvE-only skills, but there aren't
any of these skills in the Prophecies campaign so~.
Alright, now the infamous blue button next to "Profession," as promised. Clicking this button brings up four options: Load from Template, Save to Template, Manage Templates,
and Template Code. Save to Template allows you to save your current build (skill set) to a predetermined location ON YOUR HARD DRIVE (so yes, if your
computer explodes or something, you will lose your builds. Kinda counterintuitive, since everything else you have/do ingame is saved on Anet's servers
besides your .dat file). Choosing this option brings up a window with all of the information that would be shown if you pinged your build and someone
clicked the link (at the top of the window, anyway), a Template Code button (brings up a window like the one on the previous page of this How to Play guide
that talks about pinging builds, so from there you can ping your saved build, any saved build, in chat as well, as previously mentioned), the file path of where the template will
be saved (i.e., the location of the Templates folder on your hard drive), a list of what builds you already have saved (will be empty if you don't have
any saved yet), and a field at the bottom that allows you to choose a name for your build (this name is what shows up in the list later). If you have
other builds saved already, you can mouse-over them here to preview what skills/attributes/professions they require. The Load from Template option allows
you to, well, load a build onto your current character if you have one saved. Please note that if you do not have the required secondary on that character,
you won't get the full build (or if you don't have all of the skills unlocked on that character), and if you are not the same PRIMARY as in the template
(even if that character has all of the skills unlocked that are required for the build) it will not load either. Yes, makes so much sense, I know. When
you click on one of the builds, a Template Code button appears in the menu which allows you to open another menu like the one I keep talking about that lets
you send the build template to chat. This is useful if you have, say, a good warrior build and someone is asking for one, but you're not currently on your
warrior (please note that trying to send the build to all/public chat will result in a bunch of gibberish and no clickable link, so you will either have to
invite the person to party or pm them with the build). The Manage Templates option allows you to rename or delete builds you have saved. And Template
Code yet again brings up the same menu I've mentioned about fifty times already in this section. ^>__o^;; So yes, moving on...
Quest Log
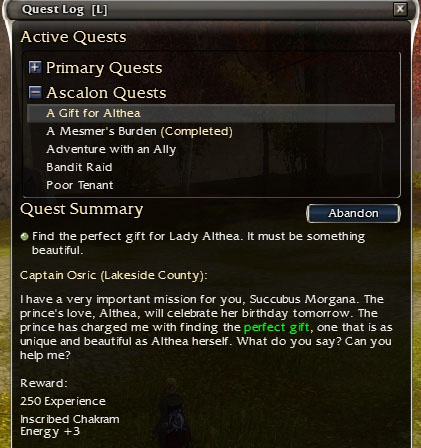
Behold, the wonders of the L menu! This is, as the title of this section states, your Quest Log. Unfortunately, only currently active quests are shown here,
so if you want to keep track of quests you've already completed, I'd suggest investing in some paper and pencils, as GuildWars doesn't keep track of such
things ingame in any visible location that the player can access. The first subheading lists your Primary quests. These are quests that will advance the
storyline, like co-operative missions do (generally, you cannot progress in the game without doing the primaries, and usually the primary quests lead you
to the next mission outpost. Prophecies, however, is a bit special in that the only primary quests you are REQUIRED to do in order to continue on are two
found in pre-searing. After pre-searing, you can pretty much just walk or run to wherever you wish to go and do the missions there (as long as you are
still in the Prophecies campaign). This was changed for future incarnations of GuildWars, however). Anyway. As you can see, our little friendly + button
is back, so obviously the various subheadings in the L menu can be expanded or collapsed at will. Primary quests are not separated into other subheadings,
so you could have primaries from random different places in random different campaigns under this one subheading. All other subheadings have quests under
them that are relevant to that area (so in this menu, "Ascalon Quests" will have quests pertaining to Ascalon under the heading). Clicking on a specific
quest will list a summary of the quest under the list of active quests. In this example, there is one bullet. For longer quests, more may appear as you
complete certain objectives for the quest. Under that is the name of the person who gave you the quest and where he is located, and what the original
quest dialogue was when you accepted the quest. Under that are listed whatever rewards you will get upon completing that particular quest. Different
quests can and will give different things as rewards. These "things" can range from varying amounts of EXP (in this case, 250 EXP, but others can give as
much as 10,000 or more EXP for one quest), varying amounts of gold, items of various values and/or effectiveness, quest items for other quests you may have,
quest items for a new quest, or even spells and/or skills for your character. Clicking on different quests may or may not change the location of the starburst
on your compass map (this is discussed in the main walkthrough, and will also be on a later page of this How to Play guide), but it will change what
information appears under the list of current quests. As you can see in this example, one quest has "(Completed)" next to it. When a quest has that next
to it, that means you do not have to do anything further and can now recieve your quest reward from whoever the quest log tells you you need to speak to. There is also a button in this menu
that says Abandon. This allows you to get rid of the quest you currently have highlighted. Different people will have different reasons for doing this, but just because you
abandon the quest does not mean that you can never acquire it ever again. Just return to the original quest giver to take the quest again. This can come
in handy sometimes when one of your quests affects the enemy spawns in a certain area and either you or one of your party members just doesn't want to deal
with that at that moment for whatever reason.
Friends
No screenshot for you, so I don't have to black out all the people on my list to avoid trolls spamming them. ^>__o^;; Plus, the menu is pretty easy to
explain anyway. Press N to open this menu. At the top will be your character's name. Under that is "Player Status" and a drop-down menu. This allows
you to change your status to Online (default setting), Away (people can still pm you, but they will get a server message that tells them that you might
not reply because you are set to away, which is useful when you have to leave the computer for short amounts of time), Do Not Disturb (you are still seen
in other peoples' lists, but people cannot pm you. This is useful if you are doing a difficult quest or mission that requires concentration, or if you
just do not wish people to pm you. You can still pm others, however), and Offline (you will not appear on any lists (although your character is still
visible in whatever location you are currently in, so people can still see your character in towns and such, and enemies can still attack you in explorable
areas, but no one can pm you. You can still pm others, however, which sometimes leads to frustration on both sides if someone forgets they set themselves to Offline...). This is also the menu
you will want to open if you get disconnected from the game and then are able
to reconnect successfully (I do not mean when the game gives you an error and sends you back to the character selection screen, though), as you will have
to press the Reconnect button in your friends list for people to be able to pm you, otherwise you are automatically set to offline after such a thing happens.
Under that are three subheadings: Friends Online, Friends Offline, and Ignored. Your friends list can hold up to 100 people, plus up to ten in the Ignored list.
Friends that are currently online (or at least set to some status that shows them in lists) will show up in the Friends Online list. Friends that are not
online will show up in the appropriately named Friends Offline list. Putting someone on your Ignored list will prevent them from pming you on any character
they have on that account, and will prevent you from seeing any of their messages in any chat (allchat, tradechat, teamchat, allychat, guildchat, whatever). You can still pm people you've ignored,
though. Both the Friends list and Ignored list has an input field that will allow you to add someone's character name to that list. As with the Ignored list,
putting someone on your Friends list adds all of the characters on that account. If these input fields disappear, then you have reached your limit for that
list (as previously stated, 100 for Friends, and 10 for Ignored) and you will have to remove a name in the list to add another one. There are also two more options if you do certain things,
such as "Recent Trade Partners" for people you've recently traded with, and "Recent Teammates," which shows you a list of people you recently partied up with (as long as you guys actually did
something together, like a mission or PvP battle or ran around in an explorable area. Just joining a party doesn't add this option).
Besides each name in the list is an icon that looks like a person's head. Clicking this icon brings up several options, depending on which list that person
is on. Friends Online will allow you to pm that person ("send a whisper"), delete that person from your list ("remove"), or ignore them (if your Ignored
list isn't full), OR move them to your Friends list if they are in your Ignored list (if your Friends list isn't full). If they are on your Ignored list,
you also get the option to remove that person from all lists.
Guild
If you are not in a guild, pressing G will open the window pictured below.
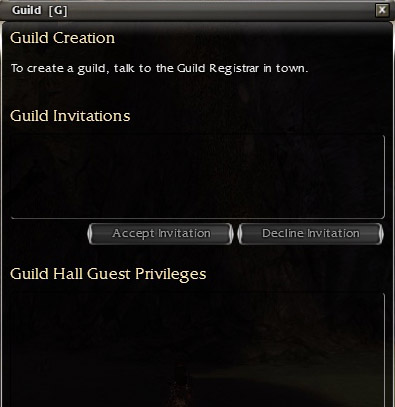
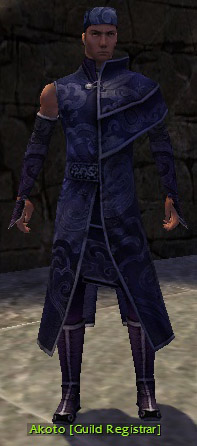
As the menu states, you must speak to a guild registrar before you can create a guild. Guild Registrars are located in the following towns: Ascalon City
(pre and post), Lion's Arch, Shing Jea Monastery (Factions campaign), Kaineng Center (Factions campaign), and Kamadan (Nightfall campaign). They will have
some name or other followed by the [Guild Registrar] tag (like the guy pictured to the right of the G menu screenie above this paragraph), although they won't all be dressed the same way. Just
look for the tag. Creating your
own guild costs 100g. You can also join a guild by having someone else invite you to theirs. This is generally the preferred method for newer players, as
guilds have other costs attached to them (which I'll get to in a minute). If someone invites you to their guild, the name of the inviting guild, the date,
and the name of the person who invited you will be listed in the G menu under "Guild Invitations." Once you are in a guild, your G menu changes, and lots
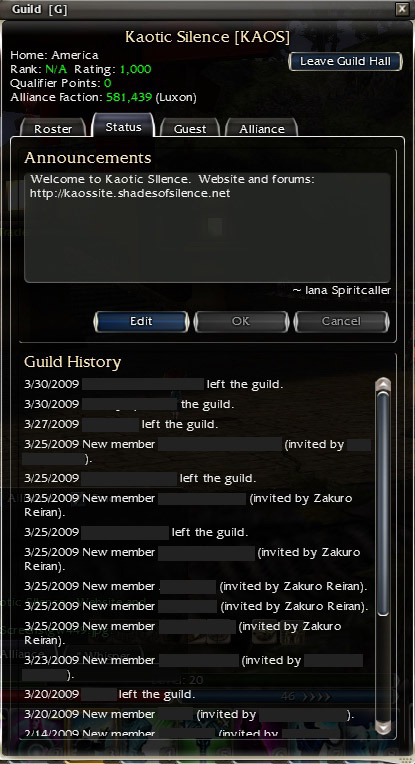
of tabs get added to it, like so:
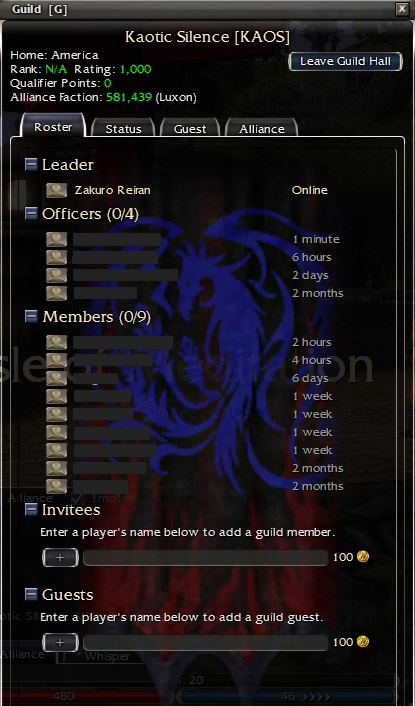
Your guild's name will be at the top of the menu, followed by some information (please note that once one of your characters joins a guild, all of the
characters on that account will also be in that guild, automatically). "Home" seems to be attached to wherever the guild leader consideres "home"
at the moment, ingame server-wise. Rank and Rating have to do with GvG (Guild vs. Guild) matches, and "n/a" and "1,000" are the default scores for those.
Qualifier Points also have to do with PvP, so won't be covered in this guide. Alliance Faction shows your alliance's faction (Kurzick or Luxon) and the
amount of that particular faction your alliance has accumulated. Even if you only have Prophecies, you might end up in a guild or alliance led by someone
who has the Factions campaign, so you still will see this information there if your guild/alliance has joined either the Luxon or Kurzick side in the Factions
campaign. Quick sidenote: an alliance is just a group of guilds (up to ten) that have banded together under the leadership of one guild (I will expand on
this in a minute), and despite the opinion of random players ingame, the Luxons are not better than the Kurzicks, and vice-versa. Both sides are composed
of players ingame, and the sides generally only matter if you're doing the Factions-exclusive PvP, Alliance Battles (abbreviated AB), or in specific parts
of the Factions RP campaign. Also, Kurzick and Luxon faction can only be acquired in the Factions campaign, and this isn't a Factions guide, so I'll just
stop the Factions explanation at that. Moving on! To the right of this info is a button that, when not in the guild hall, allows you to travel to your
guild hall (if your guild has one), or to leave it if you're already in the guild hall (however, you can never travel to your guildhall from pre-searing, even if you're the guild leader). Under
that are a bunch of tabs which I'll get to shortly. Under
those will be your guild member list, including the leader, the officers (if any), and the members (if any). Only the leader and officers can invite new
members into the guild or invite people as guests of the guild. To leave your current guild, you can click on the little dude icon thingy to the left of
your name in this list and choose "Leave My Guild." Please note that if you are the guild leader, you can only "leave" the guild by first kicking all of
your guild members (click on the little dude next to the member's name), then clicking your own little dude icon and disbanding the guild (or you can just designate someone else as guild leader
by clicking on their little dude icon and choosing "Designate [player name] as guild leader" and then leaving the guild the regular way). You will NOT
get back any money you spent on the guild if you do this, and your guild will then disappear forever (unless you remake it later and no one's taken the
name by then, but if you do that you'll be starting the guild from scratch, and you won't get any of your upgrades back).
At the very bottom of this "Roster" tab are the options to invite people as either actual guild members or as guests (again, only if you
are the leader or an officer. If not, the options are either gone or greyed out). It costs 100g per invite (guild or guest), and guest invites expire after
about eight hours. It does not, however, cost anything to promote members. You do not get the money back if someone rejects your invite or leaves your
guild. The maximum number of members any one guild can have is 100. The background of this tab will be your guild's cape, if your guild has one.
The Status tab in the G menu is where you can type in any guild announcements you might have. It also shows you who wrote the latest guild announcement.
Guild announcements show up in the chat log in server-green text every time you login, or every time the message is changed. Under that are buttons to
edit the guild announcement (only the leader or officers can do this), and under that is the guild history, showing the dates of when members joined or
left the guild, or were promoted. This list clears older entries after a certain amount of time or after a certain amount of entries.
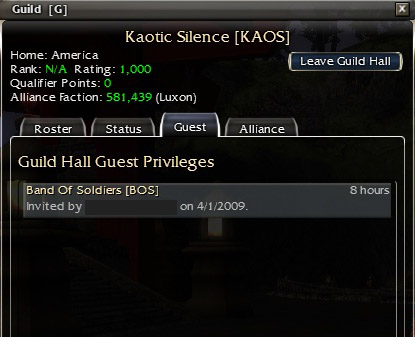
The Guest tab (shown to the right of the Status tab screenie) shows you any guest hall priviledges you have (in other words, if you've been guest invited
to someone else's guildhall, they will show up here, with the name of the inviting guild, who invited you, the date they invited you, and how much longer
your guest invite is valid). To prevent any confusion that might arise from the next screenshot on this page, I just want to mention that guilds in the
same alliance have free passage to all of their guildhalls (providing those guilds have guildhalls) to all members in that alliance (not including guests
outside of the alliance). I mention this now as the next screenshot shows that [BOS] is in my alliance (I just had them guest invite me so I could have a
screenshot of it for this guide).
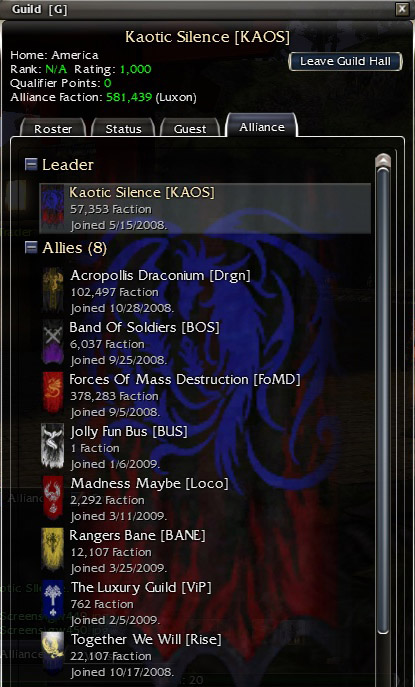

This is the Alliance tab in the G menu. You can only click on this tab if your guild actually has an alliance. At the top of the list will be the guild
that leads the alliance, with their cape, guild name, guild tag, amount of faction (Lux or Kurz), and when they joined (or founded, in the case of the
alliance leader) the alliance. Under that will be the same information for every guild in the alliance, in alphabetical order. At the end of the list
will be the option to invite another guild to the alliance, if you are the leader of the alliance, which costs 1k per guild you invite. As with guild
members, if a guild rejects your alliance invite or later leaves the alliance, you do not get your money back. The maximum number of guilds in one alliance
is ten. Under the alliance member list are buttons to either leave the alliance (if you are the alliance leader, your button will be greyed out as in the
example on the left), or kick a guild out of the alliance (if you are the leader) which only appears if you click on one of the guilds in the list. The
other button allows you to visit one of the other guilds' guildhalls (if they have one) for free if you click on that guild in the list, or leave their
guildhall if you're already there. You can also double-click on the guild name in the list to visit their guildhall. Also, the background of this tab will be the cape belonging to the guild
that leads the alliance.
- Other costs to owning a guild
While you could be quite happy with just paying the 100g to make your guild, there are other costs if you wish to stand out more when recruiting for your
guild (if you choose to do so). Many players in the game can be incredibly demanding about what they want in a guild, which is why there are more options
beyond just creating the guild. As previously stated, each member invite costs 100g. If you choose to make an alliance (which you can only do if you have
the Factions campaign and have reached either the city of Cavalon (for Luxon) or House zu Heltzer (for Kurzick) and paid the allegiance person 500g), each
guild invite you send out costs 1k.
Apart from that, if you want to have a cape for your guild (you can ONLY have a cape if you are in a guild) you must pay someone with the [Guild Emblemer]
tag 2k before you can acquire one. You have to pay an emblemer another 2k each time you decide to change the cape design, as well. Guild emblemers are
located in Ascalon City (post-searing only), Lion's Arch, Shing Jea Monastery (Factions campaign), Kaineng Center (Factions campaign), and Kamadan (Nightfall
campaign). Only the guild leader can create or change the guild cape, although anyone can talk to the emblemer and mess around with designs (you won't get
charged for just messing around with the designs).
Guildhalls
This facet of guilds deserves its own section, since there are many variables to guildhalls. A guildhall technically doesn't cost anything if you do things
a certain way. See, all you really need to get a guildhall is an object called a Celestial Sigil. The only way you can get one of these sigils for free,
however, is by winning in the Hall of Heroes (which is the last map of an elite PvP arena). If you're not big on PvP, or just can't seem to find a group
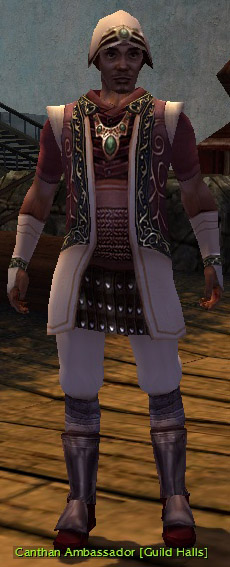
in Heroes' Ascent, you can buy the sigil from others who have won there, or from NPC's called Canthan Ambassadors (pictured left). While the continent of Cantha is in fact
the setting for the Factions campaign, Canthan Ambassadors exist in the other campaigns. Well, technically, to get one from an Ambassador, you have to first
ask him to show you an island (the islands he shows you are what your guild hall will look like if you choose that island, and visiting the islands he
shows is free) then talk to the Sigil Trader on the islands he shows you to buy one. Prices of these will vary often because of the PvP way of acquiring them,
but they generally run about 12-15k each. After acquiring a sigil from your preferred source, give it to the Canthan Ambassador and choose your "island" to
finally acquire your guild hall (only the guild leader can do this).
If you have allied your guild with the Luxons or Kurzicks (even if you haven't invited other guilds into your alliance), then you will automatically get
some NPC's in your guildhall. Two, to be exact. Their names will be different depending on whether you're Luxon or Kurzick, but one will take you to the
current AB arena, and the other will allow you to donate Lux/Kurz faction to your guild/alliance (you can only donate Lux faction if you are in a Lux guild,
and Kurz faction if you are in a Kurz guild) or allow you to choose from other rewards, like Lux/Kurz PvE-only skills (the Lux and Kurz skills are the same,
just with different icons, and they aren't linked to a specific attribute like other skills, so they scale based on your rank in the Lux and Kurz titles)
or scrolls to elite PvE areas or amber (Kurz) or jadite shards (Lux), which are crafting materials for Luxon/Kurzick armour. Donating faction to your guild/alliance allows you to gain points
towards the Lux/Kurz title, but be aware that if, say, you have both unspent Luxon and Kurzick faction earned on your account and then use Luxon faction at one of these NPCs, you will lose an
up to an equal amount of Kurzick faction "for showing allegiance to the opposing faction." Also, please note that you cannot donate faction to any guild you have been guest invited to unless
they are in your alliance, whether that guild you have been guested to is from the same faction or not.
You will always have a Guild Lord in your guildhall who, when spoken to, opens the menu below:
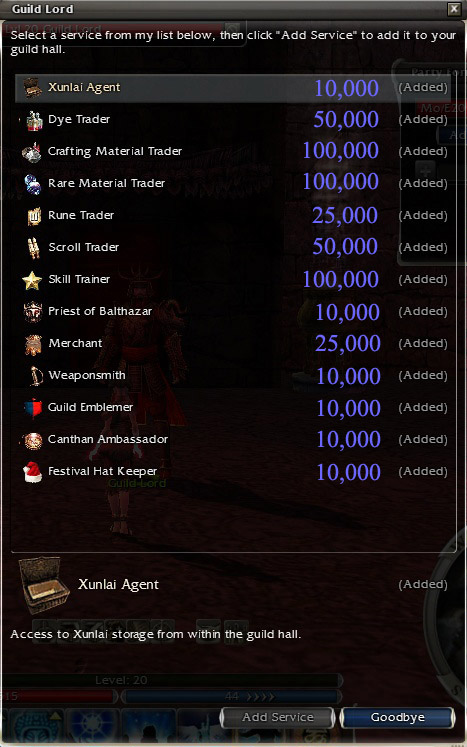
This list allows you to purchase other NPC's for your guildhall. Obviously, if you've not bought any, they won't say (Added) next to them, so I've
added in the prices with Photoshop for you. One thing to keep in mind about the NPC's: while most of them are exactly like their counterparts in towns and
outposts throughout the RP campaigns, the Skill Trainer that you can buy for your guildhall is slightly different. Basically, he only sells core skills
(i.e., skills found in all three campaigns, but not skills that are found in only one campaign) that you've already learned (like say on another character
on that account), and Signets of Capture. Sooooooo... he's generally pretty useless unless you're in desperate need of signets of capture and can't get to
another city that has them. His prices for each skill you buy still go up just like the ones in town, so there's really not much of a benefit to this guy,
especially when looking at how much it costs to buy him... Also, for those of you who know about owning towns in Factions (which I won't explain here cause,
again, this is a PvE guide), no the guildhall merchant isn't a reduced-price merchant like the one you get access to if you own a town. As you can see from
the price list, however, owning a guild with a full guild hall, cape, full members, and full alliance could get pretty expensive! So before acquiring a guild
you should probably decide what kind of guild you want to end up with, and what NPC's you actually want in your guildhall, instead of what some of
your members might make you think you want. Most guilds are quite happy with just a merchant, the Balth priest, and the Xunlai storage NPC. Oh, and since these were added recently, I should
mention that there is now a huge mob of NPCs invading my guildhall. ^=__=^;; These are guildhall-specific henchmen that you can use for GvG, and talking to them will list their skill sets.
Party Search Menu

This is the Party Search menu. You open it by pressing P. The blue drop-down menu allows you to choose a specific category for your announcement, and typing in the "(Enter description)" field
allows you to type your announcement, which will be broadcast across all of the districts of the current town you are in. Typing certain things in the regular chatlog will also send a message
that will be visible in the Party Search menu, such as LFP (Looking for Party), LFG (Looking For Group), WTB (Want to Buy), and WTS (Want to Sell), amoung other things. If you type any of these
things in the chat log, the game automatically adds "(Party Search)" at the end of your message, which indicates it was also posted in the Party Search menu. (and no, typing "WTB" and "WTS" does
not automatically put the message in trade chat so be aware of that and type it in the appropriate chat to avoid being banned for spamming)
The first tab (Players) will show you different messages people have posted, from looking for parties for missions or quests, guild recruitment
messages, people trying to sell things, etc. It shows you their character name (blacked out for privacy), their level and professions, their message, what mode (HM vs NM) they're looking to do
whatever it is in (no, I don't know why some people set their trades to hard mode, that is just silly and eats most of their message), what their party size is, and what district they are in.
So yes, unlike the trade chat or all chat, this menu will show you adverts from all of the districts of the town you are in (but just that one town, not other towns, and not that same town but
a different server). You can click on the different names to highlight a person, and then at the bottom you have buttons for other options, such as pm'ing that person, send a party invite ("Join"),
or close the window. The Join button works a little differently than the regular way to invite people to party (which I discussed on the previous page) in that it works across districts (still
not servers though). If someone in a different district sends you an invite via this method, you'll get a message in the chat log saying that you've received a party invite from that person.
If this happens, open the P menu, find their name, and hit Join to travel to their district (if you want to join them, anyway). If you are the one trying to join them it is probably just easier
to travel to their district yourself and invite yourself the regular way, because in some busy areas people will not be watching the chat log much so you're more likely to be noticed if you use
the regular method. Also, if you press Join and the district is full you won't be able to go there anyway.
The next tab is Heroes. Basically, it lists all of the heroes available to your character and their level and professions, in case you are too lazy to use the drop-down menu. From here you can
add or kick heroes in your party (again, only applies to your own heroes, not the heroes of other people in your party). The last tab is Henchmen, which is just like the Heroes tab, in that it
lists all of the henchmen in town and their levels and professions. This is that other way to add henches to party that I mentioned on the previous page. It is a heck of a lot easier to do it
from here than to run all over town looking for the henchies and then clicking on them and then pressing the + button in the Party menu. So yeah, add or kick henchmen using this tab. Very easy.
Observe Menu
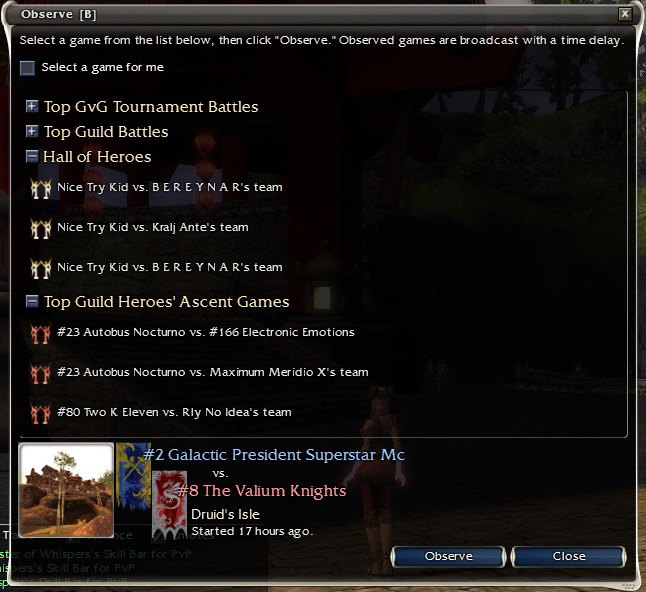
Pressing B in a town or your guildhall will take you to this menu. Basically, it allows you to watch different PvP matches, specifically GvG matches and HA (Heroes' Ascent) matches (Hall of
Heroes is the last map in HA, and I mentioned it earlier when I talked about server messages and FoW on the previous page) when you click on a match and then click the Observe button. If you're
really interested in PvP, a good idea would be to watch a lot of these matches (and I mean for weeeeeeks or moooooonths, srsly) so you can watch what team builds people are running (i.e., what
professions groups are taking), what individual builds the different professions are running (once you click Observe you are then taken to that match and you can then click on the individual
names in the parties to watch that specific person and it also shows when they cast skills, so you can see what builds they're running, for the most part), and basically how it's done. And
since this is a PvE walkthrough, that's basically all I've got to say about that~
Options
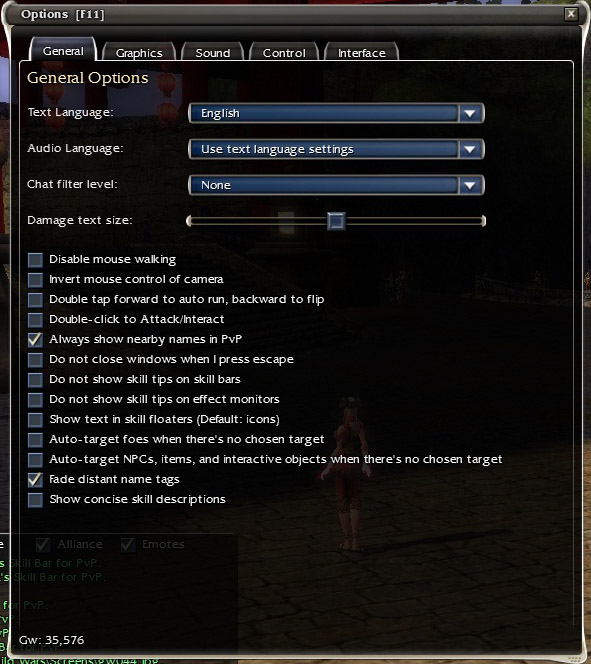
Pressing F11 will take you to the Options menu. The General tab allows you to change general settings, like text display language, audio language (a lot less options here than in the text
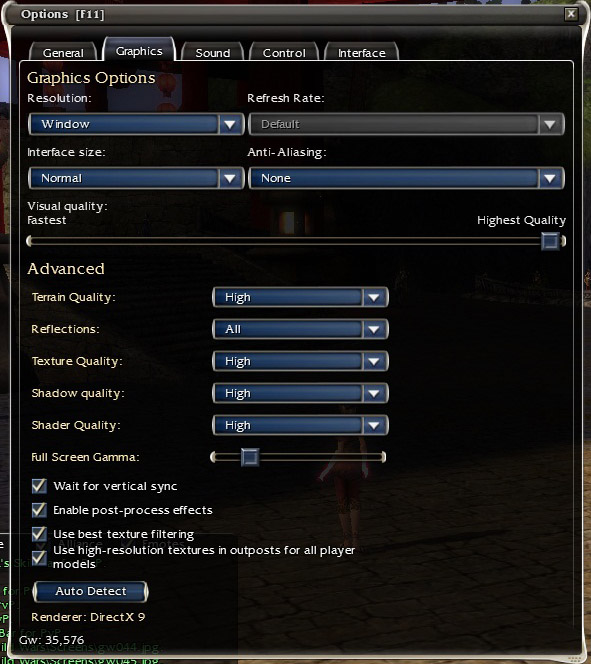
display drop-down), and other things you may or may not want to change. The Graphics tab allows you to tweak your graphics settings, and to change between full screen and windowed mode. You can
change individual settings, such as shadow quality or reflections, and there's also an Auto Detect button that will quickly check your computer's specs and change the settings automatically based
on what it finds. One thing I'd like to note about the Graphics tab: there's an option to "Enable post-process effects." I don't know exactly what this means, but what I do know is that when
you get drunk ingame (i.e., drink the various virtual alcoholic beverages available ingame which contribute to the Drunkard title) the screen does really wonky things, which give some people headaches,
and make it really hard to see where you're going if you're doing missions and the like. If you uncheck this box, the screen does not do the wavy drunk thing, so keep that in mind if you drink
anything ingame (some other ingame things will cause the same sort of effect on the screen so it comes in handy in more places than just getting your virtual character virtually drunk). The
Sound tab lets you increase or decrease the volume of the different effects in GuildWars, such as background music and dialogue, and also allows you to mute GWs when it is in the background.
The Control tab lets you remap keys, in case you want to change any of them (and no, if you prefer the arrow keys for moving instead of WASD, you don't need to remap those. The game already
recognises the arrow keys along with the WASD keys for movement from the get-go, no matter what that stupid tip thingy said in pre-searing). The last tab is the Interface tab, and this is the
thing that I kept talking about on the previous page that lets you move things about in the UI. If you click on this tab, a bunch of lines and squares appear in your UI. These surround the
different elements of your UI and allow you to change the length, width, and location of all of the components of the UI. So if you want to move anything, like the EXP bar for instance
( ^<__<^;; ), you can do that here.
Can we finally play now? (next page)