
Quests: Battle Preparations (Foreign chars), Command Training (Foreign chars), Securing Champion's Dawn (Foreign chars), A Land of Heroes (Foreign chars), The Time is Nigh
Foreign-born (Prophecies and Factions) characters start here. Nightfall characters, skip down to the Kamadan section below. Hi, Prophecies and Factions characters! Nice
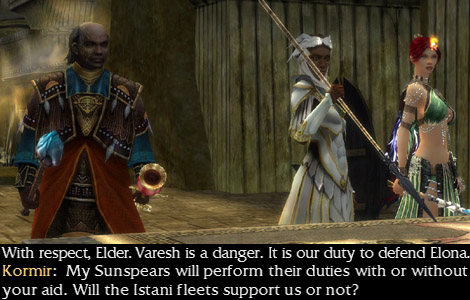
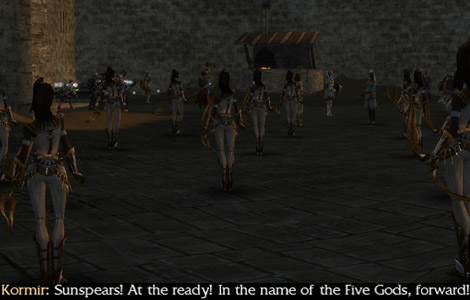
of you to join us. Here's a quick summary on the situation since I'm pretty sure the travel quest didn't really make it that clear: Kormir is the leader (Spearmarshal) of the Sunspears of Istan.
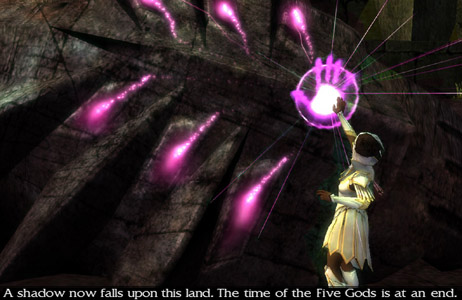
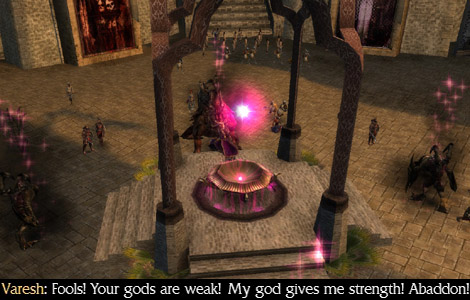
Istan, Kourna, and Vabbi are the three allied states that make up the continent of Elona. Warmarshal Varesh Ossa, the leader of Kourna, has decided to work towards freeing an evil god (Abaddon)
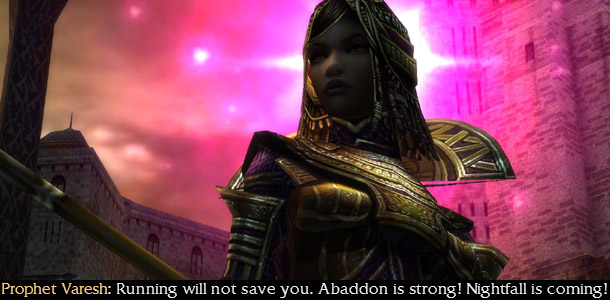
imprisoned by the other gods (Dwayna, Balthazar, etc.). If Abaddon is freed, he will bring about an event called Nightfall, which is basically the end of the world. Varesh's meddling has caused
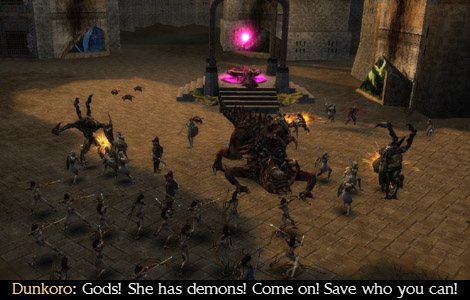
the beginning stages of Nightfall, which includes the unleashing of demons (torment creatures) all over the world, including Tyria and Cantha. You've witnessed this yourself as you fought them
in Lion's Arch/Kaineng Center on the way here. Kormir plans to stop Nightfall by declaring war on Varesh and Kourna, and that's why she's asked you to come to Elona and help her invade the
fortress of Gandara and capture Varesh to make her answer for her crimes.
Alright, so I went over Battle Preparations in the FAQ for the Travel to Other Campaigns question, but I'll go over it again since it's super-quick. After the cutscene, talk
to BOTH NPC's in the area where you load before going through the portal, or you will NOT be able to acquire heroes. Enter Kamadan, make sure you have at least six empty slots in your inventory
(you'll see why soon), then go through the portal to Plains of Jarin. Ignore the Sunspear Scout with an exclamation mark above her head. Find Kormir on your right, talk to her, and she will not only give you your heroes (Koss the warrior, Dunkoro the monk, Melonni
the dervish, and Tahlkora the monk, who will all join your party as lv 15 chars), but upgraded weapons for them (this is why you needed those free slots. Once you return to town you can add your
new heroes to your party and replace their crappy starter weapons with the upgraded ones, and throw the old ones away). Just don't forget to keep going forward while still on the Plains of Jarin
to battle the Zaishen (the other quest you got at the Sun Docks) and get your new quest to get yet another hero (Acolyte Sousuke or Acolyte Jin. Please note that you don't get upgraded weapons
for them, and join your party as lv 13 chars). I'm not telling you which one to choose, but Sousuke is an ele and actually cares about what's going on, whereas Jin is a ranger and a total bitch.
Head NW until you find a town called the Astralarium (but make sure you make a pit stop inside the building you'll pass on your right before that), enter, then go through the portal on the other
side of town into Zehlon Reach. Take a left and you'll soon find your new friend of choice. Just past them are three lv 16 ghostly griffons and a lv 20 Eternal. They are all warriors so they
won't be too much trouble. Once they are dead, return to Hayao at the Sun Docks to make your new friendship permanent. Afterwards, return to Kamadan and talk to First Spear Dehvad (south side
of town), then Second Spear Binah (further south, and make sure you have a full party of heroes, with attack skills on all of them. You won't need heals for this) to enter Churrhir Fields. Go
SE til you reach an open area with some stairs in the middle. Talk to Tactician Haj to get stranded on a pillar you can't get down from. This quest exists only to tell you about the flag system,
which is pretty self-explanatory. If you have more questions about heroes, his other conversation topics will probably answer them. Go ahead and start the quest when you're ready. You get teleported
onto a pillar. If you look around, you'll see a red flag on the field to your right, a blue one to the left of that, and another red one to the left of that. These are areas three, one, and two,
in that order. Haj requires you to "capture" all three areas. Since your heroes are lv 15 this is not going to be a problem. You'll see four little flag icons on your compass. Ignore the left-most
flag (this is the all AI flag) and use the second flag to park your first hero in area 2 (like, right next to the area 2 sign). You use flags by clicking on the corresponding flag button under
your compass, then clicking where you want to place them (you place it on the compass, the minimap, or out in the field anywhere you can see). Now use the third flag to park your second hero in
area one, and the last flag to park your third hero in area 3. At some point, some enemies will spawn but they're lv 2 so who cares. Just leave your heroes where they are til all three bars are
full and all enemies are dead. Haj will now have you return your heroes to area one (where he is), although sometimes he won't actually say it. When your heroes return to Area One, you are released
from your pillar prison, and can go pick up whatever loot the skale dropped. Head back to Dehvad here in the fields to get your quest reward and map to the Sunspear Great Hall (that place I made
you stop in on the way to the Astralarium.
Talk to Castellan Puuba to get your quest reward and a new quest. He tells you that some corsairs have taken advantage of the impending war between Istan and Kourna and are trying to take over
Istan, and that the Kournans might even be helping them. Go out into the Plains from here and go directly SW into the water. Continue SW until you're back on land, then turn west and you'll
see a res shrine just ahead. A group of NPCs is standing just in front of it. Ignore the Sunspear Scout again and talk to Elite Scout Zusoh. He explains to you about the Sunspear Scouts I
keep telling you to ignore. The reason I'm telling you to ignore them is that in this n00b zone they will only give you a bounty once and you're better off saving it for an area we'll actually
spend more than two seconds in. Talk to him about securing Champion's Dawn, then follow the NPCs into town. Quarrymaster Bohana is straight ahead to the south. Talk to her for your reward
and to get your next quest. When you're ready, speak to her again to be moved into a special instanced version of the Cliffs.
As you approach Kormir she tells you to prepare yourself and starts following you. If she dies during this mini-mission you'll have to start over, so be prepared. You'll be making your stand
where the starburst is just west of you (you can see it on your compass) so go there when you are ready. When you get close to the starburst the first group will start moving towards you from
the SW. Be aware that some mobs will come from the NW as well but most will come from SW. Any Kournan Scribes you see are your priority targets because they HURT. Like, seriously hurt. Once
the boss shows up this is the last mob for this location. And thanks a lot, Kormir, for not helping AT ALL. ^=__=^ Lazy bitch. After the boss' mob is dead she informs you that there were
Kournans fighting you alongside the corsairs (oh really Kormir? I hadn't noticed. Especially when that meteor and fireball almost killed me from that Kournan Scribe). Go down the path to the
SW that the corsairs were coming at you from and you'll soon come across three mobs around the starburst. They will break away from eachother though. One mob has a dervish boss, just fyi. Be
careful about going too far south as this will trigger some mobs to run towards you. Also, Kormir is helping now. I guess yelling at her works. Make sure all three mobs are dead and go stand
near the starburst to "capture" the landing site. Kormir explains that all three provinces of Elona were allies but now Varesh wants to conquer it for herself. Continue south to find the next
site. Again, there are three mobs to kill here. Korrrrmirrrr I already explained all of this, and better than you are doing it. Leave the splainz to t3h pr0z kthx. Cut through the water to
the NW to reach the next point. You know the drill by now. Continue west along the coast (there's another boss on the way) til you reach the next landing site, and the quarry. Landing Point
Four only has two mobs. Stay at this landing point until a mob shows up to your north. Take them out, and keep an eye out for more patrolling mobs, as they tend to run around all over the
quarry. Move a bit west and wait for another mob to come near you, then continue further west to the wall. Wait here again for another mob to come towards you. After they're dead, go directly
east from here to a bonfire and wait for another mob to come towards you. This mob probably has a boss in it. Continue east and take out the mob by the wall, then north to the next mob (yes,
the corsair camp should be captured by now, but we're taking advantage of the bounty we have. Trust me, you will need the points later). West is another group, then continue west until you
see a path sloping up to the north. Stop here and wait for a mob to come near you and take them out. Now all that's left to do is kill the boss and his mob. The boss is a monk so unless you
have a lot of power on your side take him out first. Once he and his mob are dead you get 30 seconds to grab your loot before you are transported back to Pumbaa at the Great Hall. Grab your
reward and your next quest, then map back to Kam (the first town you loaded into when you came to Nightfall).

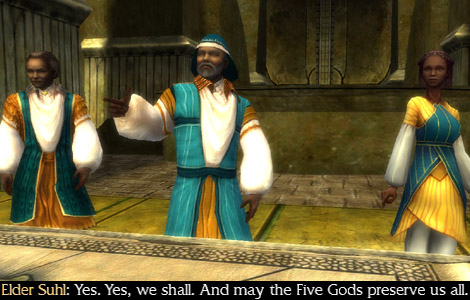
OK! Now that we're all back together again, we can get this show on the road. Foreign chars, you guys should almost be r6 (rank six) Sunspear (check your titles in the H menu), and Nightfall
characters you should be r6 and lv 19 or 20. Go talk to Binah at the south end of town to be let into the Fields, then go SE til you find Kormir and her mob of NPCs. Listen to her "motivational"
speech (I don't know, guys, I think she put all her attribute points into Command instead) then speak to her. She sends you back to Kam to play secretary. The Consulate is the portal to the north
of the Sun Docks, so head in there and speak to Hahnna so she can let you in to see Elder Suhl.


Quests: Chasing Zenmai, All for One and One for Justice, Terror in Tyria, Plague in Cantha, Welcome to Cantha
OK guys, so, here's the deal. There's some extra stuff that you guys can do if you have more than one campaign installed on your account. If you don't have anything other than Nightfall, or you
just don't care and just want to continue Nightfall, skip down to the Consulate Docks section. If you travel to another campaign now, you can still come back at any time to continue
the Nightfall storyline, so if you just want to travel to get the extra heroes I'm about to tell you about and come straight back you can totally do that and you won't break anything or ruin
anything.
If you have the Factions and/or Prophecies campaign installed on your account, Dinja right in front of you has one or two quests for you. If you have
Factions installed, she'll give you the Chasing Zenmai quest, which takes place in the Factions campaign and gets you an assassin hero. If you have Prophecies installed, she'll give you All for
One and One for Justice, which takes place in the Prophecies campaign and gives you access to a necromancer hero. Both of them will join your party as lv 15 chars, which is slightly annoying.
Well, how are we supposed to get to these other campaigns, you might ask. First,
talk to Raidmarshal Mehdara for your quest reward, then return to Kam and go south past Dehvad (yes, you're a signpost now, Dehvad, congratulations), then make a left after you pass him. Cross
the bridge and go down the stairs to find two NPCs. These are the travel quests to Prophecies and Factions, and both have you go back to Cons Docks to talk to Mhenlo, so back we go. When you
talk to him, he'll give you a quick summary of the events of the campaign you're travelling to up until the part in the storyline where you will join in. The FAQ goes into more detail on how
to do the travel quests but here's a quick rundown: Going to Prophecies, just tell Mhenlo you're ready to travel, then speak to Lionguard Neiro about everything he wants to tell you, then go
through the portal once the gate opens and BAM, you're in Prophecies! You should load very close to Firstwatch Sergio, so talk to him for your reward. If you also need to go to Factions, map
back to Kam using the little boat icon on the map then go back to Cons Docks and talk to Mhenlo again. Going to Factions, tell Mhenlo you're ready to travel to Cantha.
After you load, get your quest reward from Dockhand Quangnai just in front of you and grab your next quest. Turn left and head up the stairs, then right and up the stairs, continue forwards, then
left up some more stairs, another left, down some stairs (WELCOME TO FACTIONS, LAND OF INSANE ARCHITECTS) and through the portal. BAM, you're in Factions, congratulations!
Now, time to get these extra heroes. I'm not putting anything else in this section besides that, so any other quests you've picked up in Lion's Arch or Kaineng Center you'll have to go to the
Prophecies walkthrough or
Factions walkthrough for information on those.
Chasing Zenmai was the first in Dinja's
list so we'll do that one first. Talk to Imperial Guardsman Linro right next to where you zoned into Kaineng Center. Head south, left down some stairs, right up some more stairs and through
the portal to get to Bukdek Byway. Look, I know I said I wasn't doing anything with other quests but you might want to talk to Mhenlo and wait for their conversation to finish so they can start
following you. You might want the extra firepower around here. Go SE up the stairs, then take the first right down two ramps, left down another ramp, turn right, then left almost immediately,
up a bunch of ramps, then left up another ramp, then right (look, I wasn't kidding about the insane architects) for a bunch of Am Fah to spawn on you. Kill them, then talk to Zenmai further
ahead. She says she's never heard of you, but asks for your help in defeating her former friends, the Am Fah. Yeah, the dudes that just attacked you. She now joins your party (and you can't
let her die or you'll have to start over). Continue south
past a bridge on your right, continue south down a ramp, turn left, continue til you see a giant bell on your left, turn left and cross the bridge after the bell, try not to aggro both groups
of Am Fah at once, be careful of the ranger traps, then go east. Take a left, then a right, then another right, and continue south. At the dead end go down the steep incline on your right and
go through the portal into the Undercity. Once inside (btw, you've lost your army of NPCs, just so you know), follow the path past the first place you can turn right. Ahead you'll see a group of bloated monsters which, if you plan on playing
Factions, you'll be sick of within the first mission. Hell, you might get sick of them with this first mob. They kinda suck. Your priority targets in any afflicted mob are monks first because
of their painful elite (Ray of Judgement), then ritualists, which are the only ones who can res, then elementalists. Also, they explode in an AoE when they die, which can really hurt if several die at once. After
that group turn right, then right again, then left at the giant hole in the ground. Continue across the bridge then turn right after the tunnel (there's an Am Fah pop right at the end of the
tunnel). Turn right and you'll soon find a group of NPCs. Am Fah will spawn after Lale finishes his speech, so be ready. Also, he's an ele so he hurts. Back up when they start talking, almost
to the tunnel, so that his cronies will come to you when they spawn and you can deal with Lale after his Am Fah buddies are dead. Once Lale dies, some afflicted AND tormented creatures spawn
near the hostage NPCs. No, they don't attack the NPCs but they can hurt so be aware that they spawn. Once they are dead, speak to Zenmai, then map to Kam and talk to Arlon (near the portal to
the Consulate) for Zenny to join your party.
For All for One and One for All, go south from Firstwatch Sergio and over a small hill to reach the beach. On the pier just in front of you is Lionguard Figo, who tells
you Olias has run off after his old White Mantle comrades, hell-bent on justice. You will be sent immediately into an instance. Olias is just ahead of you, although you might want to get rid
of the nearby thorn stalkers first as they are eles and can hurt. Olias doesn't seem very impressed with you. ^<__<^;; Follow the path and soon you'll find some White Mantle guys. Abbots are
their healers, so target them first if you see one. Head up to the giant round area from either side and shut that annoying guy's mouth. He's a necro so he goes down pretty fast. However, he
doesn't die. Instead, some portals open. Seems Captain Douchebag was expecting supernatural help. Instead, some tormented creatures come out of the portal and attack him. Attack the creatures
while they're distracted with Captain Douchebag, and they should all be dead relatively quickly. Olias decides to join you, since apparently even Grenth doesn't know what these creatures are
(although, between you and me, I think he's delusional, like that Irish guy in Braveheart who swore he had a direct line to God). Map back to Kam and talk to Arlon to acquire your newest friend.

Required Hero: Dunkoro, the Drunk Monk
One quick thing before we do this mission: Everybody map to the Sunspear Great Hall, talk to Captain Ahkenchu [Sunspear Signalman], pick "written evidence," and ask for a copy of Night Falls
[Normal Mode]. This book gets filled out as you do Nightfall missions, however the ones up until this point have not counted for the book, which is why I didn't have you get it earlier. From
now on keep this book in your inventory when doing NF missions so you can fill it out. If you hand in a full copy to one of two NPCs later you will get 6k promotion points (SS or LB (Lightbringer
is a title we haven't come across yet but I'll mention it again on the next walkthrough page since that's when it becomes relevant), 60k EXP, and 6k gold. The less pages you have filled in the
smaller those numbers will be, and you can't hand in the book with less than 9 pages filled. Also, if you forget to have the book with you when you do a mission you can talk to Ahkenchu with
the book in your inventory for him to fill it out for you for 100g for each mission you forgot to bring it along for, as long as you talk to Ahkenchu within 30 days of completing that mission,
otherwise you'll have to do the mission again to fill that page in. Anyway, back to the task at hand.
If you guys made a new friend anywhere on this page make sure to give them better skills than the what-the-fuckery builds Anet likes to give them. Remember, you must have Dunkoro in your party
or no war for you. Talk to Raidmarshal Mehdara when you're ready to start. You may notice you have a buff on you called Sunspear Battle Call. This makes sure that even if you're not lv 20
you have the attributes of one (although you can't set them so sometimes they are pretty screwed up). And unfortunately this doesn't apply to heroes.
Get off the boat and turn left and Ahtok shouts something... and promptly falls over. Seeya, Ahtok, I barely knewya.
No really. We've only seen you like twice before. ^<__<^;; Once the first group is dead, pull the second group away from the stairs towards the boat. They're not going to pull very far,
especially if you still have NPCs with you, but don't fight on the stairs. For the next group, make sure everyone gets to the top of the stairs before you attack, as there's seige weaponry raining
down on those stairs. From here you have two paths you can take, but the one you want is left up the stairs. Again, get to the top of the stairs before you attack. Kill this entire mob. Sometimes
one of them will run back through a closed door for whatever reason. If they do this, kill the ones you can get to first then back up so the other one comes back to where you can hit him.
After they're all dead, go back and go down the stairs going NE. In this area, Kournans will rappel down from the walls so keep an eye out. Kournan Scribes are your priority targets, followed
by Kournan Priests. Try to pull as many as you can up the stairs you came down so you have a better view of the enemy pops. Save the boss for last. Once he is dead, the gates at the back open
up. Pull the group ahead of you back into this courtyard to avoid seige fire. Take out the next mobs starting on the left and going clockwise. Leave the boss for last and don't get close to
him cause he hurts. Once they are dead the fire siege weapons stop and some other semi-familiar faces show up. Hi, Nerashi and Captain Crazyface! How've your reef sharks been? Talk to Nerashi
for them to join your party. Oh, I guess Lonai is here too, stealing my corpses. Stop that ^=__=^;; Keep going east as quick as you can cause siege fire everywhAr. Stop right before you get
to this weird machine in the middle of a courtyard so your casters can regen and your minion masters can make "reinforcements," as Kormir puts it. Hit the group on the left first cause they
have a scribe with them.
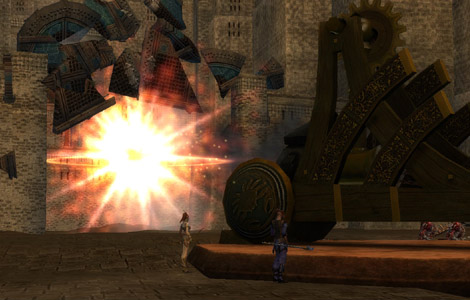
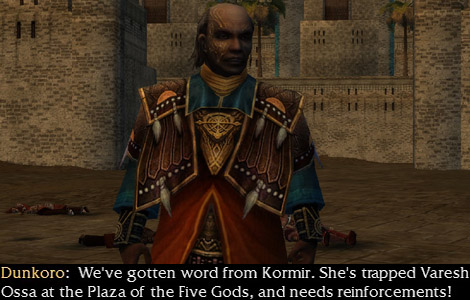
After they're dead, Dunkoro uses the machine to bust down the gates. He says Kormir's trapped Varesh in the Plaza of the Five Gods. After the cutscene, Varesh calls a
retreat for all of her forces to the plaza. Well, we're not done with the bonus yet, so head south. You can't really run past these Elite enemies cause that would be kinda suicidal, so siege
fire for this fight is gonna be inevitable. After they are dead go up the stairs and hit the two enemies up there, then head back to the machine Dunkoro used. Pull the boss mob into the courtyard,
and be careful as he's an ele. After they're dead, Dunkoro says this is a trap, and Kormir says she knows. So... why are we still pushing on? Well, whatever. Do not go up the stairs ahead of you.
Fight them from the bottom of the stairs and if the next group with the war boss aggros, so be it. We can't go up the next set of stairs after these stairs yet because we still need to finish
the bonus and if any of your party goes up those stairs you'll trigger the end of the mission. Run right without aggroing any of the other mob, take out the last field marshal group (don't banzai
to the top this time, cause it's pretty deadly up here, I just found that out the hard way), then go back for the other mobs once they are dead.

On the Run
Corsair Infestation
Those Bird-Things Aren't the Only Harpies Around Here
It's Getting Kinda Crowded In Here
And Then the Men Go Marching Out Into the Fray...