Key: Elementalist information, Mesmer information, Necromancer information,
Monk information, Ranger information, Warrior information.
For an explanation on how to play the game, including creating an account/character, click on
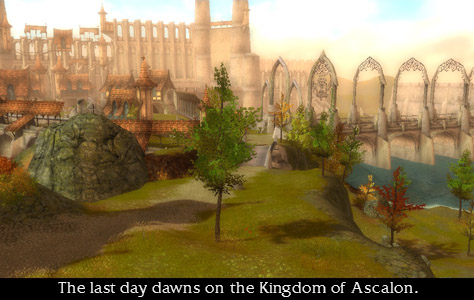
this link. Now, watch the intro...
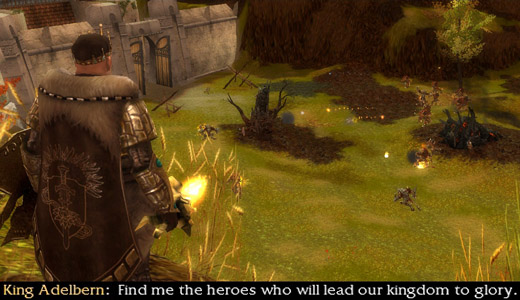
silly silly king, we all known Ascalon's about to be destroyed. The narrator lady just said so! Once that's over and done with, you find yourself in
Ascalon City. OK, here's the deal: Like I said, there are lots of professions to choose from, so obviously writing a walkthrough is gonna be difficult.
But, of course, there are things that any and every one of you can do, despite your class. Rather than make a zillion links, each class is going to have a
specific colour (see the Key above this paragraph), and sections relating to them will be in their corresponding colour. But the stuff for everyone will
be in this same white font, to make things easier. OK? OK. And if you're colourblind, well... I really don't know what to do about that. Anyway. Lemme
just link to
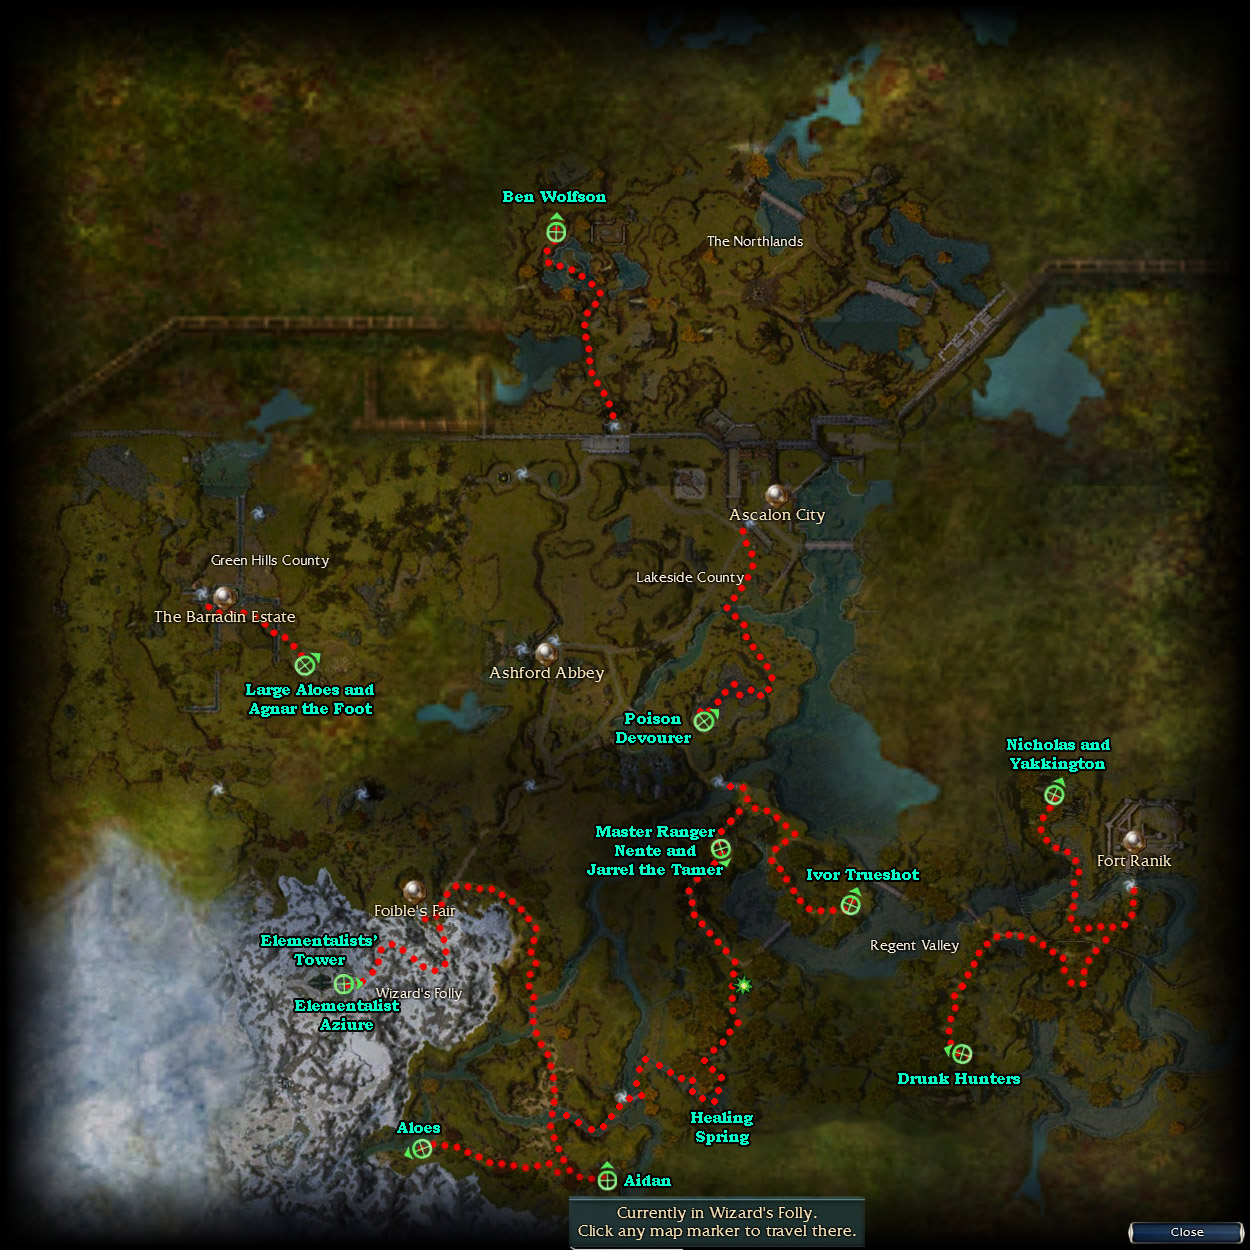
this map now, as this seems like a decent place to put it. It's got most of the major points of interest of this part
of the game on it. Now, onwards and upwards! (and possibly sideways and backwards along a diagonal axis ^O__o^;; )

Quests: Message From a Friend, War Preparations, Bandit Raid, Poor Tenant
Extra Services: Guild Registrar
The first thing you should see is a stretch of road and, about halfway down it, a Town Cryer with a green exclamation mark over his head.
*Tip: Green exclamation marks are your frieeeeeends.... they signify a person who will either give you a quest or will give you
information concerning a quest in your list. Go up to him and he'll tell you that Sir Tydus is looking for you. As I did write an incredibly long and
detailed "How To Play" section (linked in the previous paragraph and at the top of this and every page in this walkthrough), I'll just operate under the
assumption that either all of you know the basics already, or have read the section already. Just a few quick notes, however: 1)
There is no storage/bank/vault in this area of the game called "pre-searing," 2) "Pre-searing" is kind of a stand-alone area
of the game, which serves as a tutorial. As such, it is cut off from the rest of the "real" game, and you will get to that part of the game at the end of
this page. Once you do that (i.e., enter the Ascalon Academy) you can never come back to this part of the game, unless you make a new character. The "real"
part of the game is called "post-searing," and the reason why would be spoiler-iffic, so I'll let you find that out yourself. 3)
There are no armour merchants in this part of the game; the only way to upgrade your armour is by finding collectors who will trade you armour for various
objects you find in your travels. "Post-searing" has armour vendors, and the armour upgrades in this part of the game are rubbish, but if you're interested
in upgrading, each section of this walkthrough that introduces a new explorable area of the game will list what collectors (and quests and new skills) are
in that area, and what the collectors are asking for/will trade you. Anyway, moving on! To the green starburst! (he's across the bridge in front of you)
Once there, choose Accept to get 100 EXP. He now gives you new orders, and tells you that he'll have a trainer (doesn't matter which class you are) waiting
outside the city gates. Well, first things first. Behind him (sort of) is a bridge of sorts. Cross that (you are now on the second level of Ascalon City,
for future reference), hang a left, and go towards the second set of steps leading down (they're at the other end of this area). Go down them, then go
right twice to find Namar, who's just another dude with an exclamation mark over his head. He may be a Krytan (old-time enemy of Ascalonians), but his
stupid rent quest gives you a whopping 500 EXP. w00t! Alright, turn completely around to see the main gate to enter Lakeside County. Directly behind that
are the main stairs of Ascalon City. Go up to the third level and talk to Baron Egan up there for another quest in which you have to recover a stolen chest
in Ashford County. Next to the Baron you'll find an NPC simply named Guild Registrar. You can talk to him to create a guild of your own if you do not
wish to join someone else's guild. More information on guilds can be found on the third page of the How to Play section of this walkthrough (linked at the
top of this and every other GuildWars Walkthrough page). Now, turn around again and head out the main gates.

Quests: Necromancer's Test (necro), Elementalist Test (ele), Ranger Test (ranger), Mesmer Test
(mesmer), Warrior Test (warrior), Monk Test (monk), Gwen's Flute, Adventure With an Ally, Further Adventures, A Mesmer's Burden (mesmer), A Gift For Althea,
Across the Wall, The Rogue's Replacement
Skills: Vampiric Gaze (necro), Deathly Swarm (necro), Aura of Restoration (ele), Flare (ele), Power Shot (ranger), Troll Unguent (ranger),
Empathy (mesmer), Ether Feast (mesmer), Frenzy (warrior), Healing Signet (warrior), Healing Breeze (monk), Banish (monk), Imagined Burden (mesmer)
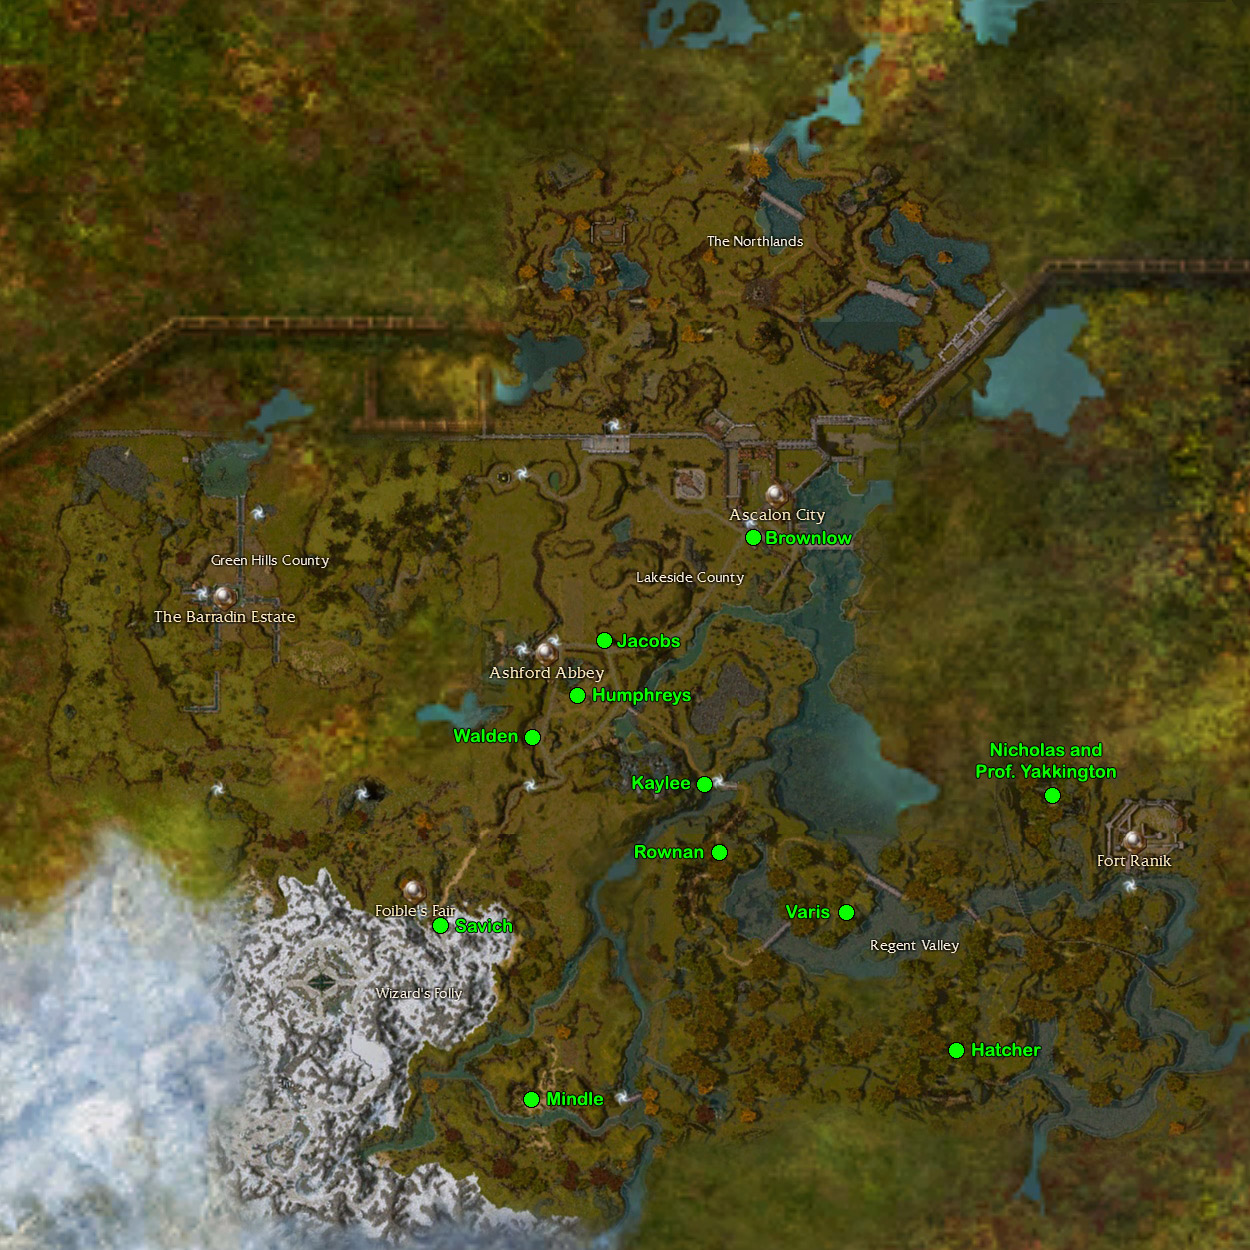
Collectors:
Brownlow: 5 skale fins for: belt pouch/devourer egg
Jacobs: 3 baked husks for: accursed icon (energy +3)/flame artifact (energy +3)/healing ankh (energy +3)
Humphreys: 5 worn belts for: belt pouch/inscribed staff (3-5 energy +3)/battle axe (5-10)/holy rod (3-5)/crimson carapace shield (armour 4)/fire wand (3-5)
Walden: 3 unnatural seeds for: bone staff (3-5 energy +3)/truncheon (3-5)/earth scroll (energy +3)/water staff (3-5 energy +3)/battle axe (5-10)/
ascalon longbow (7-10)
Kaylee: 3 grawl necklaces for: jeweled chalice (energy +3)/idol (energy +3)/earth scroll (energy +3)/divine symbol (energy +3)
Immediately, you'll notice two people with exclamation marks. One's your trainer, and the other one's Gwen (
*Note: Gwen has
been moved to the right behind the thingy emanating light (I'll explain what this shiney place thingy is in a minute)). I've not changed this because if
I don't mention her, you wouldn't know she was there. Anyway. Gwen is an annoying kid sometimes, with an equally-annoying and convoluted "quest" that doesn't
get you any EXP, but she's a healer, so... really it's up to you on whatCHA wanna do with this kid. It also nets you a particular item, but this item can
only be used in the
GuildWars: Eye of the North expansion, so... yeah. It's really your choice. I'll be mentioning what to do
for all of her quest(s), so ignore them if you don't care. The first part of her quest starts now: Talk to her and say that you'll get her flute back, and
she'll start randomly following you around (if you like solo-ing, you can benefit from her healing arts. She'll randomly heal you for 20 HP, but don't count
on her to always heal you, cause she doesn't). (
*Note: If you're a monk, you cannot do the flute quest, but your first quest
(which I'll get to in a minute) will count as a replacement for the flute quest if you want to do Gwen's series of "quests")
Talk to your trainer, who'll have you do something before they'll give you any skills. Van is the warrior trainer. He wants you to
kill off all of the scales on the river. The elementalist trainer is Howland, who wants you to obtain a Shimmering Scale by killing
skales until they drop one. Sebedoh, the mesmer trainer, wants you to drive the skales off of the road.
Verata is the necromancer trainer. He wants you to kill a skale so he can make a bone horror out of its corpse.
Ciglo the Monk wants you to go rescue Gwen. You have to kill off the skales before she will follow you.
Artemis will have you kill the River Skale Queen. Skales skales skales... seriously! What do these people have against skales??
Before that, though, go left from the gate to see the large shining monument of sorts I mentioned earlier (pictured
right). This is the res(urrection) shrine. There are several like it scattered all over the world, and this is where you appear when you die (depending on
where you die, you will end up at a different shrine), unless you're partied up with somebody, in which case your corpse gets left where it fell all by its
lonesome until your party member either resurrects you or abandons you by leaving the party (bad party member, no cookie!). I will refer to the resurrection
shrines as res pt's from here on out, cause I'm a lazy sod. Talk to the dude to the left of it (Brownlow the Collector) to see that he wants Skale fins in
exchange for a belt pouch (you
WILL need this, trust me! You get a
lot of crap in this game, and frankly the space you start out with
just isn't enough, and there's no storage/bank/vault in this area of the game). Also, there are many of these NPC collectors strewn about the game world,
and each one tends to have different things for trade. Each section will list the collectors at the beginning (if that area has any or if they've not
been mentioned before), and the word "Collector" will be a link to a map that shows where they all are. The only exception is for collectors inside towns
or in the Catacombs (the Catacombs has a separate map).
Well, time to hunt skales for that belt pouch! (which is conveniently what all of you have to do for your first primary profession quest). Go south up the
road to find a bunch of skales. When you attack one, the others'll probably run off instead of attacking you. When the other skales run
off, your first mesmer quest is completed. Once you kill one, Verata will create a bone horror from it, so don't be alarmed
when the thing you just killed rises from the dead; it won't attack you. You might get a weapon from fighting these things instead of getting their
fins. As soon as you get a better weapon than your stupid starting-level one, destroy the one you have (drag it into the trash can icon in your inventory,
as starter weapons have a value of 0 and no merchant will buy them) and equip the new one by double-clicking it in your inventory.
The Scale Queen is near where the mob of skales ran off to. If you're an elementalist, just kill as many skales as you need
to until one drops the Shimmering Scale. If you're a monk or warrior, you'll have
to kill off all of the skales in this short stretch of river. Monks, Gwen will be near where the mob of skales ran off to.
Gwen's flute is slightly north on the opposite bank of the river (hold down the left Alt key to see it). Bring it back to her, and she'll ask if she can
follow you. Say yes if you want her to follow you around (she won't heal you ever otherwise). She will pretty much follow you everywhere
after you do this, except into towns, the Catacombs, or the Northlands. Whenever you enter a town via a portal, and then leave the town through the same portal, she'll be
waiting right outside it. If you enter the Catacombs, she'll be waiting for you outside of whatever portal you leave the Catacombs from (even if it's in a
completely different area than where you entered). However, if you enter Ascalon City via any method (portal or mapping), she tends to not
be waiting for you outside again. If this happens, she'll be waiting around the res pt right outside Ascalon City. Just talk to her again to get her to
follow you some more (provided you don't have any Red Iris Flowers in your inventory. You'll see why soon enough). If you tell her to "wait here" at any
point in time and then zone somewhere, you'll have to find her by the aforementioned res pt if you want her following you again later.
Once you finish your first profession's quest, Haversdan will come strolling out of the city gates, with a green exclamation mark over his head. Go talk to
him for a quest (Further Adventures). Talk to him again for the location of a new trainer. Near the res pt is Lina the Healer, who now has an exclamation
mark over her head (only if you've reached lv 2). She wants you to bring an ally to her and she'll give you a resurrection signet (very useful later in
the game; it allows you to revive a dead party member), so come back later with somebody from town and you'll get it. If you want to finish Gwen's "quests,"
don't bother with this quest until after you've finished Gwen's stuff. Also, if you want to do Gwen's stuff, don't party with anyone at all ever until you're
done with her, otherwise you could mess it up. (*Note: What I usually do is kill things for EXP until lv 5
or higher, then start doing quests, so I can get to a higher level than I would if I just did the quests right away)

Before killing some more skales for your belt pouch, go left of Haversdan and talk to the newly-appeared Captain Osric for another quest. Speaking of
Althea... go west along the city wall and up the hill to find her... with an exclamation mark over her head. Well well, it's time for one of my notorious
"cheating" tricks. See... she's a Mesmer trainer... yet if you accept her quest now (before claiming a second profession), you can get some Mesmer spells
to use until then, for free. So... talk to her and accept! And no, you don't have to be a Mesmer to do so (
If you're a mesmer, Althea
is your next trainer anyway, and she only gives you two more spells instead of three)! I don't, however, suggest actually completing this quest
at the moment, since the bull she's talking about is level five. I'm only having you take the quest because the skills she gives you are really helpful.
Wait until you're lv 3-4 or so before attempting to complete this quest.
Mesmers and
Elementalists
can kill this thing at lv. 2 if they play their cards right. Use a wand and hit the thing from afar.
Mesmers should cast Conjure
Phantasm right away, then toss Empathy at it when it gets close enough to start hitting you. From there, alternate Conjure Phantasm and Ether Feast (to
heal yourself) until the thing dies. Elementalists should cast Aura of Restoration right away, then alternate Conjure Phantasm and
Flare until the bull is dead. You gain more EXP for killing things that are at or above your current level.
After killing the bull, Old Mac appears near the main gate. Wait for him to amble up to Althea and finish yelling at her, then talk to him to find out that
the bull protected his farms, and he's pretty pissed off that you killed it. But! He'll call it even if you find him a Devourer Egg, so there's another
quest right there (Brownlow, the belt pouch collector dude, will give you a Devourer Egg for five skale fins, but you can get two eggs for free in a minute).
I don't suggest returning to Althea for your reward unless you're either a mesmer or want to take mesmer as your second profession (you can do all of the
secondary profession quests for more EXP without committing to a second profession right away). If you don't want to be a mesmer, then either wait until
after you get your second profession to talk to her for your EXP, or accept the reward but then click on the "I need more time to decide" (or whatever it
says for that option now) to avoid netting a secondary prof before you're good and ready. I really recommend first-time players to do all the secondary
prof quests for other reasons besides the EXP, as they give you a taste of what the other professions are like, and thus will allow you to make a better
decision about that later on.
Continue northwest (just so you know, most things in Lakeside County won't attack you unless you attack them first, providing
they're under lv 2) along the city walls until you happen upon Gate Guard Torin, who's... by the gate (down below) (by the way, pick up any Red Iris Flowers
you see. They're worth a decent amount (5g may not seem like a lot, but when most weapons you get are only worth about 1-3g each... well, you get the
picture. You'll also need a few later for Gwen's "quests")). Accept his quest... but you need another party member to be able to do this. Go kill some
more skales now that you have some shiny new spells. Once you've either gotten your belt pouch or are sick of skales, re-enter the city.
Quests: Trouble in the Woods, The Wayward Wizard, The Poison Devourer, Charr at the Gate, A Second Profession
Now that you are (or should be) at least lv 2, there are more quests available. Return to Baron Egan to get the Poison Devourer quest. Back on the second
level of Ascalon City go west and talk to Sandre Elek for the Wayward Wizard quest. Continue west past the second set of stairs down to find some stairs
going up. Talk to Prince Rurik for the Charr at the Gate quest. Return to the main gate and talk to a town cryer for the Trouble in the Woods quest, then
go left from him to find a merchant. If you're doing Gwen's stuff, buy a flute from him for 4g. Now, leave the city. Give the flute to Gwen (this finally
allows her to start healing you), then talk to her twice (i.e., "wait here" and then "follow me." Why? Cause for some reason she'll stop following you after
you give her the flute if you don't do this), then follow Prince Rurik west, but keep behind the monk and the guard that are with him (who seem to be rather
apprehensive about the whole thing, judging from how slowly they're going). By the time you get there, most of the Charr should be at least half-dead.
Conjure Phantasm and Ether Feast (and Vampiric Gaze, if you're playing a necromancer) are your spells of choice here, but
make sure you at least physically hit all of the Charr there, even if you just hit them with a wand once. This is because you won't get any EXP for any
Charr that you didn't attack yourself, and these guys give a lot of EXP (especially if you're alone). After they're all dead, talk to Rurik again for your
reward. Now that that's over with, we can get Gwen's stuff also over with (finally!). There are two ways to finish her stuff. The first way is to spend
200g at a merchant to buy a Small Girl's Cape, give that to her, then give her one or more Red Iris Flowers (until she gives you the Tapestry Shred). The
other, less expensive way is to forget about the cape and just give her around five (very rarely 6-7) Red Iris Flowers, at which point you'll still get the
Tapestry Shred. And... that's all you need to do for that! It's just slightly annoying. And now you can party up with other people without worrying about
messing anything up! (if you party with someone who's done more of Gwen's stuff than you have, at any point in time, then you won't be able to get the
Tapestry Shred, hence my earlier warning) Return to Sir Tydus and talk to Armin Saberlin (who's just right of Tydus) about a second profession (if you accepted
Althea's offer to take mesmer as your second profession you can get your reward right away). Leave the city.

Quests: None
Collectors: None
Here's the information for the Over the Wall quest, although you really should be around lv 4-5 or more for this. Return to the area where Torin was. One
of your party members needs to stand here in front of the gate and be ready to run inside as soon as it opens. The other party member needs to turn east,
go up the hill, turn west, then run towards the lever up here on top of the wall and click on it. The gate will now open. The party member at the gate
needs to RUN inside before the gate closes. They close faster than one can run from the lever to the gate, which is why you need two people to even enter
the Northlands. Once inside, go north up the path a tad and kill off the Oakhearts (this is another reason why you need another party member, since everything
north of the wall is lv 5+, except the grawl and aloe seeds). Go north a bit more, then go left as soon as there's a break in the wall. Cross the lake and
go north some more, and Ben will be at the top of the hill near a tree, observing the too-close-for-comfort Charr... Suicidal-much, Ben?? Lead the twit back
to the gate, then LEAVE and get your EXP from Torin (believe me, you don't want to go exploring in this area, unless both you and your party member are at
level 12 or so, because the Charr in this area, despite being only lv 6-9, hit HARD. Plus, their shamans have healing spells... soo... yah. ^x__x^
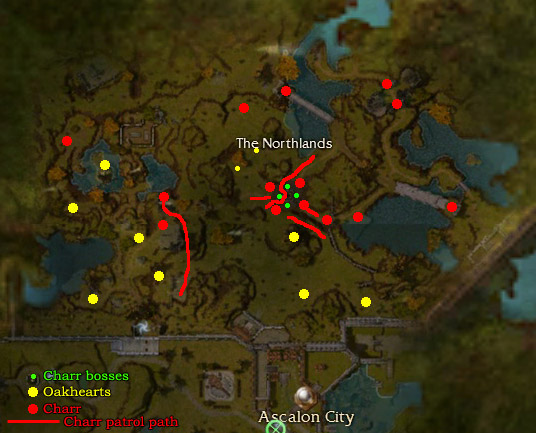
There are, however, more Oakheart in the area, so if you
really want to explore/level up, check out
this map. The
yellow circles are Oakhearts, the red ones are Charr mobs, and the red lines are Charr patrol paths. The small bright green dots are where the bosses are.
Yes, I am aware that some people do go Charr-hunting in pre-searing. Most of these people, however, are out to acquire a certain
ingame title, which can only be achieved by reaching max level (lv 20) in pre-searing, and this is a guide for regular players,
not crazy LDoA players. :op The other reason why some people go Charr-hunting is to acquire certain items that they can sell at pretty high prices (well,
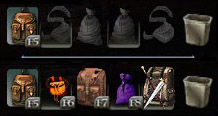
for pre-searing they are high prices, anyway). Charr bosses have a chance of dropping two special items (besides sometimes dropping "armour" pieces
(salvage items) that may contain runes), but only if you're lucky. These items are the green-rarity Charr Bag (pictured right, and can be used to expand
your inventory by ten slots each), and the gold-rarity Charr Salvage Kit, which can function as a regular salvage kit, but only has five uses. BUT they can
also salvage runes from Charr salvage items, and this is the only way to acquire runes in pre-searing (unless you buy runes from other people who have done
this). The item "rarity" that I just mentioned (i.e., the meaning of the different-coloured text some items have) signify rarity. However, that doesn't
always mean that something that has coloured text is more
expensive than something of a lesser colour. Anet really made this "rarity" system confusing...
From least rare to most rare, the ranking goes: white, blue, purple, gold, and lastly, green (which are also called "unique," even if there are lots of them
floating around. This is so because these things have a special name (like "Kanaxai's Axe" or "The Purifier" instead of something like "fire wand" or "tower
shield"), and are usually dropped by bosses). As I just said, the colour ranking doesn't always mean it will net you more money if sold than an item of a
lesser colour (which is why I said Anet made this system confusing). I have seen gold items that get sold for a lot more money than some green ones, so do
your research before buying/selling! Check the
Links section for some price check forums, amoung other informative sites. Anyway.
Next section!
Quests: Unsettling Rumours, The Hunter's Horn, Little Thom's Big Cloak, The Worm Problem, rounding up the pigs (no quest name)
Go south up the road and keep following it until you reach the top of a hill and a bunch of dudes on your right. This is Ashford County. By the way, the
guys are a guard, a merchant (sell stuff you don't need! Also, I'd recommend investing in a salvage kit and break down anything you don't need from now on,
as you'll definately need the raw materials later, TRUST ME), and a collector. Continue west down the road and enter the building there to reach
Ashford Abbey. You now have another dot on your map. Map tele(port)-ing, or just "mapping," makes travel a hell of a lot easier, as you don't have to deal
with all of the random enemies. Just press M, then double-click on the dot you want to get to, and *POOF,* you're there! Go back outside for now.
I'd suggest busting up all of the worms in the field north of here if you need the EXP, since they're easy prey and drop a lot of decent stuff. Also, you
can trade the baked husks to the aforementioned collector for semi-decent things. Back near the Abbey, go south along the fence then turn left at the field
and go directly southeast. Go right of the circular pen there and continue southeast until you find Devona. Talk to her about the Charr threat, Unsettling
Rumours, then about Trouble in the Woods, in that order. As soon as you mention Trouble in the Woods, she runs off. Follow her north across the
bridge and kill off the Grawl (ignore the Charr and the Spirit of the Woods, as they're not important for this quest, and the Charr runs off through a portal
anyway). If you die, just map back to the Abbey to reset Devona's location, then speak to her again (you can get your EXP now without having to do anything,
but what's the fun in dying? Then again, sometimes this doesn't work for whatever reason. And sometimes she dies) If you die and she tries to go after the
grawl (which usually happens a lot if you're a warrior), after you res go directly east, into the water, onto the island, then run across the large branch
there leading up (to circumvent the grawl), then go south towards where the Charr is. Now, defeat the grawl!. Healing skills are a must for this battle.
Warriors will probably want some help (i.e., another party member) for this one, since their healing signet thingy sucks, and Ether Feast just isn't enough
(at least, not at lv 2). Also, kill off the Grawl Shaman first, as they heal the others, often resulting in the infamous neverending battle. Speak to
Devona afterwards for your reward.
East of Devona is Miller Upton, Namar's friend. Talk to him, then pick up the massive honeycomb behind you. You have to carry it across the bridge to where
you fought the grawl in the previous quest. Make sure that there are three little dot-shadows following you or else this won't work (one group is by the
water near the Beautiful Shell). Anet has since made this quest a lot easier by marking the swarms of bees as small bright green triangles on your radar.
When you get the Quest Updated message in the bottom left-hand corner of your screen, drop the honeycomb and return to Upton for your reward. Find the
Beautiful Shell again and click it to get the Beautiful Pearl. West of Devona is a guy named Pitney, who also wants a Devourer Egg (yes, you can get one
from Brownlow, but think of the items!). Go up the road west from Pitney and find Chantalle the Troubadour to get another quest. Directly north of Upton
is Alison the Tanner, who gives you yet another quest. Fun fact: In the very beginning of GuildWars, Alison the Tanner was
still named Alison, but was actually a male NPC... Go around right behind Alison and up the hill to get the Beautiful Feather. Find Farmer Dirk in the
middle of this area. He'll be the one yelling about his pigs. If he's not standing at the entrance to the pigpen, then you can get this quest, which has
no name and will not be listed in your quest log. Click on a pig to start chasing it. Tip: Get on the opposite side of
them to make them go the other way. Once you get four or five pigs back into the pen, Farmer Dirk will now have a green exclamation mark over his head.
Talk to him to receive 25g. (Note: You can repeat this quest whenever Farmer Dirk is not standing in the entrance to the pigpen.
Apparently his pigs get loose rather often) Return to the Abbey, speak to Meerak the Scribe about the Charr threat, then map back to Ascalon.
Quests: Opposition to the King, Tithe for Ashford Abbey
Exit through the gates and speak to Osric again about Althea's present, then give him the pearl and then the feather. ... ohhhh, so he doesn't like em, eh?
^>__<^!! *kicks him, sighs* Fiiiiiiine, we'll find something else... Don't forget to talk to Haversdan to find out the location of a new trainer (yes, I
mentioned this before, but most of the time he doesn't give this quest til around this time, for whatever reason). Back inside, speak to Armin to give him
Meerak's message. Talk to Rurik again for the Charr in the Catacombs quest (he only gives this to you after you complete the Trouble in the Woods quest),
then go back outside. Time to find that stupid present that Rurik's too lazy to find himself. Oh, and before anybody emails me about it, I am aware that
you can talk to Althea about this quest right after Osric gives it to you, and complete the quest without this rubbish treasure hunt, but Anet has added,
removed, and re-added the option to have Althea complete the quest sooooooo many times that it's really annoying to have to revise this walkthrough every
damn time they change their minds. ^-__-^ Anyway! The present! Go directly west, around the rocks in your way, then go south up this hill here (where the
bandits are). Follow the path til you find a chest, open it, then grab the Beautiful Pendant and return to Osric to finally be done with this bloody quest.
Return to Ashford Abbey and go talk to Devona again for two more quests, then return to where Gate Guard Torin is. Go west as far as you can (past Torin)
and keep following the path to get to Green Hills County. (Torin says: What am I, a signpost? Stop using me as a landmark! -_-)

Quests: Grawl Invasion (war), The Egg Hunter, The Prize Moa Bird
Skills: Sever Artery (warrior), Gash (warrior)
Collectors: None
Warriors, speak to Warmaster Grast to get some EXP (he's your next trainer), then again to get a quest from him and some shiney new
sword skills. This quest is also the "tester" quest for people who want to test out warrior as their secondary prof.
Kill off the three Grawl Intruders on the road to finish this really easy quest. Necromancers, your third trainer is also
here, but ignore her for now. Monks, your third trainer is here as well, but ignore him too. We'll be back later for
those. Talk to Farrah Cappo, Protector Grazden, and Kasha Blackblood for Opposition to the King, and to Grazden again for Tithe for Ashford Abbey. Return
to Devona for your reward.
Now, from where you got the Beautiful Pearl (by the way, you can collect all the items again to sell them to people who are too lazy to get them themselves
(Rurik is setting a really bad example) or don't know where all the items are) go north, up the tree trunk, right down the road, then hang a left into the
grass right before the bridge/portal. Go north here until you see two people standing outside of a cave. Talk to Duke Gaban, then go kill stuff inside.
Kill everything inside while leading Fadden to Devourer Eggs (no, he won't die) and you'll eventually also complete the Poison Devourer quest. Sometimes
when leading Fadden you have to go over to the other side of the eggs from where he is in order to get him to actually pick them up. Once Fadden has
collected three eggs, go outside and Duke Gaban will reward you with two (I'm not entirely sure giving away 2/3 of his product for free is the best business
model ever, but hey, his loss is your gain). One egg goes to Pitney, and the other to Old Mac (remember him?). OK, go to Pitney, then follow him to the
fields northeast of the abbey. Kill off the Worm Queen when she shows up (she pops up about two seconds after Pitney kneels, right in front of him, and is
only slightly larger than the other wurms in the field), then get your reward. Talk to him again to get another quest. Now we're going to finish off a
quest we got about 1,000 years ago (only slight exaggeration). From these fields, go east to find a bandit camp, but don't go in yet! Hold down Alt and
click on the Ashford Strongbox. Now, run in from the right, dodge the bandits, pick up the box you've locked onto, dodge some more bandits going left, then
run in a circle back to where you first clicked on the box then... RUN TO DEVONA! RUN LIKE HELL!! AAAAAAAHHHHHH!! They stop chasing you after awhile though,
and running around like a chicken on fire is a lot easier (and safer) than fighting them off, especially if you're of a profession with low defense (i.e.,
casters). If you're around lv 5 or higher, however, these guys aren't really that difficult... anyway. Return the box to Devona to get your reward. Return
to that bridge we took a left in front of earlier, and cross it to go through the portal into Regent Valley.

Quests: The Ranger's Companion (ranger), A Test of Marksmanship (ranger), Unnatural Growths (ranger), A Monk's Mission (monk), The
Blessings of Balthazar (monk)
Skills: Charm Animal (ranger), Comfort Animal (ranger), Point Blank Shot (ranger), Read the Wind (ranger), Ignite Arrows (ranger),
Dual Shot (ranger), Orison of Healing (monk), Retribution (monk), Symbol of Wrath (monk)
Collectors:
Rownan: 3 dull carapaces for: devourer egg/grim cesta (energy +3)/storm artifact (energy +3)/smiting staff (3-5 energy +3)/earth wand (3-5)/ascalon hornbow (7-10)
Hatcher: 5 unnatural seeds for: Krytan robes
Varis: 3 spider legs for: Krytan leggings
Nicholas Sandford: item required changes daily, traded for one Gift of the Huntsman
Professor Yakkington 50 red iris flowers for: small equipment pack (adds five inventory slots)/Krytan Helm (war)/Simple Mask (ranger)/Dragon Scalp Design
(mo)/Ragged Scar Pattern (necro)/Discreet Mask (mes)/Third Eye (ele)
Follow the path til you see some people on your left. Master Ranger Nente is the second ranger trainer (and whom you should talk
to if you want to take ranger as your second profession). He also gives the "tester" quest, if you're just trying out the different professions, like the
one Althea gave. Nente wants you to tame a Melandru's Stalker (fancy name for "big cat"). Keep following
the path til you get to an open area in which you'll find a couple of these big cats. Click on one to target it (don't attack it!), then cast Charm Animal.
It'll start attacking you, but after the skill finishes casting the cat is now yer buddy and will follow you everywhere. There are other animals you can
charm here in pre-searing, so if you don't want the cat just talk to Jamal the Tamer who is near Nente, and he'll take the pet from you (choose "Are you
interested in my pet?" or something similar). The other animals you can charm here in pre-searing are a warthog (found in the Northlands and near where
the rogue bull was), a wolf (found in the fields near the Abbey and in Wizard's Folly), or a Strider (near where you got the Beautiful Feather, and near the
Barradin Estate). I personally like wolves, but the Stalkers join you at level five and the wolves (and every other pet) join at lv 2, so it's really up to
you. Just remember to get your reward from Nente before giving your stalker to Jamal, if you want a non-stalker pet. The only downside about not keeping a
stalker as a pet is that there is a similar quest given by Nente a short time from now that requires you to have a stalker as a pet. You DO NOT need
to finish that later quest to continue on in the game, though. You'll just miss out on a rather small amount of EXP and a skill, which you can always buy
later anyway. Type /namepet NAMEOFPETHERE to rename your pet if you wish. Return to Nente for your reward.
Now, return to where you got the stupid cat. Go directly south from there til you hit the wall, then go right, then left into a clearing. Look to your
right and hold down Alt to see the Healing Spring. (You can use
this map if you're having trouble finding it) Click on it and go there
to purify the Hunter's Horn. Now, the easiest (well, "quickest" would be a more appropriate term, depending on your level) way to Aidan is going to the
right through the mess of skales. Good luck! When you get out of the valley-type thingy, hang a left and go through the portal. Go immediately left and
follow the river until you reach the village, then go left, hug the wall, and take another left. After a bunch of spiders, you'll find Aidan.
Rangers, this is your secret trainer, and as such will give you some new skills and a quest. Not all professions will
have a secret trainer, but if you have one, I'll get to it eventually. :op Anyway.
Do a 180 and head straight to the river (not the one that passes through the village, check this map if you're
lost, you're looking for aloes). The aloes will be down the river on your left. You only need one Aloe Root (even though they will all drop one) for the
quest. Make sure to use the new skill Aidan gave you (Ignite Arrows), as plants are weak vs fire. Once you've got your root, return to Aidan for your
reward.
Return to the Abbey, give the Poisonous Stinger to Brother Mhenlo, then talk to him about the Charr in the Catacombs.
You should also
talk to him if you're a monk or if you want to take monk as your second profession. And also if you want to try out the monk profession before picking a
secondary. If you do, he gives you a quest to do. Back in Regent Valley,
use the
presearing map to find Ivor Trueshot if you're a ranger, as he's your second trainer (Aidan doesn't count, as he's your secret
one). Once you accept the quest, quickly press "Equip Later" to each of the new skills he gives you, and don't even bother reading his quest accept dialogue,
as the timer starts right as soon as you accept the quest. Now, quickly, kill off the five wurms! Gah, I hate timed things! The Ignite Arrows skill you got
from Aidan helps a lot. Afterwards, get your reward. Also, check the same map to find the drunken hunters in the forest. Kill everything around them
except DO NOT GO NEAR BEARS, then talk to Bruse. Turn around and face where the bears are (southeast of the drunkards) and wait for them to finish talking.
A timer now appears near the top of your screen. Now, go kill a bear! Once it's dead (only kill one, although there are two here), return to Bruse, who'll
give you free ale. After a couple of minutes, you can repeat this, as there is another bear in that same area. You'll get another ale for it. Now you can
either get drunk with them or sell the ale in Ascalon for about 100g (prices may vary). This quest is repeatable, just rezone if you run out of bears. It's
a rather easy way to make some money in pre.
I'd like to note one more thing in this section. If you've really looked at that map I keep linking to, you'll notice two names near the Fort Ranik map dot
(which are also mentioned in the Collectors list in this section). These two collectors are rather recent additions to pre-searing. Nicholas will trade
you a Gift of the Huntsman for five trophies (trophies being the things that each member of a species will drop, like skales dropping skale fins, and wurms
dropping baked husks). The trophy he asks for changes daily, but you can trade up to 25 trophies per account (not character) each day. Double-clicking the
Gift will give you something random from the following list: five bottle rockets, five hunter's ales, five aged hunter's ales, five champagne poppers, five
honeycombs, five jars of honey, or five sparklers. Using any of these items contributes towards
an ingame title, and thus will
sell for decent prices if you don't wish to use them yourself. Professor Yakkington, however, has entirely different things to trade. Before he came into
existance, there was no way to upgrade one's headgear in pre-searing. Now, you can give him 50 red iris flowers in exchange for upgraded headgear. He will
also trade you a "small equipment pack" for the 50 flowers, which will expand your inventory by five spaces (even beyond the backpack + belt pouch + two
Charr bags).
Return to the Abbey, then enter the other portal in here to reach the Catacombs.

Quests: The Necromancer's Novice (necro), Rites of Remembrance, The Accursed Path (necro), The
Vineyard Problem (war), Warrior's Challenge (war), The True King, The Orchard
Skills: Animate Bone Horror (necro), Life Siphon (necro), Deathly Swarm (necro, only if you're necro secondary), Faintheartedness
(necro), Soul Barbs (necro),
Executioner's Strike (war), Cyclone Axe (war), Hammer Bash (war), Frenzy (war)
Collectors:
Gwynn: 3 skeletal limbs for: cane (3-5)/frost artifact (energy +3)/holy staff (3-5 energy +3)/war hammer (8-10)
Kathleen 5 gargoyle skulls for: Krytan boots
Varis (Fort Ranik version): 3 spider legs for: Krytan leggings
Hatcher (Fort Ranik version) 5 unnatural seeds for: Krytan robes
Ignore Necromancer Munne for now.
Follow Paulus (try to keep up, eh?) and heal him and yourself with Orison of Healing while he runs
through the poisonous areas. Let him do all the dirty work of dispatching the enemies, as one of his spells can one-shot any of the undead lurking about.
If you've got a pet with you, don't bother healing it too often, as Paulus is vital to this quest and your pet isn't. When you see some stairs going up to
a wall, run up them before Paulus does, and HEAL! Now, get ready for another mad dash back. When he goes back into the Abbey, talk to Munne about
the Charr in the Catacombs. She sends you off to Oberan the Reviled. *sigh* Talk to her about Rites of Remembrance, too.
Also, talk
to her if you're a necromancer or want to take necro as your second profession, as she'll give you the Necromancer's Novice quest. This is also the "tester"
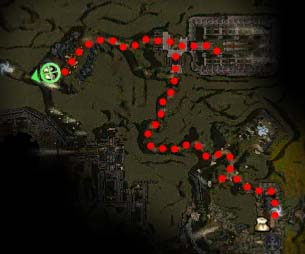
quest for people trying out necromancer as their secondary. Follow Munne as she runs off (why does everyone in here assume we can't keep up with
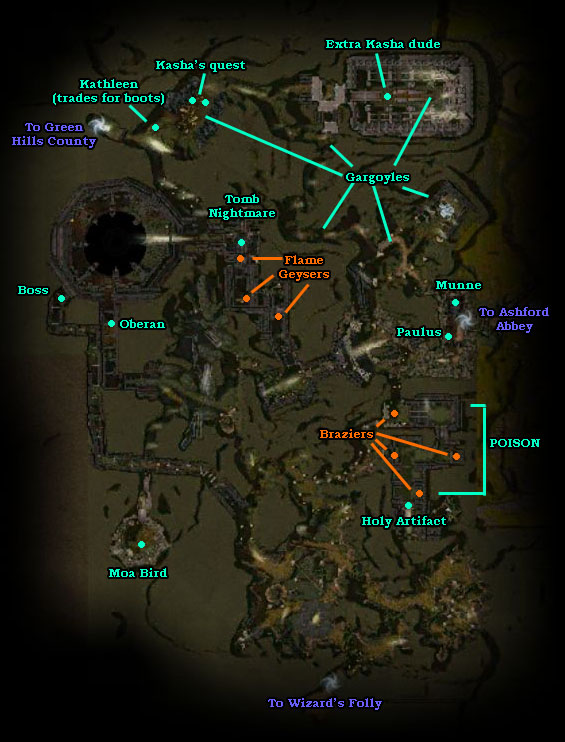
them??). Use this map I made to find your way to the Tomb Nightmare. (yes, I know my map sucks, but it amuses people and more
importantly, amuses me. Now that Anet's finally made it so the minimap works inside the catacombs, here's an arguably-better version
if you want to use that instead) On this path, a short way after Munne stops running, you'll see a devourer. Stop and watch him. He runs into a flame
geyser and dies. There are more of these, so be careful. The map I made shows approximate locations for the geysers. Use the left Alt key if you don't
trust my map-making skillz. :op To do this quest, as you go, keep casting Animate Bone Horror until you run out of bodies. Some of the bone horrors will
inevitably trip the geysers so you don't have to die to get past them. If you're not a warrior primary (they have very little base max energy), by the time
you get to the last geyser you should have a small army of bone horrors following in your wake. Use the spell again to trip the last geyser, then attack
the Tomb Nightmare. He should be pretty easy to kill, especially with your undead army. Return to Munne for your reward.
Use either of the maps linked in the green section before this sentence to find the braziers for Rites of Remembrance, since the starbursts love to lead you on random routes
for this one instead of to the nearest one. Whenyer done, return to Munne to get your reward(s). Now, follow the path labeled Oberan to get to Oberan the
Reviled. Talk to him about Charr in the Catacombs to finally get some answers. He also gives you a Charr tooth (Charr with gingivitis? ^O__o^;; )
Necros, this is your secret trainer. Kill all the Crypt Fiends (five) that pop up along this corridor, then return to Oberan for your
reward. Now, turn around and head back the way you came. You should see a path going off to the right that you didn't see on your way in (labeled
"Moa Bird" on my crappy paper map). Follow it into the round room labeled "Bird," kill off the Crypt Fiends (yes, more. They spawn if you go into the
middle of the room), then map back to the Abbey. By the way, save your spider legs, as you can trade them in for armour later. Also, small side-note: on
the non-paper map, I've labelled a "Boss." The only thing special about this guy is he's the only boss (shiney-type dude) you'll find in pre-searing without
going into the Northlands (unless you count the lone Charr you see running away during the Trouble in the Woods quest. But since you don't get to kill him
since he runs away as soon as you aggro the grawl, I don't count him). As a boss, he'll give you a morale boost if you kill him, but otherwise he's pretty
unremarkable.
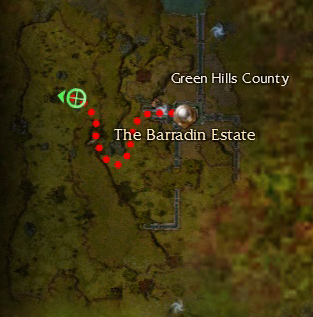
See Mhenlo for your reward for helping Paulus, then see Pitney for your EXP. Back in the Catacombs (last time, I swear! I can
stand this place about as much as you can, believe me) follow the path marked Gargoyles to reach a portal into Green Hills County (no, the gargoyles won't
attack you, unless you're foolish enough to venture near the Shatter Gargoyles), then veer left towards the building there and enter it to reach the
Barradin Estate (use the
pre-searing map if you can't seem to find the Estate).
Warriors, your third and secret
fourth trainers are both here. Talk to Duke Barradin to acquire the True King quest. (
*Note: You can only get this
quest if you have already accepted a secondary profession. Doing the tester quests without making a permanent decision doesn't count)
Leave town and follow your starburst from Little Thom's quest to get to the large aloe seeds, kill them all (Cyclone Axe is rather helpful
for that), then go a bit further in that direction to find Agnar the Foot, whom you have to kill as well. Return to your trainers for your EXP.
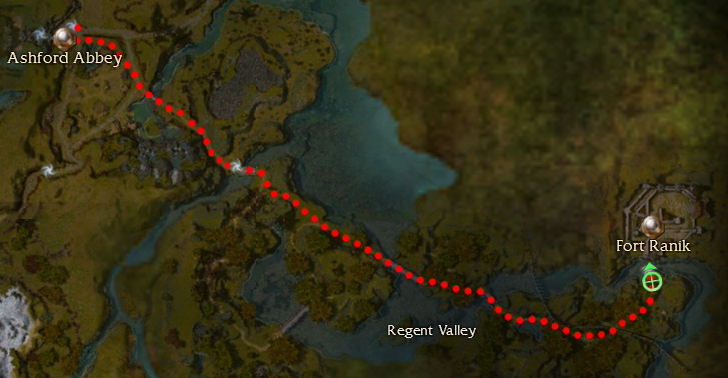
Map back to Ascalon and show Rurik the Charr tooth to get EXP and 100g. Woo! Back at the entrance to Regent Valley, take a left (while your back is to the
portal) up the hill then go forwards and right down the hill towards the path. Follow the path to the end to reach Fort Ranik (you might want to have a
buddy along for this cause you get attacked a lot, unless you have minions). You can also use
this map to get there. Find
Lord Darrin and give him Barradin's message. You can also get two pieces of upgraded armour here (you can use the spider legs I told you to save to get one
of them. You can obtain unnatural seeds outside of the Barradin Estate, from Aloe Seeds and Aloe Husks. They are located
here,
with some more on the way to that location). Leave again and talk to the lady right outside (Mary Malone) who gives you a quest to go find her basket of
apples. Follow the arrow to get to the apples. And yes, you have to fight more spiders. After looking for Oberan, you'd think you'd be rid of them by
now... Press F1 to drop the basket when the spiders come out so you can attack, unless you prefer to use spells. Return to Miss Malone for your reward.
Back in Ashford County, go down the road in front of the Abbey (right coming out of the Abbey) and follow the road south as far as you can go, then take a
right up the hill and go through the portal.

Quests: The Supremacy of Air (ele), Domination Magic (mesmer), The Elementalist Experiment (ele)
Skills: Blinding Flash (ele), Lightning Javelin (ele), Backfire (mesmer), Shatter Delusions (mesmer), Glyph of Lesser Energy (ele),
Fire Storm (ele)
Collectors:
Savich: 3 icy lodestones for: Krytan gloves
Mindle: 3 enchanted lodestones for: cane (3-5)/grim cesta (energy +3)/Krytan gloves (ele)/war hammer (8-10)/Ascalon longbow (7-10)
Follow the path southwest until you reach the snow, then hang a sharp right to get into Foible's Fair. Talk to Ralena Stormbringer about the Wayward Wizard
quest we got like half a century ago (Elementalists, she is your third trainer so you'll have to come back here later, as she won't train
you until you've talked to Aziure. We'll go see her in a minute). Vassar, the guy next to her, is the third mesmer trainer.
Leave and follow your arrow to find Orion, and kill the bears you find along the way. One should eventually drop a bear pelt for your Little Thom's Big
Cloak quest. If not, just kill more bears. ^<__<^;; Destroy the River Skale Brood to complete Vassar's quest (it's on the opposite
side of the road from where Orion is). Cast Backfire on it as soon as you spot it (use the left Ctrl key to bring up nearby enemy names) and it should end
up killing itself from casting Ice Spear over and over again. Just remember to use Ether Feast or some other spell to heal yourself, as Ice Spear hits you
pretty hard. Oh, by the by, if you've gotten extra bear pelts you can sell them to lazy people. ^~__~^ Return to Foible's Fair, and grab your EXP
from Vassar (who calls you an ignorant mesmer ^>__<^ Slightly odd that he also disses Elementalists, since he's dating Ralena... Perhaps insults are
his version of compliments?). Leave the Fair and enter the snowy area right in front of you.
The collector near the res pt will trade you upgraded gloves for some icy lodestones.
Find the Elementalists' Tower on
the map to reach the second elementalist trainer. She wants you to get rid of some (well, more like TONS) of ice elementals for her.
This is also the "tester" ele quest, for those who are sampling secondaries before making a permanent decision. Fortunately, the elementals are all really
low level. Wait for them to bunch up around you, then use Fire Storm (which Aziure's just given to you) to make short work of them. Get your EXP, then
talk to Ralena in the Fair. Back into the snowy wastelands for you! Find the Tower Golem near the, well, tower, and beat the crap out of it (the air spells
Ralena gave you work very well, especially Lightning Javelin). Speak to Aziure again for your EXP. Return to Alison the Tanner and give her the
bear pelt you should've gotten while hunting down Orion, then map over to the Barradin Estate and give Little Thom his cloak.
Quests: The Power of Blood (necro), Protection Prayers (monk), The Path to Glory
Skills: Blood Renewal (necro), Vampiric Touch (necro), Reversal of Fortune (monk), Shielding Hands (monk)
Talk to Kasha Blackblood if you're a necro (if she's being attacked by grawl, haul ass over to her and help her, otherwise she'll die
and you'll have to rezone...) and Grazden if you're a monk. If you're the latter, he wants you to protect Farrah Cappo, so go
talk to her... Meet her outside and cast Retribution on her, then just follow her, letting her do all of the killing. Cast Orison of Healing and Shielding
Hands (reduces damage received) on her as needed. Once she kills off the bandit leader dude, return to Grazden for your reward.
For Kasha's quest, head to the Barradin Estate and use the back entrance into the Catacombs (this is REALLY the last time I send you in
here, I swear!! Look, we're almost at the end of the page! If you weren't a necro, you'd be done with this place by now...). Kasha's former students are
pretty much only a few steps in front of you (gogo shortcuts!). Follow them deeper into the catas if they run from you, then rain down unholy justice upon
their heads. Return to Kasha for your EXP.
Map to Ascalon and talk to Sandre Elek for your reward for finding crazy Orion, then talk to Armin to get your second profession quest EXP (you need to have
chosen a permanent secondary profession to get your EXP. Actually, you need to have your permanent secondary to continue on in the game past this point, so
if you've not chosen one, go do so now. Remember, Althea (near Ascalon) for mesmer, Warmaster Grast (in Green
Hills County) for warrior, Brother Mhenlo (in Ashford Abbey) for monk, Necromancer Munne (in the
Catacombs) for necromancer, Master Ranger Nente (in Regent Valley) for ranger, and Elementalist Aziure
(at the Elementalists' Tower) for elementalist. Now, talk to Tydus (I recommend being around lv 6-8 for this) to enter the Ascalon Academy and leave
pre-searing.
Do the arena battle to get your first taste of PvP (Player vs Player). Doesn't matter if you win or lose (I just won 11-1, go me and my team of henchmen
:op And I don't even like PvP...). (*Note: If there are not enough people leaving pre-searing at the same time as you are,
you will not get to do the arena battle. Sorry! Also, if you're going for the Survivor title and you end up in the PvP battle, immediately exit the game to
avoid dying (PvP deaths count towards your total number of /deaths)) Afterwards, listen to Rurik the windbag talk for a very long time, then follow the path
and annihilate the grawl and the lone Charr boss, Vatlaaw Doomtooth. After that, watch the movie. Oh, uh... hrm...

Everything Went [BOOM]

