

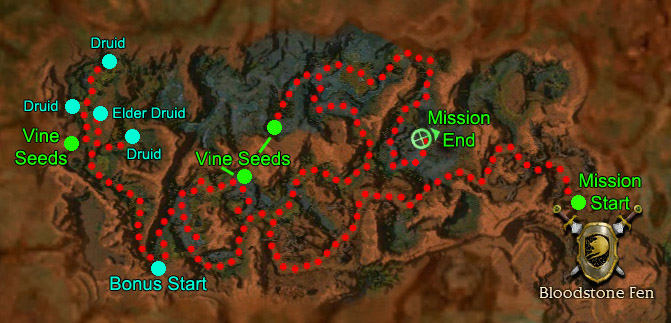
Mission map here. Go forwards and keep following the path until you find Saidra (go right when the path splits). Talk to
her and she will give you a Vine Seed. If you did the bonus in the last mission, you know what to do already. If not, drop the seed into the glowing circle
behind Saidra, between the two glowing plants. Cross the vine bridge and keep following the path. When you come across a large tree trunk over where the
path seems to split, don't worry about that cause both options are very short and lead to the same place. The right one has less enemies though. A couple
of feet after that you'll find a small ravine. The left side is easier here, although you'll probably end up aggroing everything. Soon enough, the path
splits again. You can't really continue right at the moment, but you'll might as well kill off the trolls over there anyway, since you'll be back here soon
enough. Go left and down the incline. If your party is semi-low level, you might want to pull the trolls away from the scarabs to save yourself some
grief. Cross the misty blue area and climb the large tree trunk (be careful of the wind riders around here though, they can get annoying in numbers).
Follow the path into the next blue area, kill off all of the enemies near the vine seed flowers and the nearby trolls (they're up a hill). Return to the
flowers and I really suggest touching all of the flowers (all three) right now. Some will make a bunch of scarabs spawn (so warn your party before doing
this) but it's better to fight them now than later, in case one of your party members decides to come back here by himself to grab a seed. OK, grab two
seeds and go up the hill where the trolls were. Drop one on the glowing circle, then cross the bridge. You are now at that place where I told you to kill
the trolls because you'd be back here again soon. Yep, it was really that soon. Slightly past where the trolls were is another glowing circle. Drop the
second seed. Now, if you're not doing the bonus, skip to the paragraph that starts with "Cross the bridge."
If you're doing the bonus, go back to the vine seed flowers and go back through the large blue misty area (make sure you've got the third vine seed with you).
If you stopped on the tree trunk before going down, you would have seen the path we need to take in the distance. If not, just stick to the right side
(west side) of this area. Follow this new path to the very top, and drop the seed on the shrine-type thing here. Ah! Giant druid dude! Well, he talks a
lot and tells you what you need to do for the bonus. Once he's done talking, a vine bridge grows out to your right. Alright, before crossing,
read this warning: The druid you just woke up mentioned it, but DO NOT kill the jungle guardians (the tree things). They ARE
hostile and will attack you, but if you kill any of them, you fail the bonus and some evil lv 20 shadow things spawn. If you're trying to do this with
only henches (no heroes), you're gonna be kinda screwed here unless you can leave them all behind and survive this next part on your own (by the way, there
are a lot of jade scarabs in this area, which you can kill but it kinda makes it a lot harder to survive on your own). If you're using heroes, leave any
non-monk henches behind (although I've taken Alesia and Claude as my only henches and brought them along and done OK, but taking the risk is up to you) and
set any of your heroes that have attack skills/spells to Avoid Combat. Just another forewarning: the jungle guardians hit pretty hard, and also if you've
got an mm hero with you, disable any of his minion skills as well.
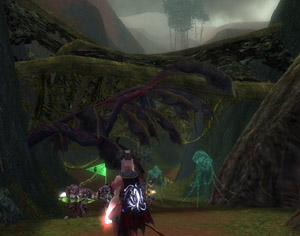
Run past the first group of tree-things until you see a medium-sized tree branch and lots of other foliage-type stuff crossing the path overhead (pictured
right). Stop here (and flag any heroes/hench here) because there's a scarab spawn right here. The jungle guardians shouldn't follow you this far. Kill off the scarabs, then
RUN some more. Follow the path but keep to the far left so you can go up and across a tree trunk and avoid getting hit too hard by the guardians. Alright,
if you move forwards a bit and go up the incline on the right you'll see a large rock in the ground with a glowing rune in the middle of it. Your friend
the druid you just woke up should either already be here or coming towards this location. If not, he might've gotten stuck on the first group of jungle
guardians or a chest near the first group. You should go find him to make sure he's not stuck If he's stuck on a chest (press Alt to check if there's a
chest there), your bonus just got screwed. If he's stuck on a guardian though, one member of your party is gonna have to be bait. Have your healers wait
at that medium overhead branch I mentioned earlier (where the scarabs spawned), and some non-squishy target (i.e., not a caster) go in and aggro the guardians
to make them move out of the druid's way. Again, do not kill the guardians. The easiest thing to do to make them move is pull them to the east of their
location as their area is wider than the rest of the path, and thus is more likely to allow the druid to get by them. Anyway, moving on.
From the giant glowing stone thingy you can see another group of vine seed flowers down the hill and a bit to the right. Make sure your heroes have their
skills enabled again and set to Guard again (do not enable minions until after you finish the bonus) and go touch three of the vine seed flowers (yes, only
three). Usually doing this will spawn more scarabs, but sometimes it doesn't. Take one seed for now, and turn slightly to the left to see a path that
goes under the log that you used to get to the glowing stone. Put heroes back on Avoid Combat, run under the log, and stop once you're out of aggro range
of the guardians above you. Quickly put any heroes back on Guard because a mob of scarabs is around here. After they're dead, go to the glowing vine thingies
(I'm just gonna call them pillars until we finish this bonus) and drop the seed between them to summon another druid. Return to the glowing stone area and
grab another seed. The next pillar is just slightly north of where you are now (somebody can go alone for this one, no problem), wake up the druid, grab
your third seed, and go back to the glowing stone. Walk to the northmost side and you'll find a path going down (you might aggro some scarabs from down
below to the left by standing here. If so, let them come to you and stay up here to fight them). Have a high AL person (non-caster) take the seed and have
a healer or both go with him, then make a mad dash to the last pillar at the far north part of this area, on the other side of the north group of guardians.
Once you drop the seed there, hightail it back to the glowing circle. Once the last druid reaches the circle, the Elder Druid appears. Talk to him to
complete the bonus. Yay! From now on, the jungle guardians will not attack you anymore (unless you attack them first), but will still spawn the shadow
things if you kill one. Leave the bonus area and return to the second vine bridge you spawned before we started on this bonus thing.
Cross the bridge and hang a right (there's a boss before you turn right but you don't NEED to kill him if you don't want to, as he's usually not in aggro
range of the first group of centaurs. And if he is in aggro range, you can pull the centaurs away if you want to avoid the boss). Follow the path to find
Ryder the coward who tells you to go by yourself. Nice. Go left from him (hey, if he's gonna be as useless as a stick, I'm gonna use him as a signpost)
to find a bunch of Shining Blade corpses... apparently it wasn't really the White Mantle who killed them, but the centaurs. ^<__<^;; Go left again and
around this area (keep left) til you find a lone Maguuma Protector near a glowing circle. Kill him, then do a 180 turn and head down the path here (hug
the right wall). Kill off everything near the vine seed flowers, grab two seeds, then head back to where the Maguuma Protector was (sometimes a group of
scarabs spawns while you're going back to the glowing circle, but sometimes they don't. Just be ready in case they do). Drop one seed on the glowing
circle, then stop for a bit. Seems like the only thing on this ring of land you need to fight is one lone boss, but there are scarab popups here so be
aware before you go in. On the other side of this ring of land (on the left side) is another glowing ring, so drop the second seed there and continue
onwards (oh hey, look, finally some White Mantle). After the first two single Mantle dudes there will be a Mantle boss with some cronies on your left whom
you can completely avoid if you really want to. Once you get onto blue ground head right to make your way down to the bottom (you'll see Ryder on your
right if you look up, which makes one wonder what he's doing so close to the Mantle if he's so scared of them ^O__o^;; ). Right after that, about 10 paces
onwards, you'll trigger a cutscene. Make sure your party leader knows about this, because at the end of the cutscene he'll be out near the base of the
bloodstone while the rest of you are still back here. Kinda disconcerting the first time around. Go join your party leader (or wait for your
party/heroes/hench to join you below the bloodstone, if you're the leader), then head left up the incline, but not all the way up. Wait for the Abbot and
Knight to come to you, kill them, then you can do one of two things. If you've not got aggroing minions, skirt the edge of the bloodstone and take out the
other Abbot-Knight group on the other side of the bloodstone so that you won't have to deal with them AND Hablion's group at the same time. If you have
an uber-party, this won't matter. If you do have minions, go back down to where you were after the cutscene and go up the other side and let the Abbot and
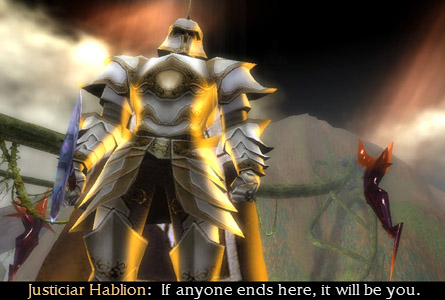
Knight come to you, then kill off Hablion's group. Target the Abbot in Hablion's group first, then the rest of the group. Once they're dead, the mission
is over. Seems like Confessor Dorian isn't too happy about the fact that you've killed off Hablion...

Quests: White Mantle Wrath: Demagogue's Vanguard (primary), White Mantle Wrath: A Helping Hand (primary), Urgent Warning (primary), Dropping
Eaves, Blood and Smoke
Skills: Conjure Frost (The Price of Steel, ele), Arcane Thievery (The Price of Steel, mesmer), Contemplation of Purity (The Price of Steel,
monk), Rend Enchantments (The Price of Steel, necro), Barbed Trap (The Price of Steel, ranger), Crushing Blow (The Price of Steel, war);
Iron Mist (Dropping Eaves, ele), Spirit of Failure (Dropping Eaves, mes), Rebirth (Dropping Eaves, monk), Death Nova (Dropping Eaves, necro), Predatory
Season (Dropping Eaves, ranger), Shield Stance (Dropping Eaves, war);
Meteor (Blood and Smoke, ele), Spirit Shackles (Blood and Smoke, mes), Protective Spirit (Blood and Smoke, monk), Barbed Signet (Blood and Smoke, necro),
Savage Shot (Blood and Smoke, ranger), "I Will Survive!" (Blood and Smoke, war)
Talk to Gareth Quickblade for your next primary and about The Price of Steel (see? Much easier). Head out into Silverwood and meet up with the scouts
just outside town. Head left, then right, stick to the top path and follow it around to the north. When it heads down, you'll soon encounter the lost
White Mantle dudes. Kill them and pick up all five Ruined Armour pieces they drop, then map back to Quarrel Falls. Grab your skills from Gareth then go
back outside (wah, creepy baby face on that monk skill). Go left again but almost immediately take another left (kinda hidden, check your compass, it
goes west) and then yet another immediate left (heads south). The first group of enemies for your primary is just ahead. Priority targets: White Mantle
Abbots/Priests, then White Mantle Savants (fire eles). Continue along this path and you'll soon encounter the second group. When the path splits, keep
going forward and then hang a right. Be careful, as a second mob of centaurs is heading towards you, so try not to get mobbed. Take another semi-hidden
path to the south under a tree bridge and you'll find the last group just ahead. After they're dead, go through the portal into Ettin's Back. From here,
wait for a bit. You'll soon hear the sounds of battle as the centaurs and the White Mantle fight. Once one side or the other wins, you can kill off the
victors and head through this south path. Take a right at the res point and go around the gorge. You'll eventually be heading east and will soon find a
portal on your left. Head towards it, but talk to the two people just outside it first. Councilor Vaylor gives you your reward for your primary and two
new quests, which are both primaries. The guy with the odd name next to Vaylor also has a quest for you with some really good skills (for the most part,
anyway). Go ahead and enter Ventari's Refuge.
You'll be here all of about two seconds, so no new section title needed. Ventari is the large white shiney centaur in the back. Awww, he looks so huggable!
*ahem* Talk to him about the quest, but after that you don't really need to ask him anything. He doesn't want to help, cause he's a pacifist (this particular
bit of information is really important to one of the new races in GuildWars 2, but no spoilers for you!), but does mention that the White Mantle seem to
have the town surrounded. Go back outside so we can get rid of these monkeys. Once you approach the starburst the White Mantle split up into three groups.
Kill off the middle group first, then go for the one on the left. Once those are gone, finish off the ones on the right at your leisure. Talk to Vaylor
for your reward. Deep Root's quest is really long and more than slightly annoying, so we'll do the other primary first. Go south from Ventari's Refuge
and go left when you see an NPC to your left on your compass. Stick to the left side of the area and keep heading north-ish, and continue in that direction
when the path splits. When the path splits again, head right and keep heading east under a tree bridge. After the tree bridge head right, and keep heading
east into a grassy area. Right about where the dust turns to grass is an NPC with another strange name (which he doesn't seem to want to talk about).
Lots of scarab pops around here, just so you know. Talk to Snakebite, then head north, and then right when the path splits. The portal to the next mission
outpost is just ahead. ... looooooong winding path... when you finally find Elder Gretchen (who doesn't really look all that old) talk to her for your
reward, then map back to Ventari's Refuge so we can do Deep Root's insanity quest(s). ... yes, quests, he gives you another one afterwards.
Head outside and go left, then right and west when the path opens up. At the end of this second path is a portal you need to go through. In this next
area (Reed Bog), stick to the right side of the area, then turn right when you can (beware the maaaaany many scarab pops around here, especially under the
trees after you turn right). After the trees, stick to the right side of this area and head west. Once you pass the weird thing on your left that looks
like semicircular steps slow down. After you kill the second Redwood Shepherd, stop there and look south (hold down Ctrl). You should see the two White
Mantle Zealots just up ahead. Walk SLOWLY towards them, and DO NOT aggro them. When they start talking, stop where you are (and don't aggro the giant
mob of scarabs wandering about nearby if you've got minions, or you'll aggro the White Mantle dudes as well). Once they stop talking, you'll get a quest
update, at which point you can kill them if you really really want to. Map back to Ventari's Refuge, step outside, grab your new skills from Deep Root,
get his next quest, and head back into Reed Bog. Talk to Scout Melthoran just to the left of the portal for a quest update. Now, this quest is supposed
to be incredibly long and involve lots of running about, but I've got a shortcut for you. This time, go left instead of right (use the trees to get down
to the bottom path) and head south. After some spiders drop down from the trees, you should see a bunch of enemies up ahead on the right side of the path.
Hold down Ctrl and you should also see an enemy named Drogo Greatmane. I don't care about any other enemies in that group, just kill that centaur! Pick up
the Bloody Heart he drops to get another quest update. See, otherwise you would've had to go all the way to Dark Oak, then all the way back here to get
the heart, then all the way back to Dark Oak to deliver the heart. ^>__<^ Return to the path and continue following it. After an insane amount of popups
of various sorts, you'll find the portal into The Falls. Goooooooo... (and I really don't suggest running for the portal as soon as you see it, cause there
are a TON of spiders between you and it) Follow the path (moar spiedarzzzzzz...) and keep heading straight when the path splits. Eventually you'll see a
group of centaurs on a hill to your left. Keep going straight past the hill, then left up it when you can. I highly suggest getting rid of these centaurs
so you can talk to Dark Oak in peace. He's just south of the centaurs on this same hill, just in case you didn't notice. Talk to him for him to take the
bloody heart and give you some words of... wisdom? Insanity? Vagueity? Whatever, map back to Ventari's place and talk to Deep Root for even more new skills,
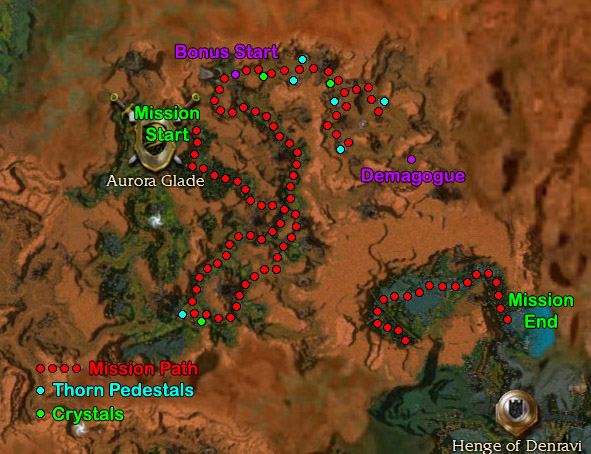
yay. Now, map back to Aurora Glade to do your next mission.

Mission map here. OK, so, I really really really hate this mission with the passion of 1,000 fiery suns. Really. If I had to
make a list of all of the missions in all of the campaigns in order of most favourite to most hated, this one would be at the very very bottom of that list.
Anyway. One note before we kick this annoying mission off: There will be no separate bonus section for this mission in this walkthrough, as the bonus doesn't
take you more than a few steps off of the main mission path at random points during the mission. Also, make sure somebody in your group has run skills and
has at least studied the mission map several times before starting the mission (specifically the part near the Demagogue dot on my mission map). You'll
see why soon enough (and also why I hate this mission).
Beware of spider popups, cause there are a lot of them in this mission, including about ten feet in front of where you spawned. Follow the path til you
reach the stalker/troll group, then go up the tree branch behind them. Up top follow the path and hang an almost immediate right after you cross the
treetrunk bridge. Cross this second treetrunk bridge (some scarabs will popup from the middle or end of the bridge) then keep going forward into a greener
area. Here, you can easily skip the White Mantle boss and his mob on your left. Continue on and head right. From here on out, target any White Mantle
Savants first, because they have a very powerful AoE spell called Searing Heat. Make sure all of your party members know about this so they don't just
stand in the Searing Heat and die. If you find a boss called Manton the Indulgent, she's like an upgraded version of the Savants, so be careful with her
as well. After the boss in this area is dead, the game will ping your radar. Turn around to see a druid there. Talk to it, then take the crystal that
now spawns from the thorn pedestal in front of the druid. Take it to the other thorn pedestal near the pillar of light that was near the boss you just
killed (I'm just gonna call these things pillars from now on, too). Put the crystal into the pillar's pedestal to unblock the path into the next area and
continue onwards. Take the second right in this area (if you keep going ahead, there's a huge mob of devourers, so warn your party about that) then a left.
Follow the path til you find more White Mantle dudes. Try to only aggro one group of them at a time to save yourself some grief. From here, if you're
doing the bonus you'll want to head right in this open area, under what looks like some sort of house (there's a group of White Mantle right under it).
(If you're not trying the bonus, just go right into an area with a pillar on either side of you. Us bonus people will get there in a minute). Kill this
first group under the house thing, and then I suggest leaving either your minions (if you have an mm in your party) or just one or two people in your party
to deal with the boss and keep following the path to the right. An NPC called Less Longbow is here, probably in the middle of fighting two White Mantle
Knights (the game will have pinged him at some point on your way here). Like that Benji kid in the Gates of Kryta mission, you NEED to keep this guy alive
if you want to do the bonus. Fortunately for you, Less only tries to fight these two dudes, and not, like, every single enemy in the area. Once the two
Mantle thugs are dead, talk to Less to initiate the bonus. Continue right into an area with two pillars, one on either side of you (where you'll already
be if you didn't want to do the bonus).
Kill all the White Mantle in this area, do a 180 and talk to the druid back there, grab the crystal, and attune one pillar (put the crystal into the pedestal).
Now, you need to attune the second pillar but before you do, I need to explain the next part of this mission. You know, the one that makes me hate this
mission so much. OK, do me a favour and take a look at the mission map. Now, the White Mantle are all camped out where the Demagogue dot is (yeah, the
same Demagogue you have to kill for the bonus). There are three pillars in this area (or Thorn Pedestals if you're looking at the map). In order to
continue the mission, you must attune all three pillars. Unattuned pedestals, as you've already seen, give off a white light. When you attune them, they
give off a blue light instead. Buuuuuuuuut... the kicker here is that the White Mantle are also trying to attune the pillars, and when they attune one, it
gives off a red light instead. Also, there are a lot more of them than there are of you. It's even more annoying if you want to do the bonus, cause you
can't just zoom about and attune all three (because once you attune them all, you trigger a cutscene and get teleported to another area of the mission).
The thorn pedestal that spawns the crystals in the next area is near where you come in, but it only spawns one crystal at a time, so you can't just have
three people each grab a crystal and run towards one pillar. The next crystal spawns as soon as the first crystal is either used to attune a pillar or is
dropped (and dropping a crystal causes it to disappear, so don't get any ideas). Also, the White Mantle start running about attuning pillars as soon as
you attune the second pillar in the area I'm making you wait in and read this thing. Which is why I had you stop after the first pillar in this area.
Sooooooo... now that I have described all of this to you, you can share in my hatred of this mission. Or, you know, just finish the mission. ^@__@^;;
Anyway, send all of your party members to the other side of this area and have one person attune the second pillar. This one person should be your designated
runner for the next area. As soon as the second pillar is attuned, all of you (except the runner) should run into the next area. Someone in the main party
should grab the crystal from the thorn pedestal as you pass by, and have the runner wait there for the next one. The main party should stay on the right
side and head to the second pillar on this right side (just keep hugging the right wall), dropping the crystal off into the first pillar's pedestal on your
right as you go. This will spawn the second crystal. At this point, the White Mantle have probably already attuned one of the pillars, either the one
your main party is heading to (second one on the right), or the one on the left. Let your runner know which one's been attuned so that he runs to it and
attunes it. Either way, your main party needs to make a stand here at the second right pillar. Keep an eye out for any White Mantle headed your way.
They'll come in a mob, but your target is a White Mantle carrying a crystal (yes, they have a crystal spawning thingy of their own), and any profession of
White Mantle could be carrying the crystal so keep your eyes peeled. When you spot the crystal carrier, call the target and KILL THEM. As I mentioned before,
dropping a crystal makes it disappear, and when somebody dies, they drop any bundle they might have been carrying, thus killing the Mantle's crystal carriers
(again, the crystal carrier could be anybody, so they won't have a special name) stops their attempt at attuning your portal. If you want to do the bonus,
you can either have a ganker in your party (PvP term that basically means someone who can run off by themselves and solo a target without getting killed
themselves) run off and kill the Demagogue, or just keep only two pillars attuned to your side (blue light, and make sure one of them is the second right
pillar you've parked your main party at) at any given time and just keep wiping out White Mantle as they try to attune your pillar. The second option is
easier because while there are a lot of White Mantle, they don't respawn so they do eventually run out of dudes.
Once you've either attuned all three of the pillars or killed off all of the Mantle (you'll know they're all gone cause they've stopped trying to attune
pillars, at which point you can take your entire party to kill off the Demagogue and THEN attune the non-attuned pillars) you'll trigger a cutscene in which
you'll teleport to a dim blue area full of devourers and wind riders. Follow the map dots around to a large open area with a lake in it. Kill off any
wind riders near the edge of the lake before aggroing the behemoths, then go have fun with the stationary targets (yep, even these behemoths don't move,
including the Henge Guardian). Once they're dead, the mission ends, Evennia and her merry band join you, you all go to your new home, and a mysterious
voice claims that everything is going as it should...


Fear and Loathing in Maguuma
There's Something Looming on the Horizon
Everything Went [BOOM]
Of Princes and Kings and Banishings
I've Got Snow in My Boots
Corpsicle Alert!
From Snow to Sand in 2.5 Seconds
Of Lions and Lambs
White Mantle, Coast to Coast
In the Jungle, the Deadly Jungle

