

Recommended level: 19
My current level: me: 19, Acolyte Sousuke (hero): 18, Vekk (hero): 20, Olias (hero): 19, Alesia: 17, Claude: 17
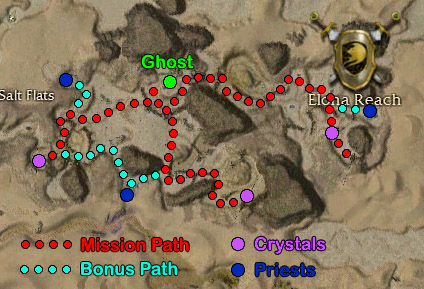
Mission map. One random sidenote before you start: Often enough people run this mission for money, in case you feel like being
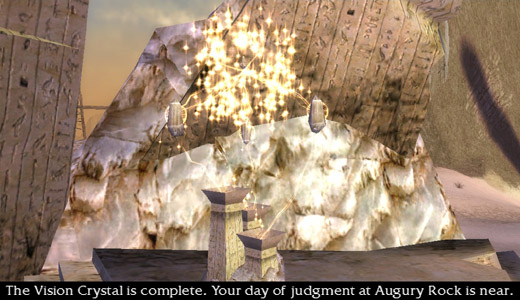
lazy. Some will even run mission and bonus, so yeah. Anyway. You start off in an enclosed area completely devoid of enemies. Run forward and talk to
this ghostly priest dude to receive something called a Vision Crystal. Now, before we go any further, I want to mention that the crystals in this mission
are NOT like the ones in the Aurora Glade mission, so you can drop them whenever you want without worrying about them disappearing. Anyway, go outside and
hang a right if you wanna do the bonus. Go a couple of feet east until a ghost appears and starts talking, then go back the way you came. Alright, in
this mission the bonus is in the same area as the rest of the mission, so there's not gonna be a separate section for each. Anyway. Head west through
the mobs of minos and pass a bridge with a dune burrower on either side of it. Go over it, under it, or around it, doesn't matter, just continue west and
you'll soon find the Ghostly Hero. Talking to him initiates the first cutscene (so don't talk to him unless you've killed any enemies that happen to be
chasing you, in case they kill you during the scene. Or just skip the cutscene if something's attacking you), in which Mr. Ghost tells you what you need
to do (i.e., find and return to him the other two pieces of this Vision Crystal thing). Once the cutscene ends, a timer begins to count down, so get a
move on. Run up these stairs to find a really BIG altar, larger than the ones in the previous two missions in the desert. This is where Mr. Ghost is
gonna stay, so you don't have to worry about him dying in this mission unless you do something dumb like pull enemies into this area and to the Ghost and
then run away and leave him to die. ^O__o^;; Whyyyyyy would you do thaaaaat? ^>__<^ Annnnnnyway.
So, say a momentary goodbye to Mr. Ghost and head left (south) towards the front of this fort-type place. There are two exits here. Now, you have the
mission map I made and the order you grab the crystals in or awaken the other bonus ghosts in doesn't matter at all, but I find it a lot easier to go for
the southeastern crystal first, cause in most cases if you're gonna fail this mission it'd be in this area, so if you do end up dying in that area you won't
have almost finished the mission. Soooo... I'm just gonna write this with the assumption that you're going that way first.
Head straight south, and make any Arcanists you encounter your primary target. You'll eventually hit a rock wall with a ravine on your left. Go left
behind the ravine, and continue forwards. Be careful here because not only is there a group in your way, but you'll almost surely aggro a mob of Arcanists
up on the hill to your right. So try to pull the mob that's in your way back to the west so you don't get both groups at once. Once they're dead, hit the
mob on the hill I just mentioned to save yourself some grief. Alright, if you started the bonus, you saw something called a Splinter Mine. I didn't mention
it then cause it didn't really matter then, but as soon as you approach these things, they start a five second countdown leading to them causing any party
members within a couple of feet of the Splinter Mine to become crippled and start bleeding. It didn't matter before because minos are slow and often
ignore you for awhile before they start attacking you. But now it'll matter, so try to avoid them as much as possible. They are interactive objects, yes,
and they won't continue to spam the Splinter Mine effect if you remove the Splinter Mine (object) from the actual plant, and if you drop it, it has the same
effect as the plant has on you, except on any foes within the reach of the skill (instead of party members) and can only be used once (i.e., once you drop
the mine you can't pick it back up again). HOWEVER, a lot of the enemies in this mission are immune to conditions (like anything with Enchanted in its
name), and you shouldn't be spending much time around these mine things anyway, so personally I find them a waste of time but it's up to you.
Alright, from the hill you fought the Arcanists on, you should be able to look southeast and use Alt to see the next crystal. Head that way, kill the
1-2 groups on the way (including the boss), grab the crystal, and go back to the ravine you passed on the way here. Go west behind this rather large rock
on your left here until you come back out into the open area (make a detour near the middle of the rock and go a couple of steps south to wake up the second
bonus ghost) and continue west. I suggest either taking out the patrol in this area before aggroing the next boss, or running PAST the boss
so you don't aggro the patrol at all. All the way west, in the back, is the last crystal guarded by yet another boss. The last priest is to the north.
There is a crapton of mobs between you and him, but if you hug the left wall (when heading north), then when you aggro them, they'll have to make their
way around walls to reach you and thus will arrive to attack you in reasonably small numbers. Wake up the third ghost, then I suggest retracing your steps
back to the ravine and running back the way you came to return to the Ghost. Once there, give him both crystals to trigger the ending cinematic.


Please note that this is a solo mission, and thus you cannot take anybody else with you, henchmen, heroes, or otherwise. You have ten minutes to defeat
your Doppelganger, a creepy-looking construct that copies whatever skillbar you enter the mission with, with the difference that it has 12 points in every
single attribute ever, including all primary attributes. First, a note for all professions: At the time of this writing (after Doppel has existed for over
4.5 years), Doppel does not use PvE-only skills, like Sunspear rank skills, Kurzick/Luxon skills, or rank skills from GW:EN like Vanguard or Norn skills,
with the sole exceptions of Winds and Vampirism, so if you've mucked about in another campaign and acquired some of these, go ahead and toss some into your
skill bar. Ursan Blessing and/or Pain Inverter are pretty good bets. The best build to use for this is composed solely of GW:EN skills, but it looks like
this: Summon Ruby Djinn, Ebon Vanguard Assassin Support, Pain Inverter. Yeah, just three skills, but trust me, it works. And if you've got one of those
summoning stone items, toss that in there too. :oD Another note for any profession, as long as you have access to ranger primary or
secondary, Dopple also does not use a pet, so if you load up your bar with Charm Animal and purely pet attack skills, Doppel can only attack you physically.
And yes, there is a bonus for this mission, just like all of the others, but the bonus is just to kill Doppel in under two minutes, just so
you know.
And lastly before we get down to business, a few random historical notes (if you don't care, just skip down to the next paragraph): In the Dawn of Time of
GuildWars, Doppel did not use secondary profession skills. That made things a whole lot easier... It also had rubbish attribute points before. Also,
Doppel used to wield an Eternal Bow for ranged attacks and a Chaos Axe when it was getting all up close and personal, but now it uses a tormented spear
(ridiculously expensive spear from the Nightfall campaign) for ranged attacks. Sheesh, big spender!
A couple of last things for any profession: Feel free to use runes, but remember that major and superior runes also have an HP penalty attached to them.
Runes can really help, even if you use a superior rune (just don't put on more than one superior rune), so keep that in mind (and keep in mind that headgear
comes with different inherant attribute modifiers in and of themselves). Also, if I say in any of these strategies "Use [name of spell or skill here] before
going in," what I mean is, step into the circle, then step on two of the stones after it, THEN cast whatever spell or skill I mentioned, and right away
after casting step on the last stone." This is so that you've got these things already in effect before the battle even begins (cause as soon as the cutscene
is over, Doppel starts attacking), and makes sure any timed spells or skills don't run out before the battle starts. Also, DO NOT cast any summons before
stepping on the last stone, because they will not follow you inside. Cast any summons AFTER the cinematic. And when I mention "points" I mean attribute
points. In all of the sections for this mission, I start off with strategies for single professions only, then add some for specific dual-profession
combinations.
Elementalist
Strategy One: Bring only Flare (leave the rest of your bar blank) and just spam it over and over. It helps a lot to have as
much HP as possible via a superior vigor rune and HP mods to weapons. I'm not a big fan of this one, though.
Strategy Two: Grab a max damage element-type weapon, as long as it's not an earth damage one, and the appropriate Conjure spell
(i.e., for a weapon that does fire dmg, bring Conjure Flame, etc.). Add Glyph of Elemental Power too, if you've got it (you can capture it from some bosses
in Bloodstone Fen, Aurora Glade, and Riverside Province, even though it's not an elite). Put all of your points into the relevant elemental magic (i.e.,
fire damage weapon, put points in fire magic), and toss your Conjure spell on yourself and the Glyph before going in. From here, just wand Doppel to death.
Yes, I know, what an epic battle.
Strategy Three: This one is even more epic. Bring only Blinding Flash (max out Air) and a wand or staff with you. Keep casting
Blinding Flash whenever it wears off, and then just wand the thing to death. Woo? If you use any other type of weapon besides a wand or staff, Doppel will
use Blinding Flash on you, so don't do that.
Strategy Four: Elementalist/Mesmer. Same as strategy three, except bring
Empathy as well, and DO NOT attack this time. Max out Air and Domination, then just keep casting Blinding Flash and Empathy whenever either wears off.
Doppel will kill itself and you should hardly even get hit ever. Just remember: Don't attack physically, or you'll hurt yourself from Doppel's Empathy.
Strategy Five: Elementalist/Necromancer. Max out Curses, and bring Insidious
Parasite and whatever HP-sacrificing spells you've got in your skill list. DO NOT use any of the HP-saccing skills yourself, ONLY use Insidious Parasite,
and DO NOT ATTACK DOPPEL. Doppel should sacc itself to death, and if not, kill itself from attacking you. You can also take Enfeeble as well, if Doppel's
physicals really worry you. Price of Failure is also a nice spell to take along, but the more non-saccing spells you take, the more options you give Doppel
to use that won't kill it from saccing itself to death.
Strategy Six: Elementalist/Monk. Max out Healing and Smiting, and dump any
leftover points into Energy Storage. Only put Retribution and Healing Breeze on your bar, and cast both before you get inside (cast Retribution first, then
regen your energy before casting Healing Breeze, then go in). After that, just keep Healing Breeze on during the fight and Retribution should kill Doppel.
Also, Doppel doesn't use Healing Breeze to heal itself from direct damage, only for HP degen, which you're not using here anyway.
It can get a little iffy sometimes, and sometimes Doppel might kill you when he's only got a very small amount of HP left, but feel free to combine this
method with Strategy Two above (as long as you dump any leftover points into whatever elemental magic you're going to be using, i.e., Conjure Flame + fire
wand/staff == points into Fire Magic). This is my favourite method for eles, but not everyone is E/Mo, obviously.
Mesmer
Strategy One: Max Fast Casting and Domination. Put Empathy and Backfire into your skillbar, cast Backfire as soon as you load,
and hopefully you'll cast Backfire either before Doppel does or when Doppel is casting Empathy. Doppel tends to cast things that are on your bar from left
to right so if you put Empathy in slot 1 then you're more likely to get Backfire off first. DO NOT ATTACK DOPPEL. Immediately cast Empathy after you've
cast Backfire, then wait for Doppel to kill itself from Empathy. When Backfire on you wears off, and if Empathy has worn off (check for the purple down
arrow on Doppel's HP bar; if it's gone, then Empathy has worn off) cast it again (or if you know the duration is almost up regardless of if Doppel still
has Empathy on him, cast it anyway). Repeat until Doppel is dead.
Strategy Two: Mesmer/Necromancer. Max Domination and Curses. Bring Empathy,
Insidious Parasite, and Price of Failure. DO NOT ATTACK DOPPEL. The important spells to use are Empathy and Insidious Parasite. Only use Price of Failure
if you've got enough energy to cast it without depleting all of your energy, because you want to keep the first two spells up continuously. Doppel will
end up blowing itself up.
Monk
Strategy One: Max out Smiting Prayers, then split the remaining points between Healing Prayers and Divine Favour. Put only
Retribution and Healing Breeze on your skill bar (make sure your Healing Breeze is +7, which happens at 8 Healing Prayers. Going over 8 in Healing won't
get you more HP regen unless you get it up to 11 but you really need the points in Divine Favour for this to work). Cast Retribution first (before going
in), regen your energy, step on the first two stones, cast Healing Breeze, and step on the last stone. Yeah, if you read the Ele strategies up there, this
is gonna look pretty familiar. The difference is that the points in Divine Favour will heal you for some HP every time you cast Healing Breeze, so just
keep spamming Healing Breeze every three or so seconds (depending on how badly you're getting hit), even if Healing Breeze hasn't ended yet, so you can
benefit from the extra healing from Divine Favour. If you want to speed things up a bit, you can take off one of your armour pieces, since Retribution
does more damage to your attacker if they do more damage to you, however there are obvious drawbacks from doing this (like possibly having the damage you
take being too much to be healed properly by spamming Healing Breeze) but you can always put your armour piece(s?) back on if you're taking too much damage.
Also, Doppel only uses Healing Breeze to heal HP degen and not direct damage, so don't worry about him using it cause he won't.
Yes, I am aware that I've only put one strategy for monk, but I have gotten at least three monks (of my own) through this mission, and told tons of people
asking for help in Augury Rock to use this method, and all of my monks got through successfully with this method, and all of the people I've told to use it
have pm'd me afterwards and been like "OMFG I can't believe that worked, ty!" so I know it works, and you get both of these skills in pre-searing so everyone
should have them.
Necromancer
Strategy One: Max out Curses, and bring Insidious Parasite and whatever HP-sacrificing spells you've got in your skill list.
DO NOT use any of the HP-saccing skills yourself, ONLY use Insidious Parasite, and DO NOT ATTACK DOPPEL. Doppel should sacc itself to death, and if not,
kill itself from attacking you. You can also take Enfeeble as well, if Doppel's physicals really worry you. Price of Failure is also a nice spell to take
along, but the more non-saccing spells you take, the more options you give Doppel to use that won't kill it from saccing itself to death. (and yes, I am
aware I wrote this up in the Ele/Necro section but it's pure necro skills so meh at you and your nitpicking :op )
Strategy Two: Max out Curses and only bring Insidious Parasite. DO NOT ATTACK DOPPEL, and just let Doppel kill itself.
Strategy Three: Necromancer/Mesmer. Same as Strategy Two, but max out Domination
as well and bring Empathy. Keep both Insidious Parasite and Empathy up at all times, and Doppel falls over dead relatively quickly.
Strategy Four: Necromancer/Monk. Same as Strategy Two, but max out Healing
Prayers as well, and put Healing Breeze on your bar. Keep Insidious Parasite on Doppel at all times and use Healing Breeze to heal yourself.
Strategy Five: Necromancer/Monk. Same as Strategy Two, but max out Smiting
Prayers as well, and put Retribution on your bar. Cast Retribution before going in, and keep Insidious Parasite on Doppel at all times.
Ranger
Strategy One: See the last part of the first paragraph of the Augury Rock section about Doppel and pets. Yeah, I said even secondary
rangers can use it, but I'm just re-mentioning it here just in case.
Strategy Two: Max Marksmanship. Bring lots of bow attacks and move in close to Doppel. Doppel will switch to using an axe, but
only has bow attacks equipped. Dumb Doppel! :op Turn him into a pin cushion. :oD
Warrior
Strategy One: Max your weapon's attribute (Swordsmanship/Axe Mastery/Hammer Mastery) and Strength. ONLY put Frenzy on your bar.
DO NOT USE FRENZY. Just attack Doppel with physical attacks and let him use Frenzy, which causes him to take more damage. Haha, stupid Doppel.
Strategy Two: Warrior/Elementalist. Make sure your weapon has an elemental mod on
it (such as Fiery [sword/axe/hammer] of [whatever], as long as it's not an Ebon mod). Max out your weapon's attribute (Swordsmanship/Axe Mastery/Hammer
Mastery) and Fire, Air, or Water (whichever one goes with your weapon, so Fire Magic for a Fiery sword/axe/hammer, Water Magic for an Icy sword/axe/hammer,
and Air Magic for a Shocking sword/axe/hammer). Bring Conjure Flame, Conjure Lightning, or Conjure Frost (whichever one you maxed out the attribute of),
cast the Conjure spell before going in, and just let loose on Doppel. Doppel's weapons don't get mods, so boo for him. :op
Do Not Meddle in the Affairs of Dragons, For Thou Art Crunchy And Taste Good With Ketchup
There's Something Looming on the Horizon
Everything Went [BOOM]
Of Princes and Kings and Banishings
I've Got Snow in My Boots
Corpsicle Alert!
From Snow to Sand in 2.5 Seconds
Of Lions and Lambs
White Mantle, Coast to Coast
In the Jungle, the Deadly Jungle
The Shining Blade's Labyrinth
Fear and Loathing in Maguuma
Ascension Contention

