
Quests: The Hero's Journey, Seeking the Seer, The Ranger's Path, The Monk's Path, The Mesmer's Path, The Warrior's Path, The Necromancer's
Path, The Elementalist's Path, The Misplaced Sword, The Hero's Challenge
Skills: Flame Burst (The Misplaced Sword, ele), Guilt (The Misplaced Sword, mesmer), Healing Touch (The Misplaced Sword, monk), Well of the
Profane (The Misplaced Sword, necro), Flame Trap (The Misplaced Sword, ranger), "Shields Up!" (The Misplaced Sword, war)
Extra Services: Morgren (Armourer), Seifred (Armourer), Machir (Material Trader), Benato (Rare Mats Trader), Vegeir (Dye Trader), Murgur
(Rune Trader), Magi Sul (Rare Scroll Trader), Bartoch (Skill Trainer)
When you first load, you'll be on a bridge of sorts. Head left (north) to find the storage (although there's one behind you, when most people mention
storage in this town, they mean the one I'm having you go to now). A couple of feet directly east of storage you'll find an NPC named Vanyi. If you are
a Prophecies character and got here via the Dragon's Lair mission, then she'll have a quest for you called The Hero's Journey. Anyway, we'll get to this
quest in a minute, but first go right from Vanyi and then head east into Crafter's Corner. There are a bunch of NPC's here, but the most important ones
are 1) the armour crafters (yes, there are two of them and they each craft different armour sets) who are the first armourers in Prophecies to craft max
armour, and 2) Captain Hugo Bronzebeard, who's got your next primary quest. Anyway, if you're crafting armour and need materials, the traders for mats and
rare mats are further east in Merchant's Row (and just north of that is the skill trainer, if you need him). Also, note the nearby portal into Witman's
Folly. This explorable area has many elite skills for you to capture if you wish to do so.
So. Vanyi's quest. She's actually got two, but she'll only give you the second one after you do the first one. Anyway, I hope you went to all of the
desert towns when I told you to, cause you need the extra towns now. If not, use these maps to find the extra towns (I didn't put the routes, but the
towns are on these maps): [
Map One] | [
Map Two] | [
Map Three]. Well,
whenever you get the towns, talk to every ghost there that has an exclamation mark over their head (we've already done two of these quests, in case you
are just joining us. For those two,
go here and check out the third paragraph in the Augury Rock section. So yeah. Most
of the quests we're about to do are the profession-changing quests. Now, at this point you could just map to the Great Temple of Balthazar (click the boat
on the world map) and pay the profession changer there 500g per profession (only the first time you change to each profession), but doing these quests
costs you nothing but time. Buuuut if you've got another campaign installed, these quests will not unlock assassin, ritualist, dervish, or paragon
secondary, so you'd need the Temple's prof-changer for that. But what's the benefit of unlocking other secondaries for your character? Well, now that Anet
has gotten rid of that ridiculous rule of only being able to change your build/attributes every couple thousand EXP or so, you can change your build/attrs
any time you enter a town. And having other secondaries unlocked will make you more versatile (especially if you unlock more skills). This is also the
only way to get the Legendary Skill Hunter title (if you've got all of the campaigns), and will also let you unlock skills for your heroes. Oh, and just
as a side-note, once you unlock a new profession, that character can go back to Old Ascalon and Yak's Bend and do the profession-specific quests there if
you want to unlock those skills. I won't re-write the walkthrough for those quests here because, well... yeah, repetitive and unnecessary, but go
here for the Old Ascalon page, and
here for the Yak's Bend section. Alright, moving on.
Telius in Seeker's Passage has the ranger quest, Nausuan in Seeker's has the monk quest, Eulenias in Destiny's Gorge has the mesmer quest, Agastos the
Brave in Destiny's has the warrior quest, Zratha Kor in Heroes' Audience has the necromancer quest, Cembrien in Heroes' has the elementalist quest, and
Yort the Bronze in Heroes' will have a non-profession quest for you that teaches you new skills.
Map to Augury Rock and head into Prophet's Path for the elementalist quest. Head to where your starburst is, and then WAIT there. Well,
feel free to clear out any close-by enemy mobs, but otherwise park yourself on this spot and just wait. I don't know how long it will take, but trust me,
it's easier to stay put, as your target has a huge patrol circle and it will actually be faster if you let him come to you. Sometimes, however, it seems
to get confused and just run about in a small circle around the starburst, which makes this much easier. Kill it and pick up the Kree Minotaur Hide that
drops. From here (or from Augury, if you didn't do the ele quest, follow the path until you can head north) head north til you see a bunch of minos
near a teleporter. Go to the teleporter, but don't use it. Just to the right of it is a path leading down into the grass. Head left on the grassy path
and you'll soon reach your starburst. Inspect the Ancient Remains to acquire Yort's sword.
Map back to Augury and head out into Prophet's Path. Follow the path until you reach the part with all the pillars, at which point head left. Once you reach the
large open area, turn left and stick to the left side of the area, as there's a big huge evil mob and a boss to the right of your position and
you do NOT want to aggro them if you're not prepared. Plus, they have nothing to do with this quest. Be aware that there are some scarab patrols that have a really random patrol pattern here,
so keep an eye on your compass and stop moving if you see some approaching so you're not caught unawares. Keep following the left wall and at the end of the
area you'll find the griffon you're supposed to kill, in the company of some regular griffs. You'll want to get rid of the non-quest griffons in the area first so as to not get overwhelmed.
The three with the boss are not technically part of his mob, so feel free to pull them away from the boss if you want less of a hassle.
Map to Seeker's next, and all of you follow along for the
ranger quest, because we'll be doing Ancient Secrets (that quest we got in Amnoon so so long ago) as well, since its almost in exactly the same place.
Head outside and go left, then head north through a couple of hydra mobs. Head left through an archway past a collector NPC to find...
more hydra. Continue southeast into a large open area full of storm kin. I highly suggest staying right at the entrance for a bit and let some of the
storm kin come to you, and then slowly work your way through this area, eliminating the storm kin, from the right side to the left. Why? Because if you
just run for the boss you will get mobbed by these random storm kin patrols. Don't worry about anything past the stairs to the northeast. Once the storm
kin patrols are gone, head north towards the boss. He doesn't have a mob of his own, so if there are any storm kin near him, wait for them to resume their
patrol. Despite being lv 24, the boss is cake, so meh. Once that's over with, head up the wooden stairs to the northeast. Be wary of the myriads
of popups around here. After the second set of stairs, go left of the third set to end up on a small hill where an NPC awaits you. Because of the like
10,000 enemies near him, most people just talk to the NPC and grab their reward without paying attention to what he says. If you really want to know, he
basically says that Fangfa Tai is a moron who doesn't pay attention. He's also a rare materials crafter, in case you're interested. Next, map to Elona
Reach for the mesmer and monk quests. Head out into Diviner's Ascent and watch out for the popups around here as well. Head east, and
you'll see some pillars and a giant backbone of some long-dead thing of indeterminate origin in the distance. Go there (popups, popups, popups), and now
people doing the monk quest and those doing the mesmer one will split up. Head east-ish towards your starburst, but very very slowly.
At some point, you will see a giant green-aura scarab in the distance (pressing Ctrl will highlight his name as Eater of Souls). But! Keep heading towards
him (slowly) and he'll disappear (also, there might be a wurm around here as well). Keep slowly approaching the starburst, because there will soon be a
LOT of scarab popups here. As soon as they start popping up, back off so you don't get overwhelmed. Once each wave is dead, regen, then approach the
starburst again to pop the next wave, back off, kill that wave, regen, and repeat. Don't stay on the starburst because one of the waves has like 5,000
scarabs in it. Don't be afraid to run the heck away when necessary. Once the giant mob has been dispatched, the Eater of Souls will reappear. Kill him
to finish the quest. Those of you doing the mesmer quest, once you reach the backbone hang a right. Try not to aggro too many drakes
at once. There's also some hydra running about so... keep that in mind. Hang another right when you can, then a left, then another left into a sort of
sandy cul-de-sac. You'll find the Tempest Drakes just a bit further on. If you've not got minions with you, you might have to do some guerilla hit-and-run
tactics here. Aggro the drakes, kill one, and run the hell away, regen, run back, kill another, lather, rinse, repeat. Our last
stop is Thirsty River. Head out into The Scar and out of this small closed in area, then head left. Go around, and you'll soon be able to head down into
the grassy area. Follow the grassy path (priority centaur targets: Losaru Lifebands, then Losaru Windcasters (who have Diversion)) then go right when the
path splits. When the area opens up, be careful as the centaurs tend to patrol around this area in a weird circle-type thing. Some of the patrols are
a larger mob. Just wait in the water for about two minutes to make sure all of the patrols are dead, then go ahead and attack the Orshad Chieftain on the
small hill in the middle of this area (by the way, the boss doesn't have a mob, so go ahead and pull any nearby centaurs away from him first). Now,
let's go grab our quest rewards!
Once you get your reward from each of the profession-quest NPC's they give you the option to change your secondary. Go
ahead and change it each time (change it back later if you want), just to have them unlocked. From then on, you can change your secondary in the skills
menu (K) by clicking on the drop-down next to the word "Profession." You'll also gain access to a couple of starter skills from your new profession(s).
Now, return to Vanyi to get your reward for The Hero's Journey quest (and for her to bitch about you not talking to any of the ghosts there, even though
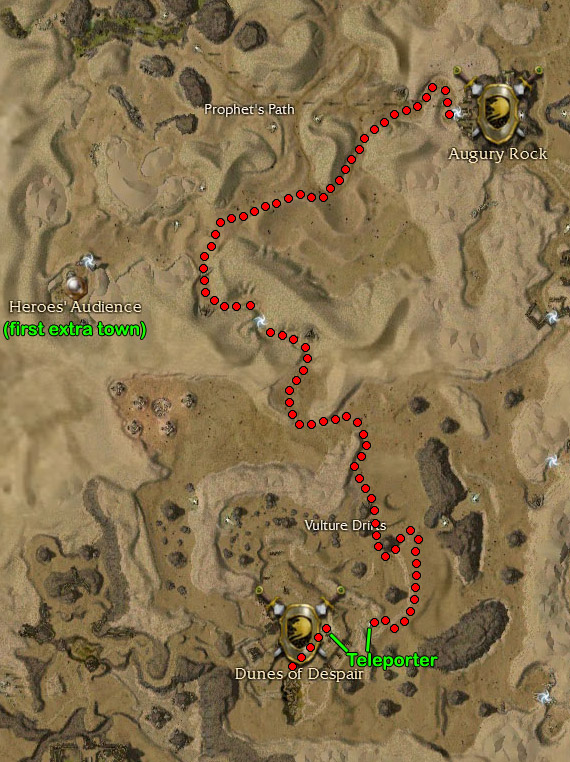
we did!! ^>__<^!! ) and to get the 15 attribute points quest she gives. Alright, look, there's another way to get to this quest than the one she wants
you to take (i.e., do Ice Caves of Sorrow mission to get to Iron Mines), but it's a lot longer and I'm not gonna write it out. I will write the route to
get there from Iron Mines once we get to that mission outpost, but if you wanna try the other way,
here's a map.
You'll want to go north from Drok's to Camp Rankor (town), then north from there til you find the portal into Grenth's Footprint (beware, the enemies here
can be rather difficult, especially the ones in the cave! Also, you'll want to make a stop at the Deldrimor War Camp while you're here, as the bosses in
Grenth's Footprint and Sorrow's Furnace (where that other portal near the Grenth's Footprint name on the map leads) can drop some decent green weapons.
Green weapons are the highest rarity on the scale (i.e., white -> blue -> purple -> gold -> green), but that doesn't always mean they are better. There
are four creatures in the Prophecies campaign that can drop green weapons that are outside of these two areas, so... get that town!), then east into Spearhead
Peak, then southeast to the Copperhammer Mine, and the next quest objective is literally right outside the southern door of Copperhammer. You might also
want to stop by The Granite Citadel (once you head north in Spearhead Peak towards the Citadel you can just die and you will res right outside the Citadel)
because that's one of the towns that has elite armour (also known as 15k armour because it costs 15k per piece plus materials) in Prophecies. The other
town is Marhan's Grotto, which I'll mention how to get to later on, and the last place to get 15k armour in Prophecies is the Fissure of Woe, but that's
even more expensive.
Note: 15k armour is not "better" than 1k max armour in any way, shape, or form, stats-wise. It does not give you any
bonuses not found on other max armour. The only difference between 15k armour and 1k armour (besides the obvious difference of price) is looks. It's also
often called prestige armour, and basically its only function (besides looking different) is to show off how much money you've managed to acquire ingame.
So do not think that buying 15k armour will somehow give you stats bonuses. OK! Moving on!
Alright, time to do the primary. Head out the northern exit of Droknar's Forge (into Talus Chute). Just so you know, Stone Summit Gnashers are minion
masters. Go forward, then right. Just to the north of the second group of gnashers is the first NPC you need to talk to. He mentions something about a
seer who can make armour, and about sending Rornak up ahead. Yeah, Rornak, that guy we had to save for two separate bonuses up in the Northern Shiverpeaks.
:op OK, move on! Continue east and you'll see a bridge to your right. That's where you need to go, so demolish anything between you and it. Well, the
good news is that if you die at this point, you'll res on the other side of the bridge, so... I dunno, shortcut by death if you wish. ^<__<^;; Annnnnnyway,
however you manage to get to the other side of the bridge, talk to Onar Ironblood to hear more about Rornak and that Evennia's been captured (which we
already knew because Glint told us). Turn east to find the portal you need to go through to enter the next mission outpost, and grab your reward from Blade
Scout Shelby inside. She'll also answer random questions for you.


Mission map. When you first load, hold down the left Ctrl key and look around. After a bit you should see a group of three
enemies with "Mursaat" in their name wandering near your position. OK, I'm again assuming that this is your first runthrough of this game, so you won't
be infused (infusion will be explained in the next mission, as that's when its supposed to happen). All I'll tell you right now is that if you see
anything,
and I mean ANYTHING with either "Mursaat" or "Jade" in its name, DO NOT AGGRO IT. It will kill you pretty quickly, and the rest of your party as well if
they're not infused either. I will tell you that heroes are automatically infused upon you aquiring that hero (but not henchmen), but anyway.
Go down the incline on your left (the mursaat patrol should be approaching on your right, you can see them with the left Ctrl key, so just wait for them
to get out of your way), then hang a slight right. You'll also want to be careful of the ice imps around here because they can freeze you and then spam
some heavy water magic at you and your party. Use the mission map to see where you should be going, because the route isn't all that apparent from your
current position. Up this hill on the other side of this valley full of ice imps and evil trees is a path where you'll see your first Stone Summit dwarves
in this mission (and a boss). Continue down the hill. Alright, just so you know, your priority targets in any mob of Stone Summit in the Southern
Shiverpeaks are Dolyak Masters (healers), and then second priority are Stone Summit Gnashers (necros). Once you get down to the bottom of the hill,
you'll start hearing a nostalgic sound... aaaagggghhhh seige catapults! Again! What is with these Stone Summit and their stupid catapults. ^-__-^;;
There will be a group of Stone Summit up on a hill on your left. If you have minions, then the minions will probably aggro them, but any party members
should not go up there as one of the catapults fires repeatedly directly onto that location, and could wipe your entire party pretty quickly. Generally
they can be avoided completely if you've not got minions, but if you really want to kill them, aggro them from down below and let them come down to you.
Regardless, keep going going around the hill and wipe out any enemies between you and the frozen water further west. The dwarves that pull the levers on
the catapults (on the parked ice ships) don't attack, just like the ones in the Northern Shiverpeaks, but you should kill them anyway as you need to stop
the catapults from firing. Be careful when attacking the first ice ship, because a boss and an unrelated mob patrol nearby and aggroing them can also
easily wipe your party if you're unprepared. I keep saying things that could wipe your entire party, but I've solo-healed a full PUG party through this
mission on my Me/Mo, so it's not that the mission itself is difficult, it's just knowing what you're doing and being cautious. Anyway, moving on.
Once you stop the first seige ice ship thingy, head north and kill off the boss and the mobs and take out the second catapult. Once the mob around the
cata is dead, activate the catapult yourself by pulling on the lever (hold down Alt to see it) to trigger the first cinematic. Aaaahhh, stampeeeeede!
The panicked Dolyaks take out the catapults manned by the White Mantle, which is a good thing for you cause the catapult fire was blocking the way to the
rest of the mission. Go back up to land and head north across the bridge. Head slightly east and if you look off to your right a bit and hold down Ctrl
you'll see some Jade enemies with some White Mantle, so don't go that way. Just keep heading north, kill the Seekers up on the hill to your right, keep
going north, and take out the White Mantle group guarding the gate. Now, this next part is going to involve a hell of a lot of splosions (yey!), but that
will involve either lots of people carrying lots of Dwarven Powder Kegs, or multiple trips back to the keg station. Which of those scenarios you want to
do is up to your party, just remember that you can't drop the kegs without them exploding, so if people are gonna be carrying kegs make sure it's people
who don't need their weapons to fight or need the extra energy provided by weapons/offhands to heal your party. The first keg station is to the west,
near a patrolling group of White Mantle. You can easily avoid this mob, however, if you just don't want to be bothered with fighting them. Bonus or not,
you're gonna need three kegs in the very near future (if you're just H/H'ing this, then you're gonna need multiple trips). A non-caster can carry one of
them for now because the first keg required is for the gate we just liberated from the White Mantle, so no fighting involved until then.
So go ahead and blow that gate to smithereens. Just inside you'll encounter a group of White Mantle. Remember that White Mantle Abbots are healers.
Stick to the right side of this cave, but dont aggro any enemies on your right (you can see them on your compass but they're down below your current
position), as they're mostly mobs of Mursaat. Fight your way to the cave exit and stop for a minute. Those of you not attempting the bonus, skip the
next paragraph.
So as previously mentioned, heroes come pre-infused, and I have completed this bonus in NM on an uninfused character in a party of three heroes and four
hench, so it is possible to do even the bonus without being infused, just don't try it with a 100% UNinfused party or Spectral Agony (the
evil spell the Mursaat use that pwns uninfused chars) will eat your face. Anyway, make sure you've got two barrels with you (or one if you're H/H'ing this
for whatever reason) and back up from the cave exit like five paces or so. Turn around and head left to battle your first group of Mursaat/Jade thingies.
Mursaat Elementalists can cause some real pain and since this mission has nothing other than Mursaat Elementalists and Jade-whatevers, you don't have to
worry about them healing. Also, Jade Armours hit REALLY HARD, so keep that in mind as well. Kill the first mob of Mursaat (usually a mob of three Jades)
then regen before continuing onward, as the next group is generally a group of three Mursaat Elementalists. Make sure that while fighting this group you
aggro the group of White Mantle patrolling beyond the gate here. They're melee fighters, generally, so just aggro them and don't blow the gate yet. That
way, they can't hit you but also won't wander off and kill the NPC you're here to see (if you don't aggro them, they WILL kill the NPC and then you won't
get the bonus). Once the Mursaat mob is dead, blow up the gate and kill the White Mantle out there. Now head left and use your second barrel (if you're
soloing, go back and get another one) on the prison cell here. Hiiiiii Rornak! ... again! Jeeze, how many times is that now that he's gotten himself
captured? Well anyway, once he's free, talk to him (no, don't worry, he doesn't have to follow you) to activate the bonus. Now go back to the powder keg
station and grab two more barrels (if you're soloing, pay close attention to the instructions in the next paragraph so you don't screw up) and return to
the cave exit we stopped in at the end of the previous paragraph.
You should have two kegs with you for this (if you're soloing, just follow the next instructions TO THE LETTER so you don't screw up), so if you've not
got any for whatever reason, go back and get some (yeah, for those of you who have done this before, there is another keg station up ahead but it is pretty
heavily guarded by the White Mantle, plus a mob of Mursaat patrols within aggro range of that keg station, so it is much safer and smarter to just already
have the kegs with you). From the cave exit, look left and you should see a path going off that way. If you don't, just trust me that it's there. Now,
RUN THAT WAY! Keep to the very left side of this area and you'll find another smaller cave here. There are White Mantle in here (beware of the Savants!)
but you completely avoid the Mursaat mob this way. Once you exit the cave, keep going south and you'll see some word bubbles up ahead shouting for help.
DO NOT GO TO THEM YET! Yes yes, it's Evennia and Saidra and rescuing them is the whole reason you're even doing this mission in the first place, but just
trust me, whether you have two barrels with you or not. Just to the left of the cell that Evennia and Saidra are in is yet another gate, so blow that up
now with one keg. If you're soloing this, backtrack all the way to the keg station now and grab another keg and come back. Once you've blown this gate
(again, the GATE, not the prison cell) enter the cave you've unblocked and go to the exit of it. Have your entire party wait right at the exit, and have
ONE party member move about five steps forward. You should see a HUGE mob of uber-doom off to your right, which should slowly (very very
slowly) start moving east and towards your position. Once you are certain that they are moving, retreat back inside the cave. I'll tell you why in a
minute. Return to Evennia's cell now and blow up the door to free her and trigger the second cinematic.
Ho crap! The Mursaat are coming! Brave Saidra decides to use herself as bait and sacrifice herself so you can get Evennia to safety. Well, you know, there's
still a crap-ton of CRAP between us and the end of the mission, but OK. Saidra, of course, is uninfused, and she's a ranger wielding a sword for whatever
reason, so the Mursaat basically one-shot her, so as soon as the cinematic is over, RUN LIKE HELL to the gate you blew up next to the cell (this is why
I had you blow it up first). Nothing will follow you into the cave unless you somehow managed to aggro something before entering it. Go out the other
side and look left. You'll probably see a bunch of corpses on the ground. If not (corpses do expire after awhile, but I think there's supposed to be a
boss right there, whose corpse would still be there), trust me that there were a bunch of Stone Summit out here earlier. Now, this is why I had you trigger
the movement of the uber-mob before. Not only will they now be ahead of you (and thus not behind you where they could box you in while you were fighting
some other mob and then you die), but they will also destroy any Stone Summit in their way. Why? Cause that uber-mob was composed entirely of Mursaat
Elementalists and they don't like anybody but themselves and the White Mantle. Anyway. For those of you doing the bonus, make a short detour to where
the uber-mob started out to find Hamdor Grandaxe. Nope, you don't need a keg as he's not in a cell, it just looks like a cell. And don't ask me why the
Mursaat didn't eat him. Maybe he's a ninja dwarf, hiding in plain sight? Regardless, talk to him to complete the bonus.
Head north and fight any White Mantle you find. Make sure you stop every ten paces or so and scout ahead with your Ctrl button to make sure you don't
inadvertedly catch up and aggro the Mursaat uber-mob because as I mentioned earlier, they move very very very slow. When you hear the first seige catapult
in this area, stick to the right path (i.e., just keep going straight) and you'll avoid the first seige fire completely. The second one is just ahead, but
if you stick to the left and go around the tall rock you can avoid most of it, just make sure you run across the bridge. You'll definately have seen the
Mursaat uber-mob by now. The way this mission is supposed to work is that the Mursaat eliminate all of the Stone Summit in your path up until this point
here, and then they all die from the second seige catapult here because they don't heal themselves and they move very slowly instead of running out of the
way of the catapult fire. But sometimes (rarely, but still has happened enough times) one or even a few (2-3) Mursaat actually somehow survive the second
catapult fire, so just look ahead of you to see whether this has happened or not. If they do, sometimes the Summit mob after the second seige area will
attack them, but most of the time they treat eachother like allies (because of what I explained earlier, no Mursaat are supposed to have survived til now,
so this is basically a glitch). They will still not be part of the same mob, so if some Mursaat did survive, make sure you pull only the Mursaat towards
you and destroy them before aggroing the Stone Summit. A Summit boss is also in this area (and he's usually a healer), so once you're ready for the Stone
Summit, kill off the nearby ones, then pull the boss down the hill towards you (do not go up the hill yet, unless you're only pulling!) if he's not already
at the bottom of the hill. Once all the Summit in the immediate area are dead and you have a clear run up the hill, stand at the base of it, wait for the
catapult fire to hit once, then RUN LIKE HELL up the hill. Don't stop at any point on the hill cept at the top, even if you're dying, because Evennia is
a monk and if anybody in your group stops, she will also stop and attempt to heal them. And her armour sucks, so this will almost certainly one-shot her
and you'll fail the mission. Stop at the very top of the hill and regen here. Now you only have two mobs left (including a boss) between you and the
end of this insanity mission. So... get cracking! I don't suggest attacking both Summit groups at once out of an eagerness to be done already though.
Once both groups are dead, go south til you hit the rock face, then go left and you'll see an ice ship here. The mission only ends once you walk onto the
ship, so go ahead and do that and weeeeeee're dooooooooooone.....! Yaaaaaaay! Er, uh, I wouldn't curse the gods like that if I were you, Evennia... That's
some bad mojo right there.
Infusions and Invasions
There's Something Looming on the Horizon
Everything Went [BOOM]
Of Princes and Kings and Banishings
I've Got Snow in My Boots
Corpsicle Alert!
From Snow to Sand in 2.5 Seconds
Of Lions and Lambs
White Mantle, Coast to Coast
In the Jungle, the Deadly Jungle
The Shining Blade's Labyrinth
Fear and Loathing in Maguuma
Ascension Contention
I Don't Think Desert Makes a Very Good Dessert
Do Not Meddle in the Affairs of Dragons, For Thou Art Crunchy And Taste Good With Ketchup

