
Quests: The Krytan Ambassador, The King's Message, Counting the Fallen, Helping the People of
Ascalon, The Ambassador's Quandary, Rastin's Ritual, Scorched Earth (ele), Elemental Knowledge (ele)
Skills: "For Great Justice!" (war), Lava Font (ele), Vile Touch (necro), Mending (monk), Energy Tap (mesmer), Penetrating Attack
(ranger), Ward Against Elements (ele)
After everything goes [BOOM], talk to Osric again, then head north into the now-ruined city. Find Tydus in the back by a fountain that's up some stairs.
He gives you 500g if you don't mention his missing eye, and a quest to deliver the King's message to Ambassador Zain. Go up the stairs behind him, then go
down the stairs to the left to find Symon the Scribe. He gives you the Counting the Fallen quest. The merchants here in town will sell you two things that
you might be interested in. One item is a Bag (adds five slots to your inventory), and the other is the Rune of Holding, which you can use on the aforementioned
Bag to increase its capacity from five slots to ten. Yay, space! Anyway. Grab Alesia by the front door and leave Ascalon. Go due
west to find the Ambassador's camp. Elementalists, a familiar face is standing around the campfire. Aziure wants you to go kill off some
Hulking Stone Elementals, so go do that. Remember, entering and re-leaving a city causes the enemies to reappear. Whenyer done, she gives you another quest.
We'll get to Shalev the hermit in a minute. You'll need a bigger party for it anyway. Talk to the Ambassador (yes, Rurik is there) to get your EXP,
and he gives you two quests. Talk to Witness Rastin as well for another quest. Head south down the road (and I think you've learned by now that everything
attacks you here. Oh, you might want to grab a couple more henchmen back in Ascalon before going past Zain's camp) to reach the Sanitarium. Before going
in, however, turn back around and find the guy your green starburst is on. This is Artisan Daved. He gives you the stuff for Rastin, so head back to him
to give him his stuff. Now, enter the Sanitarium.

Quests: The Stolen Artifact (necro), Death in the Ruins (necro), Family Ties, Oberan's Rage
(necro), Protecting Ascalon (monk), Sowing Seeds (monk), Defend the Wall (primary), Endangered Species (ranger), The Charr Patrol (ranger), The Charr Staging Area
(ranger), Shalev's Task (ele), Supplies for the Duke, Trying Times (mesmer), Mesmerizing the Enemy (mesmer), Gargoyle Trouble (war), Military Matters (war)
Skills: Power Leak (mesmer), Conjure Phantasm (mesmer, only if not acquired in Pre-Searing), Ether Feast (mesmer, only if not acquired
in Pre-Searing), Imagined Burden (mesmer, only if not acquired in Pre-Searing), Insidious Parasite (necro), Life Siphon (necro, only if not acquired in
Pre-Searing), Deathly Swarm (necro, only if not acquired in Pre-Searing), Animate Bone Horror (necro, only if not acquired in Pre-Searing), Dark Pact (necro),
Orison of Healing (monk, only if not acquired in Pre-Searing), Bane Signet (monk, only if not acquired in Pre-Searing), Heal Party (monk),
Mark of Pain (necro), Hunter's Shot (ranger), Charm Animal (ranger, only if not acquired in Pre-Searing), Comfort Animal (ranger, only if not acquired in
Pre-Searing), Troll Unguent (ranger, only if not acquired in Pre-Searing), Armour of Earth (ele), Frozen Burst (ele), Sever Artery (warrior, only if not
acquired in Pre-Searing), Gash (warrior, only if not acquired in Pre-Searing), Healing Signet (warrior, only if not acquired in Pre-Searing), Wild Blow
(warrior)
Y'all will remember this as what used to be Ashford Abbey. Hoi. It's now a place for crazy people. "ROCKS! ROCKS! Hahaha!" ... yes, Horace,
rocks. ^<__<^;;
Kids, you remember Vassar, right? The pompous windbag who stole Orion's girl? Well, he's hiding out here and will train
you in more mesmer arts if you do two quests for him, one involving saving Ralena. Go back outside and use your starburst to find and slay the gargoyle.
You'll notice that he's... well, purple. Like this text. That means he's a boss, specifically a mesmer boss. Coloured auras become important
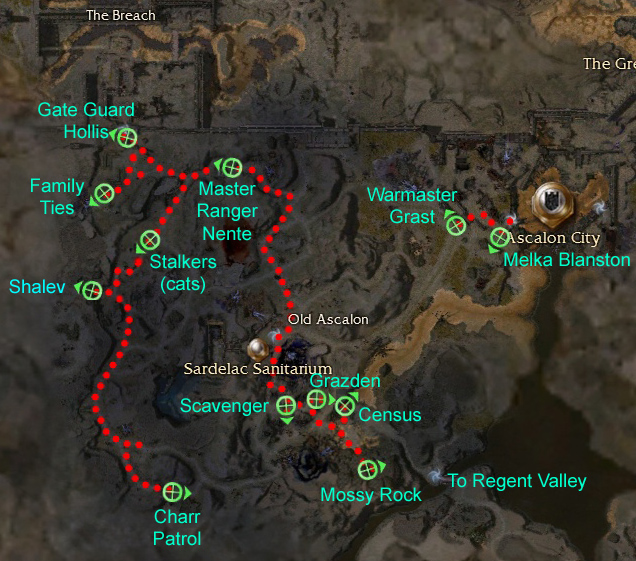
later on, as you can steal (or "capture") spells from later bosses. Now press L and choose Counting the Fallen and follow your arrow to grab the census.
I've made a
map of Old Ascalon, with key points on it, if you're interested. Return to the Sanitarium and obtain your reward from Vassar.
Necros, two of your old trainers are here. Munne wants you to help her retrieve that stupid holy thing
Paulus grabbed from the Catacombs. Kill off the grawl, then turn around and go kill off Oberan's minions like Kasha wants you to do (yes, he turned ebil...
what did you expect, he lived in the freakin Catacombs! Sheesh). Grab your EXP and spells, and Kasha now tells you to off Oberan himself. Well, what'reya
waitin fer, a written invite? Shoo shoo shoo! Once he's dead, the world may rejoice again. Huzzah.If the statue of Dwayna is active (i.e., has glowing
blue energy in it), /kneel in front of it to get the Avatar of Dwayna to come out. She will give you a quest (Family Ties).
Monks,
find Grazden south, then east when you can, in a ravine (he's listed on the map I mentioned earlier), but don't talk to him yet.
Just know where he is, cause we're coming right back. OK, go clear the road from here to Ascalon City, then come back and talk to Grazden about the Sowing
Seeds quest. Trust me, it makes his quest a whole lot easier. Follow the farmer dude to Ascalon, and make sure you HEAL him when he needs it (as that's the
point of only monks being able to get this quest). Yeah, he has Heal Area, but stuff still spawns even if you killed everything already. Plus, Heal Area
heals everything around him, too, including enemies. Bleh. Go back to Grazden for your reward, and grab his other quest (Protecting Ascalon).
Map back to Ascalon to give Symon the census, and give the stuff the Ambassador gave you to Ellie Rigby (she's near
Tydus). Oh, and don't forget to talk to Tydus for the Defend the Wall quest. Return to the Ambassador for your reward,
then turn around
(if you're a warrior) and go towards Ascalon to find Warmaster Grast. He gives you two quests. Go north from Grast's position to do your gargoyle quest,
then talk to Grast for your reward. Use
the map to get to the gate and talk to Gate Guard Hollis. If you're a warrior,
this route will be infested with Charr. Hollis wants you to find the lost supply column (and also takes the Ambassador's strongbox).
Rangers, you'll find your old friend Master
Ranger Nente along the way, and he'll have a few quests for you. Hopefully, you kept your stupid cat as a pet, or else you need to abandon your pet at
Jamal the Tamer outside of Ascalon and go tame another stalker (this is the quest I mentioned during our time in Pre-Searing, i.e., you don't NEED to
complete this quest in order to move on. So if you have a non-stalker pet and you wish to keep it, you can just ignore this quest and still continue with
the game. You'll just miss out on a small amount of EXP and one skill that you can acquire later anyway). After you do that one, talk to him about the
Charr patrol, after which he immediately runs off. Follow that ranger! After much "The tracks lead off in this direction"-ing, you find the Charr. Huzzah!
Now, kill theeeeeeem!! And no, Nente won't help you kill them, as he is lazy. Afterwards, you get another quest, but we'll finish it later.
Eles, use the map to get to Shalev. He'll probably be under attack when you get there, so make sure you kill
off the stuff attacking him first. What? If he's dead, he can't give you a reward. ^-__-^;; He gives you a couple of spells and another quest, which we
will also get to later. Use
the map to find the Family Ties starburst. Let the ghosts talk, then escort them to
Ascalon's gates (yes, they are very slow), and if they die, it's quest failed (ghosts can die? ^O__o^;; ). Now, sit and listen to the ghosts and the people
who show up. Awes, *tear*. Most depressing quest ever. Anyway. Use
the map (different one this time!) to make your way to Piken
Square. Ignore the guard dude that tells you to follow him, cause he goes the long way that is full of Charr. ^-__-^;;

Quests: The Duke's Daughter, The Siege of Piken Square, Fires in the North, Charr Reinforcements (ranger), The Red-Cloaked Deserter, Army
Life (war), Hammer and Anvil, Casualty Report, Fallen Soldiers (necro), Garfazz Bloodfang, Althea's Ashes, A Cure for Ralena (mesmer), Into the Breach (warrior)
Skills: "Watch Yourself!" (war), Ice Spikes (ele), Purge Conditions (monk), Weaken Armour (necro), Distortion (mesmer), Called Shot
(ranger), Distracting Shot (ranger), Call of Haste (ranger), Shadow Strike (necro), Soul Feast (necro), Mighty Blow (war), Dismember (war), Eruption (ele),
Shard Storm (ele), Chaos Storm (mesmer), Mantra of Flame (mesmer), Illusion of Haste (mesmer), Energy Burn (mesmer), Power Attack (war), Sprint (war),
Penetrating Blow (war), Endure Pain (war)
Talk to everybody with a green exclamation mark, including the ones at the back. Grab a couple of henchmen, since most people don't need to do Siege of
Piken Square. Leave Piken and hang a right to find the Charr Captain you need to slay (he's all shiny and gold). And yes, ignore Aidan for now if you're a
ranger, since he runs off immediately. Try to pull the patrols of Charr away from the Charr Captain so you have a smaller chance of dying. Pull each patrol
group towards the entrance to Piken (don't go into town though), then kill them, and move on to the next patrol group. Do not aggro the two Charr next to
the Charr Captain until you're ready for the boss, as that will make him attack you whether you want him to or not. Kill him off, then follow
the map of The Breach to find the lost supply column for Supplies for the Duke.
If you're an ele, kill off the
Charr Flamecallers on the way so you can get Shalev's fiery unguent. Walk the supply dudes back to Piken (yes, they're slow) and make sure that
they go inside first or else you'll have to rezone and start over again.
Now you can safely talk to Aidan. Follow him around, killing off all the Charr (don't forget to open all of the free chests at the
edge of the huge ravine for some free stuff), then return to Piken. Grab your EXP from the Duke, Ivor, and Quartermaster Aada, then map over
to the Sanitarium.
Drop the fiery unguent off at Shalev, then use
the map to get to Regent Valley.
Follow the red dots
in the Regent Valley map to find Little Thom's corpse. Oh noes, he is dead. Whatever shall we do. Well, we
can get our EXP from Farrah for one thing. :oD OK, back to Piken! Hrm... seems Farrah doesn't believe that he's dead. Ah well, whatever. She still gives
you your reward. Map to Ascalon, talk to Tydus for Casualty Report, then go back to Piken. Viggo now has a new quest for you (Garfazz Bloodfang). Talk
to Undertaker Cortis to acquire your EXP and your new skill (only necros will get a skill from this quest, though), then use
the map
to do Hammer and Anvil. You must kill the boss to complete the quest; the rest of his cronies don't matter.
Continue on towards the
entrance to The Breach to do The Charr Staging Area quest.
Now to do The Duke's Daughter (... not like that, you pervs!!). Kick your henchmen out of the party, since lots of people need to do this quest and real
people are better than henchmen any day of the week (well, most of the time, anyway). Use
the map to get to the Diessa Lowlands,
and from here on out I can't really help you as her location is random each time. All I can say is follow your arrow and hope that she's not in the Charr
base as she seems to like to be. ^>__<^ (
*Tip: Re-enter and leave Grendich Courthouse until the starburst appears nearby to
make this quest a lot easier. Use
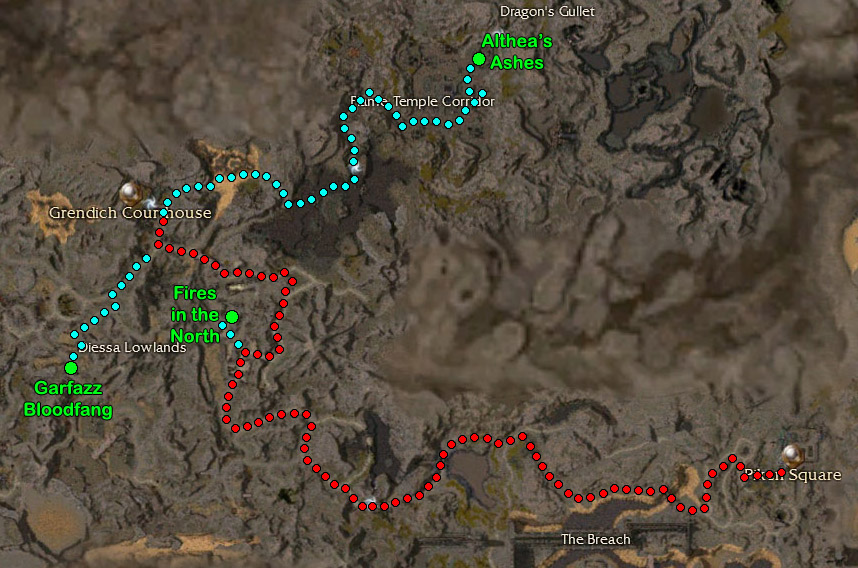
this map to get to Grendich Courthouse.) Fires in the North is on the way to the
Courthouse, by the way, so if you're walking there you can get that quest over with. Beware of the Resurrect Gargoyles; they may be lv 2, but they're named
that for a reason. They have Resurrect, which is a hard (unlimited) monster res skill, so if you don't kill them, they will resurrect their much more annoying
buddies. ^-__-^ Kill off the three Flame Keepers to complete the Fires in the North quest, then continue on to the Courthouse. There's a skill trainer
here, and I'm sure your party would like to go since there are many people (including me) who run people there for money, and fighting there is free. While
you're here in Grendich you can also do the Garfazz Bloodfang quest. Go right after leaving Grendich, then hang another right where the path splits. You'll
see a huge pit and firestands at the bottom of this hill you're on, but don't go all the way down. About halfway to the bottom of the hill you can actually
go left up the cliffs. Do so, and watch out for the gargoyles (there are Resurrect Gargoyles here too, by the way). At the top of the cliff, keep to the
right edge and keep heading southwest-ish for a bit until the Garfazz starburst is directly on your left. Now, from here start heading left but don't rush
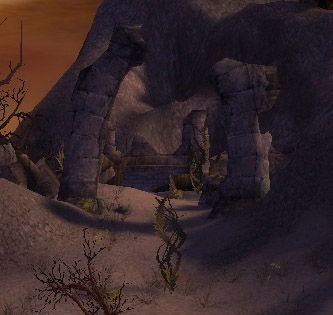
in, cause Garfazz has lots of friends. If you went far enough southwest you should see some pillars in front of you and a path leading between them (pictured
right). Go up this path, and Garfazz should be right inside. Sometimes you can even kill him without aggroing anything else, but even if you do aggro, you
probably won't aggro EVERYTHING. And even if you do, you only need to kill Garfazz to complete this quest, not Garfazz And All Of His Friends, so once
Garfazz is dead and if you're getting hammered hard by the Charr, just map back to Piken.
Map back to Piken and grab your rewards from Duke Barradin and Viggo. He now gives you a new quest. Warriors and necros, you've got one quest each pending here, so
listen up for this next part. Go west from Piken, past the Flamecallers marker on
the map, then take the first right you get,
onto a path that's got high walls on either side. Here you will start seeing Charr Overseers, who can be really annoying to lower levels who can't outbash
their healing. Target any Overseers first so that they're less of a nuisance, then continue forwards.
Warriors, if you hold down Alt
from where you fought the first mob in this ravine, you should be able to see Old Mac. Yep, he's still alive, despite what Pitney told you. I suggest you
RUN towards him now and try to take the Charr aggro away from him, cause you need him alive. Make sure any healers in your party know to make Old Mac a
priority. Kill the Charr (remember, target the Overseer(s) first), then walk Old Mac and Joe back to Piken Square and get your reward and new skills from
a surprised Pitney. Necros, continue further west and you'll soon come out into a large open area with spiky bits of wood sticking
out of the ground on your right, and massive amounts of Charr. Try to pull only a couple of Charr at a time, or lower-level characters will quickly find
themselves overwhelmed. Again, if you pull a group with an Overseer in it (or a Martyr, for that matter) target them first to save yourself some annoyance.
Once all of the Charr in this area are dead, you can go about checking the dead bodies for a family crest. Once you've got ten of these, map back to Piken
and see Undertaker Cortis for your new skill.
I'm gonna put the walkthrough for Althea's Ashes in this section, since it is a Piken Square quest, but I really don't recommend doing this
quest until after at least the Nolani Academy mission at the bottom of this page, because the quest can be pretty tough for low-level characters. Anyway,
try it whenever you want, but the information will be here in this paragraph. Make sure you've got the Urn that Duke Barradin gave you before heading out.
Start from Grendich Courthouse, as it's much closer to the quest than anywhere else. Once outside, head left and down into a large open area. From here
until the portal there are lots of devourer popups, so be aware of that. In this area, you can avoid the gargoyles and their boss on your right. Just go
straight ahead, then turn right at the end of this area. Go down this steep hill and go left into the tar lake. Go straight ahead, passing the giant
ribcages (hooooly crap, I hope none of this dead thing's friends are still alive around here...), then enter the portal that eventually appears on your
left. Welcome to the Flame Temple Corridor. Sometimes you'll see some Ascalon soldiers a couple of feet in front of you, but they won't always be there.
Go forwards and follow the path until you reach an open area. Here, go right (going left leads you to a dead end) until you enter a much larger open area.
Go right, and here you'll want to part ways with the soldier NPC's if they're still alive, as even though they're going to the same place as you are, they
take a route with more Charr and have no sense of strategic pulling. From here, go east and kill off the Charr in a straight line going forwards. Don't
bother with the Charr around the tower-thing on your left, and definately don't go right, as sometimes there are hydra in there and this place is annoying
enough as it is. Take a left around the tower thing, but go slightly right and hit the Charr on that side of a shallow pit in the ground. Keep going
north towards a set of steps and kill the mob before the steps and at the top as well (I don't mean the long staircase that will be on your right. I know
the quest marker says to go up there, but don't do so yet). Slightly north of you, down the other steps, is a group of Charr Hunters. Destroy them and
any other Charr near the res point so you don't get attacked if you die during the rest of this quest. From here you can do one of two things: a) If you
have a decent amount of casters in your party, go down around the sides of this high place that you need to get to and pull the Charr mobs on the sides
away from the high place, then use non-line-of-sight spells like Immolate or Deathly Swarm, etc., to kill any Charr that are up at the top near the edges.
OR b) Stand at the bottom of the long staircase and have someone with high AL (i.e., not a caster) or your highest level party member pull some of the Charr
near the top of the stairs down to the rest of the party, and do that with as many of the Charr up top as you can. Option A is a lot less suicidal than
option B but it's up to you. Whichever tactic you use, once you've cleared away a suitable amount of the Charr up top, go up the stairs, finish off any
remaining Charr, and click on the Altar to complete the quest. Map back to Piken to get your reward from Duke Barradin.
Now, mesmers, map to the Sanitarium. Use the map to locate the Mossy Rock for the Trying Times quest, then
return to Vassar. He gives you another quest. Use the map again to locate Nente and give him the mossy rock. He then gives you the cure, so return to
Vassar for your reward. Warriors, head to Regent Valley and find Sergeant Clark just on the other side of it. Lead him back through
the portal, then talk to him again on the other side and lead him to Warmaster Grast. Make sure he doesn't die so you can get your EXP and new skills. He'll
now give you another quest. Head to The Breach, find Captain West just a bit north of where you are, and then stay here. Mobs of Charr soon show up and
attack you. Stay with West's group and kill off all three mobs of Charr, then map back to Ascalon, head outside, and grab your reward from Grast.
Return to Ascalon and head up the stairs in the back (near Tydus), then hang a right on a sort-of hidden path and follow it to get to the Great Northern
Wall.


Recommended level: 8
My current level: me: 9, Acolyte Sousuke (hero): 11, Alesia: 3, Orion: 3
This is your first mission outpost. Missions are very different from quests. You're allowed to take henchmen, but you really shouldn't, as missions tend
to be several times more difficult (and several times longer) than quests. Missions advance the storyline; otherwise this would be a pretty boring game.
Also, where most quests in Prophecies only give you about 200-500 EXP, missions can net you a total of 2,000 EXP each (1k EXP for completing the mission,
and another 1k EXP if you complete the bonus objective). Don't forget to get your Defend the Wall quest reward from Squire Zachery before starting the
mission. When you're ready to start the mission, find the Enter Mission button in your party menu and click on it (if you are not the party leader, you will
have to wait for the party leader to click it, as only the leader will have the button in their party menu).
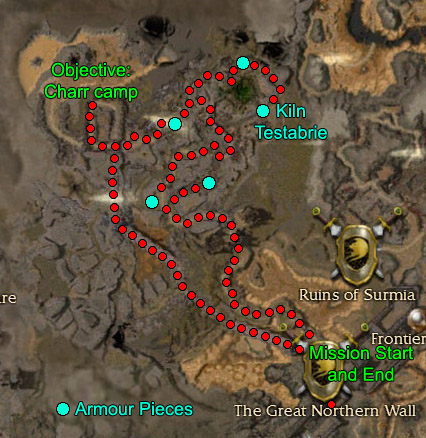
Use the
map to find the pieces of armour and ghost for the bonus, and to complete the mission. Run forwards and speak to
Captain Calhaan to receive your orders. Continue down the stairs on your right, then go out the doors to find some Ascalon Veterans fighting a bunch of
devourers. You can either help them out or just run past them, as the devourers should ignore you in favour of the NPC's if the NPC's are still alive.
Cross the bridge and follow the path, fighting grawl and devourers as you go.
Note: If you see any Plague Devourers, make sure
not to stand near any corpses, of your allies or your enemies, as these Plague Devourers have a skill called Putrid Explosion. This skill causes a random
corpse near the caster to explode, damaging all nearby foes of the caster. So, in short, this spell HURTS so try to be at least 4-5 steps away from all
corpses when around Plague Devourers, or take any Plague Devourers out first. This applies for all Plague Devourers in the game, not just in this mission.
After the path finishes a rather large curve, you'll come across a boss. Behind the boss is closed gate. Hold down the left Alt key and you should see a
lever on your side of the door. Click on it to run to it and activate it. Be careful in the rest of this mission, as there are multiple popups. Popups
(or pops) refer to enemies that you can't see on your screen or on your radar until you get close to their position, at which point they come up from
underground or jump down from overhead cliffs or trees, or appear out of thin air, depending on what the enemy is. In this case, I'm talking about devourers
who come up from underground. So just be aware that there are more enemies around here than you'd think just from looking. After you come down the hill,
take the first right (only if you're doing the bonus). There's a sort of flag or banner near where you need to turn, and you'll come out into what looks
like a type of ruined open-air auditorium, with wrecked stone stairs on either side. On your right will be an interactive object (hold down the left Alt
key) called a Wreckage. Open it to get the first missing armour piece for the bonus. Go back the way you came (further forwards is a huge war going on,
but although you need to go through the grawl-vs-gargoyle war to continue, there's another bonus piece you should grab first) and head right, holding down
Alt again to see another Wreckage up an incline. Be careful, as there are 2-3 popup groups of devourers near the second Wreckage. From there, head north
to where the war was going on. If they're still fighting eachother, I suggest killing off any shatter gargoyles on your side of the tar (the black pool in
front of you) because of their massive degen skill (Conjure Phantasm), then turn your attention to any Grawl Ulodytes left over.
Once the area is clear, cross the tar pool and go up the incline. Across the bridge in front of you are more shatter gargoyles, so be prepared. Those are
the last gargoyles in this mission though, so yay. Continue right after the gargoyles, but then make a sharp left down into a slight depression in the
ground (popups here on your right, by the way). Continue forwards and left, where you'll see another Wreckage on your left at the top of an incline (even
more popups, woo!). That's the end of the popups for this mission. Grab the third piece of armour from the wreckage, then go north and follow the dots on
the map to the last piece of armour (guarded by a boss), and then follow the dots some more to find Kiln Testabrie. Talk to him once to activate the bonus,
then again to give him the pieces of armour which completes the bonus. Apparently your speedy retrieval confuses him, as it'll take about a minute for the
game to register that you've given him all of the pieces (if other members of your party picked up some of the pieces, each member that has a piece needs
to speak to him to be able to give him the armour piece). Now, on with the rest of the mission!
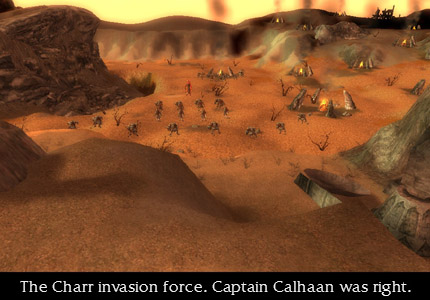
From where the third wreckage was (not the one guarded by the boss), go west to get your first glimpse of Charr in a mission. Beat up on the boss and his
two cronies, then continue towards the back and hang a right, which triggers a cinematic. Alright, now you have to haul ass back to base or else the Charr
will maul you and you won't be able to finish the mission. Unfortunately, the route you used to get here in the first place has been blocked. Unlike in
quests, missions do not have res pt's, so you'd have to start the mission all over again from the very beginning if your entire party dies (fortunately, if
you did the bonus you already have credit for that part, so you could skip the bonus if you die and have to start over). After the first cinematic, you
will automatically be running towards a bridge. If you skipped the cinematic however (by pressing the Skip button at the bottom left of the screen during
all cinematics), then you probably won't be running, and the bridge will be right behind you (whyyyyy?). Press X immediately if you skipped, so you can
do a complete 180 and you can start running across the bridge. From there just keep going straight ahead. When you reach another bridge, sometimes some
devourers will pop up. DO NOT fight them. DO NOT stop for anything. I don't care if your idiot party members decide to fight, the timer that
appeared on the screen after the cinematic isn't there just for show. You don't get back to Captain Calhaan before the timer runs out, you fail the mission
and have to start over again. Just run around the devourers if they're there, and keep running forwards. Yes, even if your other party members stop...
As long as one person makes it, you all get credit for the mission. At one point right after the devourer bridge there is a path that goes off to the right.
Ignore this path and just keep going forwards, as another huge mob of Charr will come down that path towards you around the time you reach it. Once you
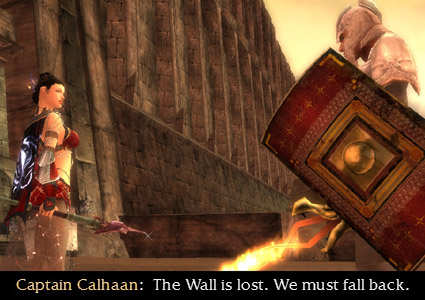
get back to the base, run back up the steps and talk to Captain Calhaan to start the end-of-mission cinematic. Captain Calhaan sounds the retreat, and you
end up in Fort Ranik.

Quests: Cities of Ascalon, Regent Valley Defense, Deliver a Message to My Wife, Ruins of Surmia, Frontier Gate Fugutives
Map back to Ascalon real quick and talk to Symon the Scribe for the quest Cities of Ascalon, then go back to Fort Ranik. Step outside to grab a quest from
the dude out there, then duck back inside before the Charr get there. To do this quest, grab a party (probably consisting entirely of henches) and kill off
all the Charr. The first group is the one you just fled from. The second group is the one guarding Little Thom's corpse, so use
the
Regent Valley map to get back there. Make sure you touch the King's Watch monument while you're there to complete one of three objectives for the quest
you just got from Symon. You have to actually click on it so the stuff written on it pops up for it to count towards the Cities of Ascalon quest. Once you
finish up there, return to Fort Ranik and obtain your reward from Lord Darrin.
Recommended level: 9-10
My current level: me: 10, Acolyte Sousuke (hero): 12, Alesia: 6, Orion: 6
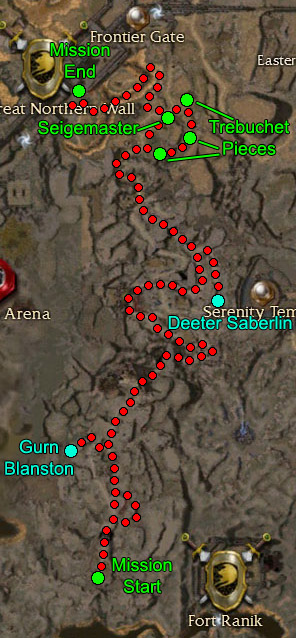
Now for the mission. There is an extra quest inside this mission, called Deliver a Message to My Wife. Use
the map for the
mission to locate Gurn Blanston and other key points in this mission. Near the beginning, be careful as there's a group of two Charr on your right
that patrol behind a large rock. You might end up sandwiched between them and some other mobs if you're not careful. Technically, Armin Saberlin
gives you the initiation of the bonus, but if he dies (he's right around where the first boss in this mission shows up) it doesn't really matter much, unlike
in most missions. Continue on through and follow the path. Kill off the first Charr mob, then turn your attention to the mob to your left. Take out the
caster first, cause the stalkers will just go around the destroyed building and show up on your right. That's the way you have to go anyway, so just follow
the path they took to get to you in order to continue on. You'll find yourself up on a wide ledge with Charr over to your right. Take out the group on your
side of the ravine, then the ones on the opposite side, since you'll have to go past them in a minute anyway and it's easier to just kill them from up here
(sorry melee chars, you'll just have to twiddle your thumbs for a bit). The mob in the ravine will probably run off to the left to get up to where you are,
but it'll take several seconds for them to get up there so just concentrate on the mob on the other side of the ravine if they're taking awhile to die.
Finish off the mob that ran up here, continue west, kill the boss wandering around on your left, turn east, kill off the mob on the ledge there (again, no
fighty for melee chars :op ), then continue on through the ravine. When you see a bridge over your heads, stop a ways from it and wait. There's a mob on
the ledge to your right, and a mob in the ravine heading towards you. Wait for the mob in the ravine to reach you so you only aggro that mob instead of
both mobs at once, then take care of the mob on the ledge or just run past them. Head north and take out the stalkers, then follow the path on the mission
map I linked to to find Deeter Saberlin for the bonus. At low levels, the bonus is a pain in the arse, since it involves taking out two Charr Overseers,
which have a habit of spamming heals at themselves and eachother, so it's up to you if you want to do it or not. If you are doing the bonus, have your
entire party concentrate on only ONE Overseer at a time, otherwise you're gonna be here for the rest of forever. Once you rescue Deeter (Armin's son) the
bonus will complete regardless of whether Armin died before you got to talk to him or not (this is why Armin's location isn't marked on the map). Anyway.
Shortly after rescuing Deeter you'll come to a ravine with Charr groups on either side, above you. Stop right before aggroing either group, because a boss
group comes running towards you and you do NOT want to have to deal with three groups at once, especially when two of them are out of reach of everything
except certain spells. After the boss mob is dead, just run past the other two groups, or just kill the one group closest to you to minimise damage to your
party.
Shortly after that, you'll come into a rather large open area. I DO NOT recommend aggroing the huge mob of Charr you'll see to the east of your
current location, as they will more than likely kill you (unless your entire party is over lv 12-13 for whatever insane reason you'd have for being at that
level at this point in the game). Just keep following the path, beat up the boss, and then talk to the NPC behind where the boss mob was (if you try to
talk to him before killing the boss you won't get your next mission objective). Seigemaster Lornar wants you to find the missing pieces of the prissy
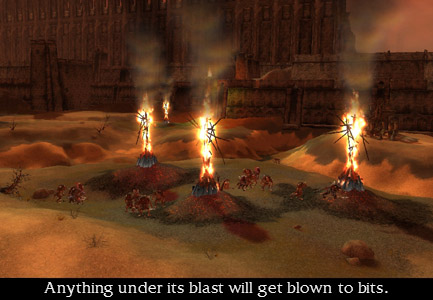
French boy catapult (trebuchet). Check the map for their locations. Once you give all of the pieces to the Siegemaster you can fire the catapult, causing
the giant mob of Charr to all go *SPLUD* in one blow.
Alright, the mission is ALMOST done. However, there are three ways that you can go about this. One is the super-lucky way, one is the super-sneaky way,
and the last is the someone-has-to-die way. The first way requires a whole lot of luck, hence the name. The second requires your party to have specific
spells that are capable of killing a boss Charr quickly and also don't require line-of-sight (I'll explain this in a minute). And the last one is what most
people do when they're playing through Prophecies on a new character. Technically there is a fourth way but it's almost 100% guaranteed to kill low-level
characters. The next paragraph will explain all three ways in more detail. Just a couple of things to note beforehand that apply to all three ways: If you
look at the mission map I've provided in the first paragraph of this mission you'll see where it says Mission End. Just to the right of that dot is what
looks like a small land-island (the red mission dots go right by it on one side and there's a wall on the other side). You'll notice there's a darker smudge
on the left side of the island-thing. This is a second trebuchet, and it or the island it's on are landmarks for all three ways. The second thing to know
before attempting any of these ways (and no, just cause you try one way and it doesn't work doesn't mean you have to start the mission over again. They are
not mutually exclusive) is that killing the boss that is at or near the Mission End dot will end the mission. You don't need to do ANYTHING else from here
on out except kill the boss. Nothing else in the rest of this mission matters. Also, the mission doesn't always end right the second the boss dies, so
if you kill the boss and there are enemies attacking you, you might wanna still pay attention to the enemies so you don't die. :op ONWARDS!
Super-Lucky Way: Again, this one requires a lot of luck. And since I know some people will probably ask this after they read this
explanation, I'll answer it now: NO, run skills (like Sprint and Storm Chaser, or any other speed-increasing skills) do NOT help with this way, even though
you'd think it would. Trust me, I've tried it lots of times. It really does 100% depend on luck. Anyway. If you hold down the left Alt key from where
the Siegemaster is and look towards the island, you should be able to see the Firing Lever off in the distance (if not, get a bit closer). As soon as you
can see the lever, click on it and then just spam the spacebar. Keep spamming it even after you get to it cause you want to get a shot off as soon as
possible, and clicking it once only loads the trebuchet; it doesn't actually fire til the second click, and also the loading takes awhile so you want to
make sure the game realises that you've clicked again (by the way, spacebar activates the lever just like clicking it does, which is why I'm saying to spam
spacebar). Keep spamming spacebar until you've heard two shots land (so have your sound on so you can tell). If after both shots have landed about five
seconds go by and the mission doesn't end, then this way didn't work. Sorry. :o( See, for some reason the boss always comes out from behind the wall and
wanders around a bit around the time you start heading towards the second trebuchet. He never stays outside very long, and the time he spends outside seems
to vary a lot, which is why I said having speed-boosts DO NOT help. Trust me, I used to run this mission using Storm Chaser, and every single time I used
it to get to the second trebuchet, it didn't work. ^-__-^;; Anyway, if the two shots didn't end the mission, then the boss went back inside before you
could launch. So if that's so, try one of the other methods.
Super-Sneaky Way: OK, same island, but ignore the trebuchet. Instead of following the red mission path south of the island, go around
the north side. You might want to wait awhile cause there's a two-Charr patrol that makes its way around the island and depending on your level, they may
or may not be a problem for you, since you're about to aggro a boss mob that has Charr in it that will probably come out and attack you. So... I'd recommend
waiting for the patrol and killing them before moving on. Alright, so, there's this giant wall on your right, and if you walk along it a ways, you'll see
a bunch of red dots on the other side of it. Again, the only thing you have to kill to end this mission is the boss, so ignore all of the other targets.
Find him with the left Ctrl key (he's the one who actually has a name) and click on him, but don't run to him. Just have him selected as your target.
Make sure everybody else in your party has him and only him as their target as well (although if you're melee or a ranger, don't bother, since only spells
will work for this method. If you're melee or a ranger you can just wait here and take care of any Charr that come out to attack you in a minute here).
You can do this by holding Ctrl and Shift while pressing spacebar, which will say your target in the chat log. Other members of your party can now auto-select
your target by pressing T (just make sure they know this). Alright, well, the only things that'll work here are non-line-of-sight spells. So, something
like Fireball or Phoenix won't work, since they can't go through walls. Off the top of my head spells that you should probably have by now (but might not,
so if you don't, I apologise): Immolate, Fire Storm, Ice Spikes, Lightning Strike, Eruption, Deep Freeze for ele (and if you have Glyph of Elemental Power
somehow, it'll help A LOT), Chaos Storm, Energy Burn, Conjure Phantasm, Backfire (if the boss is a caster) for mesmer (at least, that do direct damage),
and Deathly Swarm, Life Siphon, Vampiric Gaze, Shadow Strike, Soul Barbs, Faintheartedness, Parasitic Bond, Suffering, Weaken Armour for necro. I don't
recommend using minions for this part as minions like to aggro everything and that's not very helpful when your target is one single enemy out of an entire
mob. Anyway, use any of those skills and just pummel the boss with as many as you can as fast as you can, THROUGH THE WALL. Yes. You heard me. We are
TOTALLY cheating here. There's a part of the wall where you can pretty much get right up next to the boss, while still being on the other side of the wall.
Just stand there and spam your spells until the boss is dead. Some of his mob will probably come chasing after you, so any melee chars/rangers can just
occupy their time with those Charr, if they show up. Once the boss is dead, the mission will end. However, if you take too long, the boss will just run
back out of range, at which point he probably won't come back into range. So if that happens, go ahead and try one of the following options.
Alright, I'll get to the last way I mentioned in a sec, but first I'll mention the kinda kamikaze way that works if you're either a) high enough lv, or b)
have a good enough party. Or c) know how to pull. Anyway. This method involves just going on to the fires near the Mission End point and just killing
all of the Charr there. It helps a lot if you pull one group at a time, so you don't get slaughtered. After they're all dead, head up the stairs to the
north-ish to find the boss. Kill him, The End.
SOMEONE-DIES-AHAHAHA Way: Get to the second trebuchet, and now someone in your party has to play bait. Make sure it's not
someone who's got a resurrection spell or signet cause you'll need to revive the bait party member later. And it should also be someone who can stay alive
by himself for a decent length of time, so the person with the highest AL (Armour Level, usually a warrior, or a ranger). Everybody else in your party gets
to stay by the trebuchet. Have Mr. or Mrs. Bait round up all of the Charr southeast of the second catapult and lead them to the fire. Make sure the trebuchet
is already loaded before they do this so you can immediately fire it when the bait says he's ready, or you see all of the Charr bunched up by the fire, since
the bait might be concentrating on staying alive rather than typing out a message along the lines of "OK, KILL ME!". Make sure the bait is ready for a huge
mob, because a lot more Charr come down the stairs on the right as soon as they aggro. The trebuchet kills them all off with a single blast. ... including
your bait party member. MUAHAHAHAHAAAA!! ... *ahem* Now go revive your party member, then kill the boss that's up the stairs to finish the mission.
Rurik learns that you have all been victorious, but at a great cost. Some of the wounded have been carried away as prisoners! This prompts him to swear
vengeance and stop using the Wall as a security blanket. WE TAKE THE FIGHT TO THEM!
You end up at Frontier Gate after the mish. Grab the two quests from the guy (Warmaster Riga, and yes, Meerak is here, although he appears to be an escaped
patient from the Sanitarium...), go outside, take a left, then follow
this map to get to the Ruins of Surmia. Grab your quest
reward from Captain Miken, then map to Ascalon City.
Of Princes and Kings and Banishings
There's Something Looming on the Horizon

