How to Play
This is my second attempt at making one of these things. I personally never use "how to" thingies, so if something is missing, please email me and let me
know so I can add it. Thanks!
Alright, first things first: The commands used when just walking around. We'll get to the battle menu later.

is your accept/inspect/pretty much everything button. When somebody says something, and then
they finish talking, press

to continue. When you come across something that looks interesting, go up to it and press

. Usually something will pop up, but if not, then it's not an important object. Also, when you come across a chest, press

while in front of it to open it. Use the directional arrows to walk around, or the left analog stick. The right analog
stick just turns you around, which isn't the most useful or exciting thing ever. Use

while moving to run instead of walk.

is also your cancel button (i.e., if you go into the menu, and then decide to get out of it, you press

).
The

button brings up your special items menu. At the beginning of the game, you don't have any (unless this is a New+ Game, in
which case, why are you reading this? ^O__o^;; ). Sometimes you need to give an item to another character, and you'd do so by opening this menu, choosing
the item with the arrow keys, then hitting accept (

).

takes you out of that special items menu. Also, in
a New+ Game, the R and L buttons fast-forward or slow down the game.
MAIN MENU
Pressing

takes you to the menu. You have several options:
Status,
Elements,
Equip,
Items,
Customize, and
Save/Load.


Status
Status will highlight your first party member's picture on the left side of the screen (left picture up above). You can now choose which character
you want to check up on. The right arrow key lets you choose only the characters whose pictures are currently shown on the
screen. Pressing left from the first character's picture takes you to a table in which all of the party members you've recruited
are shown. You can scroll down and check up on a party member this way, even if they're not in your current party. Press

when you've found the party member you want to check up on. You are now taken to a page where the character you chose is
shown rotating around on the right, and his/her stats and general information are listed on the left (pictured on the right). Your star level (this is
a number, like 18/20, that shows whether you're at full power for your level or not. If your first number is lower than your
second number, go rest at an Inn), time in-game, and gold are displayed at the bottom. Pressing L1 or R1 while in this screen takes you to the status
screens of the other members of your current party. Press

to go back to the menu.


Elements
Choosing Elements then allows you to choose whether to Use or Allocate elements. Choosing Use takes you to another screen (first picture above this section),
in which your current party members' stats are listed down along the left side of the screen, and the consumable elements
(explained in the Elements section of this walkthrough) you have are listed down the right side. Here, you can use these
consumable elements to cure your party, remove poison or other ailments, etc. Press

to go back to the menu.
Choosing Allocate will highlight your first party member's picture, just like Status. Choosing which character you want to
allocate (i.e., give for use in battle) elements to works the same way as choosing which party member you want to view the
status of, including characters not in your current party. When you've chosen your character, you are taken to another screen (second picture).
On the left side of the screen is your character's element grid (at the top, in grey), and at the bottom of the left side are
the slots in your character's first grid level. On the right side of the screen are (from top to bottom), two options (Remove
All and Remove), all the elements you have available for allocation, and a description of whatever the red arrow is next to
(when you first enter this menu, the description will be the one for "Remove All." If you move the arrow down to an element,
it gives you the description of the element). Remove All... well... removes all of the elements in that character's grid.
If you choose that, it'll ask you "Are you sure?" Remove lets you choose an individual element to take out of your character's
grid, and you can choose which element to remove with the arrow keys. Pressing

while the red arrow is still on the
right side of the screen allows you to change the order that you see your elements in (very useful later on in the game when
you have a ton of elements). Your options are: Innate Attribute Color First (i.e., if your character is white-innate (explained
later), then all white elements are listed first), Attack First (all damage-causing elements are listed first), and Healing
and Supplemental First (all healing or other types of elements listed first). Pressing

takes you out of that choice menu.
Pressing the right arrow key will take you to two other options besides Remove All and Remove: Auto Allocate and Fill Blanks (third picture).
Auto Allocate has the game just put in random elements into your character(s)' grid(s), and not always the best ones, either. I only
use this for when I don't have a whole lot of characters to choose from, need to get through a no-boss area, and will recruit someone
better very shortly (like when having to go through Fossil Valley right after escaping the Temporal Vortex). If you choose Auto Allocate,
you can either do it for the one character, or for the entire party (NOT recommended!). Fill Blanks just fills in any blank slots you
may have, also for either the one character or for the entire party. The left arrow key takes you back to Remove All and Remove.
Pressing the left arrow key when on the Remove All/Remove menu will switch you back and forth between the options at the top of the right side of the
screen and your character's first grid level. From there, you can press the right arrow key to get to grid level two, and so on, and left
to go back a level, but when at level one, the left arrow key always takes you back to the right side of the screen. In the second picture, grid level six
is currently displayed. Choose an element with the up/down buttons to either Remove it (choose Remove after choosing an element), or use the down arrow key
to find another element to replace it with. This is also how you allocate elements in an empty grid (i.e., choose an empty grid slot, then choose the
element you want to put in there) if you don't use Auto-Allocate or Fill Blanks.
Here's a short explanation on elements and grid levels (element types are explained more fully in the Elements section of this walkthrough,
linked in the menu at the top of this page): Alright. Well, like I said, your character has different grid levels, ranging from one to eight. You don't
get the later grid levels til later on in the game, but elements themselves also have levels. The levels of all the elements are listed in the
Elements section of this walkthrough, and can also be seen in the Allocate menu where I said the element description shows up
(bottom of the right side of the screen). In the Allocate menu, you will see the element's level as 1 +- (well, the plus sign
above the minus sign) 0, or 4 +/- 4 or something like that (the numbers will change for each element). The first number is the element's level, so if it's
a 1 first, then the element really belongs somewhere in grid level one. The second number tells you how many grid levels forwards or backwards from its
actual level you can allocate the element to (i.e., if an element is level four, but the second number is four, then you can allocate that same element in
a slot in grid level one or grid level eight). So, in the second picture, when it says "Lv 5 +/- 3," that means that it really belongs in grid level five,
but you could also allocate it in lv four, three, or two, or six, seven, and eight. Putting an element in a slot below its level number reduces
its power, but is sometimes useful. For example, say your characters only have up to grid level three, and somehow you end up with a lv 4 element.
Higher-level elements are generally more powerful than lower-level elements, even if they're in a lower grid slot. Also, you might need, say, a blue element
to use against a red innate boss but you only have a lv 4 blue and only three available grid levels. In those cases, it would be a good idea to put the
element in a lower grid level. Another case would be if you know the upcoming boss/enemies will require you to heal yourself a lot, and for a lot of HP.
But CurePlus is a lv 3 element, and you know you'll need healing before being able to activate grid level 3. Here, too, it would be a good idea to just
put CurePlus into grid level two (yes, I know Heal is a lv 2 healing element, but this is just an example!). In the same manner, putting an element in a
slot above its level number will increase its power, but if you have (for example) a lv 4 white in a lv 7 grid slot, and a lv 7 white in another lv 7
grid slot, the lv 7 one will always have more power than the lv 4 element. But again, that lv 4 element in the lv 7 slot will have more power than the
same lv 4 element in a lv 4 grid slot. And again again, elements are explained more thoroughly in the Elements section of this walkthrough. You'll have to
press

a lot to get back to the main menu.


Equip
Select your character as usual, and you get taken to another screen. At the top of the left side are your characters full,
complete stats, including attack, defense, hit percentage, etc., etc. Under that is what weapon your character has, armour,
and lastly what accessories he/she has equipped. On the right side is a list of all of the weapons/armour/accessories/forging
items you have (forging items are listed last, since you can't equip them). Any greyed-out items in that list are also not eligible to equip on that character
(i.e., you can't equip a dagger on Serge, since he uses swallows). At the very bottom of the right side of the screen
is a description of whatever you have the red arrow next to. From here you can change your character's weapon/armour (i.e., if you've
just forged a better one, you can equip it on your character), and give them/change their accessories. Some accessories will
change more than just strength or defense. If you put the red arrow next to an item on the right side of the screen, the
changes in your character's stats will be shown on the top left side (blue == stats go down, grey == no change, orange == stats
go up).

Items
Choosing Items takes you to another screen with all of your special items listed down the left side of the screen. On the
right is a picture of the item that the red arrow is next to, and a description of the item below it.

Customize
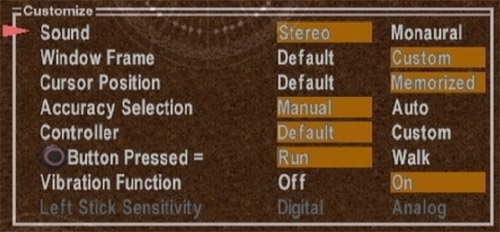
This option allows you to customize a lot of things about the game. Your options are:
Sound,
Window Frame,
Cursor Position,
Accuracy Selection,
Controller,
O Button Pressed =,
Vibration Function, and
Left Stick Sensitivity.
Sound lets you choose between
Stereo or
Monoaural sound. Personally, I can't tell much of a difference between these two,
cept that you can hear the drums better on Monoaural. Eh.
Window Frame gives you two options:
Default and
Custom. Default is, well, the default frame. Custom lets you choose between
a large variety of frames. You can also collect frames in this game (they are all listed in the Frames section of this
walkthrough, linked at the top of this page), and those will appear at the bottom of the screen when you choose the Custom option (use the left and right
arrow keys to browse through the available frames).
Cursor Position lets you choose between
Default and
Memorize (means that the cursor will return to the last place you had it
in when you left the menu, the next time that you enter the menu, including elements in your grid during battle).
Accuracy Selection allows you to choose Weak, Medium, or Strong attacks in battle yourself, instead of having the game pretty
much choose for you (which it does if you leave the default choice
Auto highlighted for this option). The attacks are explained
in the Battle Menu section on this same page.
Controller lets you customize what buttons do what in the field and battle screens (press the left or right arrow keys to
switch between field and battle options, and Start to get out of there). Be careful with this one, cause you might end up messing things up.
 Button Pressed =
 lets you choose whether having the O button held down means that your character walks or runs.
Vibration Function allows you to turn this function on or off (
*Note: The Vibration Function On only
works if you're using a DualShock or DualShock 2 controller)
Left Stick Sensitivity ... well, the only difference I can see is that
Analog makes it so that your
character runs by default instead of walking if you use the left analog stick to move around. (not sure why they're both greyed out in the screenshot,
I might've plugged in the wrong controller though)
Save/Load
This option takes you to a screen with the options "Save" and "Load." You can only use the Save option on the world map or
at a Record of FATE, but you can use the Load option anywhere, at any time (except during a battle, of course). Just choose
the game slot you want to save in or which one you want to load, and presto magnifico!

BATTLE MENU
This refers to the little black menu in the bottom-left corner of your screen when you're fighting an enemy (pictured right). Your options
are: Attack, Element, Defend, and Run Away.

Next to the main battle menu are more black boxes, the number of them depending on how many people are in your current party (maximum number is three). The
name of the character appears at the top of each box, then under it you'll see a bunch of dark green (or bright green) squares, to the left of which is a
green number and "Lv." Those green squares are a representation of your element grid. The number above "Lv" tells you up to what grid level you have activated
(how to activate them and whatnot are explained further down this page), so if there's a 3 there (like in the above picture), then you've activated grid
level three. The bright green/glowing squares are just a further indication of what grid level you've activated (inactivated grid levels are dark green).
If you've not got many elements allocated (or just your techs), then it will look like Orlha's grid in the picture above (i.e., almost devoid of green squares
of any sort). Under that is your HP (i.e., 120/150, or 636/636 in the picture above). The first number is how much HP you have left, and the second number
is how much you'd have if you were fully healed, i.e., your max HP (sometimes the first number is greater than the second number, but that only happens if
you've equipped an accessory that gives a character extra HP in battle and that character has not taken any damage yet). Under that is a blue, yellow, or
red line. This is your stamina (hence the "Sta" below it). Stamina is further explained in the next section. You can move back and forth between characters
even if you haven't used up all of your stamina, if you really want to. Just use the L1/R1 buttons, or you can also use the right and left arrow or left
analog stick to do so, but that's only in the main battle menu. L1/R1 can be used pretty much at any time.


Attack
Choosing
Attack then has the game have you choose which enemy to attack (designated by the large, downwards-pointing red
arrow over the head of the enemy, like in the first picture). Use the arrow keys to move back and forth between enemies. Use the

to get a better look at the enemies (i.e., zoom in), ifya want to. When you know which enemy you want to attack, choose them
with the

button. You now run up to that enemy (unless the character that's fighting is one with a long-range weapon), and you get
four options:
1-(__%),
2-(__%),
3-(__%), and
Element
(second picture). The numbers where I put __ before % will vary based on character, weapon, accessories equipped on that character, and/or status effects.
The 1, 2, and 3 indicate a weak (1), medium (2), or strong (3) attack, and the __% indicates your chances of actually hitting the enemy with that attack.
As you make successful attacks, the hit % of the other attacks will go up. So it is generally a better idea to start off with a weak or medium attack than
a strong one, and then switch to a stronger physical attack once the hit % goes up. Each successful attack you land activates a grid level for that character.
The number of grid levels activated correlates with the number value of that attack (so weak attacks, which are 1, only activate one grid level if you hit,
whereas strong (3) attacks activate three grid levels, if you hit), further tying into the importance of raising your hit % before trying for a strong attack,
so as to maximize your chances of activating three grid levels with one attack. You can see which attacks you've already made on the side of the battle
menu (in picture two, Serge has made a medium and then a weak attack, as evidenced by the grey bars next to the battle menu). One thing to note is that
you can't just keep attacking forever and ever ad nauseum. Each character has a certain max amount of stamina (usually 7.0, indicated by the light blue
bar in each character's menu). As you can see in the second picture, each time you make an attack, your stamina goes down (in this case, Serge only has
4.0 stamina left after making two attacks), and once a character runs out of stamina, that character's turn ends and either the enemy attacks, or the next
character gets a turn. The attacks in white are all of the attacks you can currently make, but after using up a certain amount of stamina, some of them
turn yellow or grey. Grey ones are the ones you can't make at this point, because of lack of stamina, and yellow ones are attacks that would use up the
last of your stamina, thus ending that character's turn. If you use an element (explained in next paragraph), you use up all of your stamina, regardless of
whether you had 7.0 stamina or 0.1 stamina before you used the element. Also, different characters can use up stamina faster or slower than others, even
when doing the same things as other characters.
The Element option allows you to choose an element to attack the enemy with. You'll notice that when your character first goes to start his turn, this
option will be greyed out. As I just explained, physical attacks activate grid levels. So if you don't ever attack physically, you won't get to use elements
or techs (which are also allocated on your grid) ever, either (there are some exceptions to this rule, generally involving certain accessories, but those
aren't the norm so the rule still stands). Once you've activated a grid level, you can then choose the Element option in either the Attack menu
or the main battle menu to use an element... explained next.


Element
Once you've activated some of your grid levels (explained in previous section), you can now choose this option. When you choose it, the highest grid level
that you've activated appears on the screen, including all of the elements you have allocated in that grid level (first picture). I will make an example
that reflects what is shown in the first picture: Say you only got in a weak and a medium attack, so the highest grid level activated is lv 3. Now, when
you choose Element, all the elements in your lv 3 grid slots will be shown on the screen. You can now choose one of those to
use, or you can use the arrow keys to move between the other activated grid levels (in the example I just used, you'd only be able to move back and forth
between grid levels one, two, and three). Once you choose an element, the infamous downwards-pointing red arrow appears again. If you chose an attack
element, all the enemies that will be affected by it have the arrow above their heads (if it's a multiple-enemy attack). If it's a single-enemy attack,
then you can use the arrow keys to choose which enemy you want to use the element on. If you choose a healing element (like in the second picture), then
you can also choose whom to use it on (pay attention, though, cause the enemies are also options when you choose a healing element). There is a reason for
being able to heal enemies, like when milking an enemy while trapping elements from them (explained in the Elements section), so don't think that Square was
just crazy when they made enemies able to be targeted for curing. You may come across several examples in the walkthrough that give you the option to cure
the enemy, but it's not a requirement, just a tactical thing for future battles. The same goes for supplemental elements. The element types, and what
elements fall under which category, are all explained in the Elements section of this walkthrough.

Defend
Defend allows you to, well, defend. This is shown visually as the characters putting either their hands in front of them (if they use gloves as weapons,
like Orlha in the picture above), or their weapons in front of them (like Serge and Glenn in the picture). You can't attack or use elements at this time,
that character just defends for a whole round. You can, however, attack until you use up most of your stamina, then press

until
you get back to the main battle menu and
then defend, if you so desire. Defending allows that character to take less damage from attacks, and also
raises his stamina to full (the stamina thing only happens the first turn, and then on only if your character has actually used up all his stamina at some
point, not if you still have some left).
Run Away
Again, rather self-explanatory. Funny enough, you can even run away from boss battles, but in most boss battles you don't really run away, you're just
taken back to the field and you can re-allocate elements and heal, and then you have to fight again. However, some bosses will say something like "Haha,
you can't run away from me!" or something like that and you'll get sucked right back into the boss battle without being able to heal or reallocate. But
it does always work for regular encounters, and even some minor boss battles, in the sense of you can actually not only leave the battle, but run off in
the field.


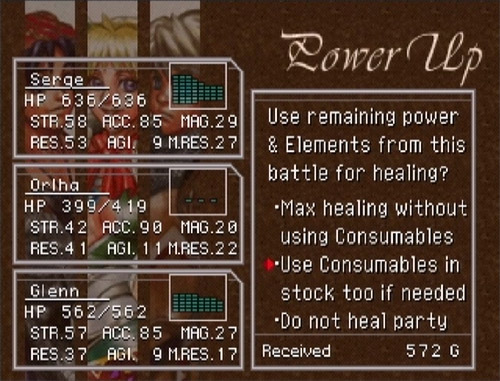
When you win or run away from a battle, you get taken to another screen. Character stats are shown on the left, and different things show up on the right
as you press the

button. The first one to show up is the Power Up screen (first picture). This tells you if your characters have gotten
any of their stats increased because of this fight, and also tells you which stats were powered up (also shown by orange marks on the left side of the screen
that say "UP"). Please note that you DON'T only get stat increases in boss battles. Sometimes you'll get minor stat increases after regular fights, so it's
also a nice way to power up your characters, as long as you don't mind fighting a lot.
Press X for the next screen (second picture), which
lets you heal your party. The options are: "Max healing without using Consumables," "Use Consumables in stock too if needed," and "Do not heal party." The
last choice is pretty obvious in what it does. The others are pretty obvious if you read the Elements section of this walkthrough, but I'll run through them
anyway. Basically, the first option will only use reusable healing elements, like Cure and Heal, etc., that are allocated in element grids still active
after the fight ends. So, if you end the battle like in the pictures above, with no grid slots activated, choosing this option won't actually heal anyone
and you'll get taken to the next screen. If you chose "Use Consumables," the game will use any consumable elements you have, like Tablets and whatnot,
whether they're in activated grid slots or not. The next screen (third picture) tells you which elements you used in the last screen (if you chose the
third option, then obviously none will appear), and the last screen is Spoils. This screen tells you if you won anything from the fight. Of
course, if you ran away, you get no power ups and no spoils.
Well, that's pretty much it. If I think of anything else (or if one of you tells me I should add something), I'll add it in here.


 is your accept/inspect/pretty much everything button. When somebody says something, and then
they finish talking, press
  to continue. When you come across something that looks interesting, go up to it and press
 . Usually something will pop up, but if not, then it's not an important object. Also, when you come across a chest, press
 while in front of it to open it. Use the directional arrows to walk around, or the left analog stick. The right analog
stick just turns you around, which isn't the most useful or exciting thing ever. Use
  while moving to run instead of walk.
 is also your cancel button (i.e., if you go into the menu, and then decide to get out of it, you press
  ).
The
  button brings up your special items menu. At the beginning of the game, you don't have any (unless this is a New+ Game, in
which case, why are you reading this? ^O__o^;; ). Sometimes you need to give an item to another character, and you'd do so by opening this menu, choosing
the item with the arrow keys, then hitting accept (
 ).
).  takes you out of that special items menu. Also, in
a New+ Game, the R and L buttons fast-forward or slow down the game.
 takes you to the menu. You have several options: Status,
Elements, Equip, Items,
Customize, and Save/Load.


